There’s one application on all the Mac’s out there that everyone uses: the file browser - on Mac OS X better known as the Finder. It hasn’t seen any major updates since I’ve become a Mac user which was shortly after Mac OS X v10.4 Tiger was released in April 2005.
After making the switch it took me about one year until I felt at home. But even today, after almost 8 years and many small refinements by Apple, I think the Finder could be much more than what it is today.
Like any good software aficionado I tried many alternatives and extensions and for now I’ve settled with this setup:
I had tried using only Path Finder, but for small tasks it was like cracking a nut with a sledgehammer. So I went back to Apple’s Finder. The thing was, I’ve become quite accustomed to having Path Finder around for bigger tasks.
Nowadays I use both of them with a little help of Keyboard Maestro. Here’s my setup for switching Finders and bringing some of the power of Path Finder to Finder (vanilla version).
The Macros
Most of the macros work with a “If Then Else” action: If the application at the front is Finder then do X, otherwise select menu entry Y in Path Finder.
If you install all downloaded files the following groups (prepended with a hash mark) will be generated at the top of your library:
RocketINK
RocketINK - Labels Palette
RocketINK - Path Finder: Browser Sets
Some macros have no shortcut assigned to them. You have to setup a shortcut which makes sense to you.
In addition, here’s another suggestion: create a group that is only active in Finder and Path Finder and put the macros in there.
If you feel like organizing your macros have a look at this post.
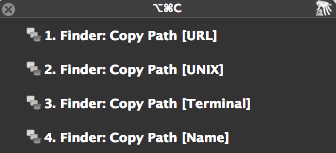
Copy Path
Path Finder has an option to copy the path of the selected files to the clipboard. With TotalFinder you also get this build-in. What I wanted was support for Finder too and a palette that pops up no matter in which Finder I’m in. As you can see in the screen shot I set ⌥⌘C to every macro and renamed the macros in a numerical order.
In the Finder you have no real menu entry for setting a label, at least the label entry is not accessible in Keyboard Maestro’s menu action. AppleScript to the rescue:
try
    tell application "Finder"
        repeat with f in items of (get selection)
            try
                set label index of f to item 8 of {2, 1, 3, 6, 4, 5, 7, 0}
		-- No color (0), Orange (1), Red (2), Yellow (3), Blue (4), Purple (5), Green (6), Gray (7)
            end try
        end repeat
    end tell
end try
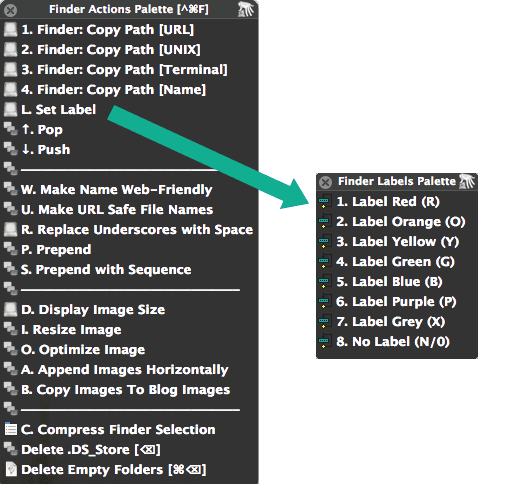
When I want to assign a label to a selection, I fire up my “Finder Actions Palette” ^⌘F and type L for label to trigger my separate “Labels Palette”:
Currently, to call up a palette from within a palette you need to work with string triggers which I explained in this post (the next version of Keyboard Maestro has this functionality build in).
The “Trigger Set Label” macro is inside the download folder. You just have to setup your own hot key and match it with the “Labels Palette”.
Side note: I added some more stuff from Gabe Weatherhead like the prepend macros, resize image and the push/pop. Visit Gabe’s blog if you’re interested in these, they are not included in the download pack. The display image size macro accidentally slipped into this post (I was a bit in a hurry, it should have been in here).
Symlink
Aliases work in both Finders the same way. You press ⌘L and get an alias. But what if you want to have Path Finder’s symbolic links available Finder too?
In Path Finder the default to create a symbolic link is ⇧⌘L(unless I made that changed myself - you’ll figure it out. You’re smart). So the macro is set to that hot key by default.
To use a symbolic link in Finder via a palette one way to do it is with shell action. However, by using a service we gain the benefit of having the option to create symlinks in the contextual with our mouse too. Since I use symbolic links all the time with Dropbox I want to keep them around in more places than just a palette.
If you already know the little shell command ln -s {source} {symbolic-target} you could whip up a service yourself with the help of ThisService from waffle software. Or, much more simple: you download SymbolicLinker Service from Nick Zitzmann.
Mirroring functions
For me it’s nice to have those functions mapped to the same shortcut. So, here’s what I use:
Show Selection in Finder/Path Finder
This macro is very basic, yet it is one of my favorites. Press ⌘R and that other Finder will open with the file you had selected. I use it all the time if I need the power of Path Finder or vice versa, the simplicity of Finder (– it doesn’t work that great if you’ve selected a folder).
Show Package Content
The idea is the same as before. Press ⇧⌘R in a Finder or Path Finder window on a package, bundle or application and the macro shows you its content.
Other Candidates
⌥⌘S toggles the sidebar in Finder by default. And, with this macro it toggles the dual browser mode in Path Finder.
⌥⌘Y “Go to Downloads” in both Finders.
Go nuts and add more.
Path Finder Extras
I got another group which is solely for Path Finder.
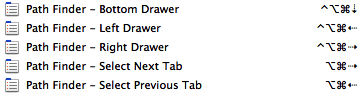
Remapped Shortcuts
I mapped the following shortcuts to navigate inside it (customize them to your needs):
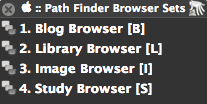
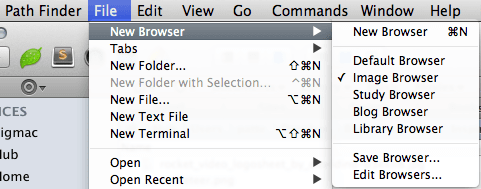
Browser Sets
And lastly, another one of my favorites: a macro which I’ve assigned to one of my global palettes so that I can reach this palette from anywhere. It let’s me choose one of my predefined Path Finder browsers:
Saving customized versions of the Path Finder browser is one of the most powerful features of the application. This way you have an easy way to switch between them.
Set up your own ones here:
The macro is set to close the active Path Finder window first and then open the chosen browser set. If you don’t like the window to be closed just delete this part of the macro or set it to inactive.
TotalFinder is a great add-on which lives on top of the Finder. It’s not the subject of this post, but I highly recommend to check it out if you don’t know it. It’s similar to XtraFinder which I mentioned earlier. ↩
The beta is out now for a while, but in case you haven’t come across Brackets, it’s the upcoming editor from Adobe. Watch the video from Nettus’ Jeffrey Way. This thing looks stunning.
A superb read by Kyan. It’s the stuff I want to and need to read, because I also have this longterm goal of writing a book. I love the fact that he mentioned one of my favorite authors in the first paragraph (Jasper Fforde).
While we are at the inspirational side: Kyle Neath writes about why the Internet is one of the best places on earth. I hope by the time I finished studying, I also have a place to go to that I like and that helps me bring food on the table.
A Dropbox for all your social networks. Access your photos, documents and any files stored on your favorite websites. It’s great if you want to upload an album to Facebook or a video to YouTube. Drop it in a folder and your done.
Once you have started with Markdown it is likely that you will come to a point where it is indispensable. What you want is Markdown everywhere. If you’re in the browser typing an email to a fellow geek or in an editor with which has no out of the box Markdown support. At least this is my experience when I look back at my Markdown quest so far. Like so often Keyboard Maestro was the best way to tackle the task for me to unify the mass of scripts and services that are floating in the endless space of the internet.
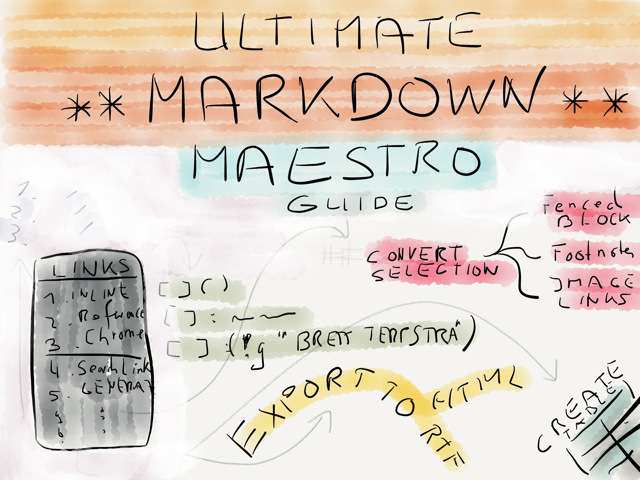
I have a lot of Keyboard Maestro macros and a good deal of them is there for editing text, which means for me: editing Markdown. I called this the “Ultimate Markdown Maestro” because for me Keyboard Maestro is the absolute best way to write and tweak Markdown, no matter which editor I’m in.
This article is about how I organize my macro library and what tools I use for writing Markdown. In short: four macro palettes and one group to rule them all.
The Goal
I want everybody who is willing to write in Markdown and has no idea how to make use of Keyboard Maestro to get inspired and give them some ideas how to use the program. For that purpose I uploaded my whole Markdown setup to GitHub. And for the die-hard geeks I hope there is the one or other thing for you in it too.
To give you a teaser I prepared a short overview in form of a video to let you decide later on which parts of this article you are interested in:
If this is more than you need you can trim it down till your requirements are met.
If you’re already sold then read on before your head on to download everything because there are a lot of dependencies: services to be installed, scripts to put in the right location, etc. Rest assured, I’ll explain everything in detail. At the bottom of this article you’ll find a link list with all referred scripts and services for your convenience.
Organization
Over the last days I cleaned up my macro collection and reorganized it. There were several things I wanted to achieve:
Get rid of macros I don’t use or those that actually don’t work for me.
Fine tune my palettes so that I can get a better idea of what is going on in each palette even if I haven’t visited the palette in question for some time.
A quick way for identifying who made a macro and what its purpose is.
Have a more maintainable system which is also easier to share.
So far I’m happy with my spring cleaning and I think you’ll benefit from it too.
Natural Dichotomy
I narrowed it down to five groups – the first three are focusing on the process of writing while the last two are for the finishing:
TXT: Markdown is where standard Markdown operations like bold, italic and making lists live. I don’t need a palette because what I want here is fast access to the basics.
TXT: Markdown Links is a specialist for links creation.
TXT: Global is a mixed palette which contains Markdown and text macros that aren’t needed all the time, but that provide power users an array of options to choose from like creating footnotes, tables and fenced code blocks. Also in the bag are standard text operations like wrapping, transforming text, etc.
TXT: Markdown Clean Up waits for you when you have finished writing and are in need to bring order into the mess.
TXT: Markdown Export offers you a variety of export options.
Doppelgänger Library
I use more groups than before my spring cleaning. What I did was creating sort of a Library inside of the Keyboard Maestro library. The resulting macro system is quite modular since I now have several sections:
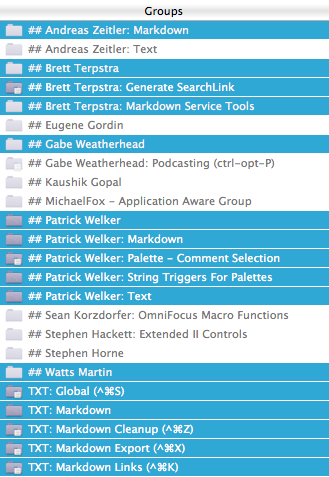
The top section gathers macros from other users. If I have a person is shares a lot of cool stuff he get’s a dedicated group folder. I transferred the folder management strategy I use in Finder to Keyboard Maestro – using hash characters from the Markdown header syntax:
#Miscellaneous → contains macros from other user #New Stuff → new macro projects or macros where I haven’t yet decided if I keep them ##Regular Contributors
What I mean with modular is that I only use Execute Macro actions in Keyboard Maestro to structure the everything. In case you never used a “execute macro” action, it is the equivalent to an alias in the Finder. The macros of the top section stay where they are and anywhere I need them I call them up by executing the macro. Nice and clean.
I tend to over use unicode characters1 to sort my iTunes Library before there where folders in iTunes. I’ve learned from my failures and kept it to a minimum here.
The reason behind this is that I wanted my text expansion groups to be position right before the bottom section. Unicode characters follow an alphabetical hierarchy and that makes them qualified candidates for sorting stuff or forcing a hierarchy upon files where only alphabetical sorting is allowed.
For example: » comes before ❯ comes before# comes before 123 comes before ABC comes before .
The bottom section is listing all of my application groups:
:: 1Password
:: Google Chrome
:: OmniFocus
This is basic file management. Everybody does it in the Finder to some extend and so I guess most of you probably have setup a similar system for Keyboard Maestro to cope with their library.
Folders
You know have a rough idea of my preferred order. I will now go into detail why I think it’s a good idea to create such a top section.
In the screen shot below you see everything that you’ll have to import into your Library (highlighted in blue).
The folders at the top which have a ## prefix are the first part of the dependencies. These are collections from other authors and myself. To keep your Keyboard Maestro library from gaining too much weight, the GitHub download only includes macros necessary for the Markdown setup which Im going to introduce to you here.
Author Comments
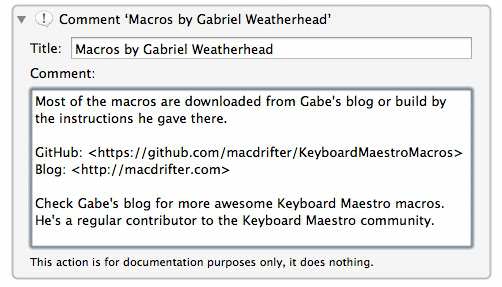
I added a read me file at the top of each group where you can find the original source and a link to their blog2 – all these people are dear to my heart, because over the last years they have contributed to the Mac community by sharing their thoughts, ideas and last but not least fabulous scripts, macros and services.
For example the group of my good friend Gabe from Macdrifter has this little note inside the read me file:
The idea behind this is, that you can check for updates of scripts and services directly at the source without having to search the web for who did what. Also you know every time who to give props to when you build something based on someones work. It’s a reference and safety net.
Macro Comments
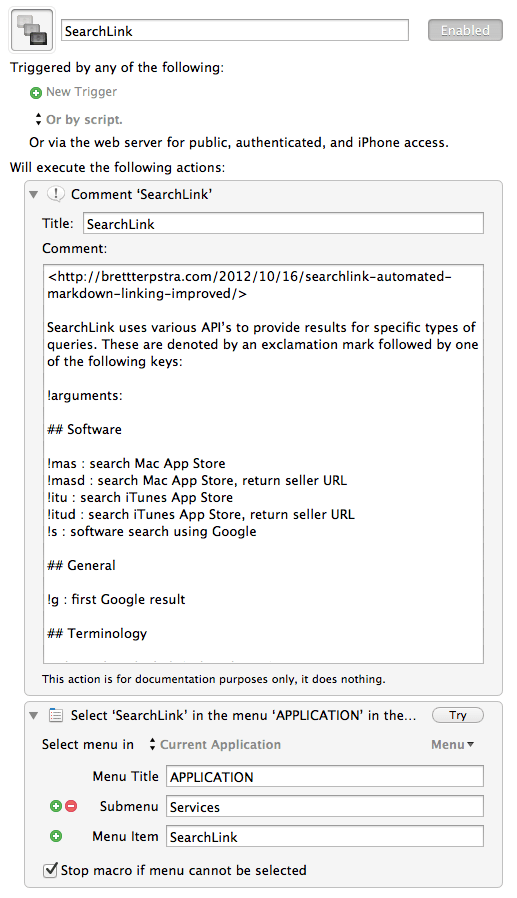
Inside those ## Author groups are all the macros that I use for the palettes we need. I rely heavily on the Markdown Service Tools by Brett Terpstra. Probably 80% of this workflow is possible due to Brett’s amazing work. And since the service tools are services, many of these macros are just wrappers for system services. Most of the macros also have a comment at the top position explaining what the macro does (– often just a simple copy and paste from the authors site):
Pro tip:
By setting the menu title in the second action to APPLICATION, I make sure that Keyboard Maestro knows the service can be triggered from any application if it’s available.
Side note:
You can leave most of the groups disabled since we access the macros inside via the “Execute Macro” action. Even the macros themselves can stay disabled. Although, I use this to give me a visual cue which macros I actually use and which are only sitting in my library without being assign to one of my global palettes or applications.
Brett Terpstra SearchLink and Markdown Service Macros
Before we dive in let me introduce two of the dependencies to you:
You have to install Brett’s Markdown Service Tools and his SearchLink service. And just for your information, that was an order Private – I just can’t let you miss the best things in Markdown, that’s why I put the emphasis there. Pardon me.
I couldn’t live my Markdown live as it is without these and that’s why the deserve a) an honorable mention in a separate section and b) I’ve build two macro groups for Brett’s two projects.
While the Markdown Services are basically all over the place because they are so useful, the SearchLink service has one purpose which is generating automatic links by using an easy to understand syntax with a DuckDuckGo-like charm:
!arguments:
Software:
!mas: search Mac App Store !masd: search Mac App Store, return seller URL !itu: search iTunes App Store !itud: search iTunes App Store, return seller URL !s: software search using Google
General:
!g: first Google result
If you’re still not convinced head over to the example section of the project. The great thing is that Brett’s scripts are always smart – you don’t need to fill out all arguments. Again, read his article to find out what’s optional, how to install SearchLink and get the whole thing running (only one Ruby gem needs be installed). If you’re done, nothing will stand in your way when in need of creating links in an instant .
In addition, if you open the workflow script in Automator you can choose if you prefer inline or reference links as output. To top it, you can enter your affiliate credentials and all App Store links are created as affiliate links.3
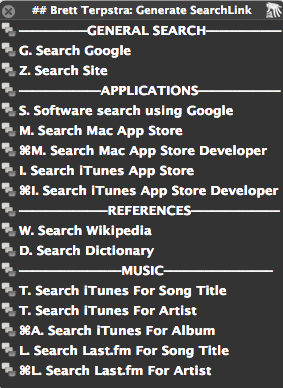
As easy as the syntax is to remember, sometimes I forget the correct spelling. So this is where my SearchLink generator palette comes in handy:
It prompts you for a reference tag and a search text and then generates ready to use snippet respecting the optional arguments. The result can be expanded via the SearchLink macro.
My intention was to save this extra step by passing the result to a variable and pass it on to another Keyboard Maestro action, an Execute a Shell Script which contains the code of the script and directly pastes the link. The sad part is, although this sounds to me like just two lines of code I wasn’t able to pull it of.4
Markdown Basic Set
Let’s start. The TXT: Markdown group is my basic set, it is no palette and includes commands which have hot keys assigned to them. I have no problem memorizing them, so it’s shortcuts for them:
Action
Hot Key
Italics
⇧⌘I
Bold
⇧⌘B
Bullet List
⇧⌘8
Ordered List
⇧⌘9
Fix Ordered List
⇧⌘0
Quote Indent
⌘’
Indent
⇧⌘]
Outdent
⇧⌘[
Increase Header Level
⌘=
Decrease Header Level
⌘-
Delete Line
⌥⌘⌫
And two string triggers:
Action
String
Create Table
table SPACE SPACE
Insert Inline Footnote
fn SPACE SPACE
These are as easy as can get but if you can’t remember them or just prefer a palette build one yourself:
Remove all the assigned hotkeys from the TXT: Markdown group.
Create a new group aka your palette:
Set a shortcut and begin assigning hot keys.
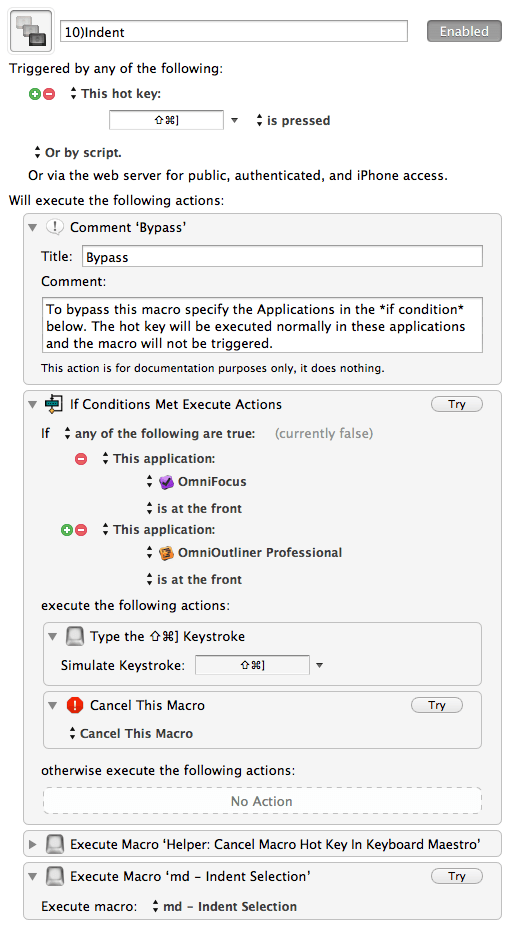
The one special thing in this group is the bypass. Palettes have a great advantage: the don’t reserve so many hot keys for themselves like a group with many separate shortcuts. To work around this disadvantage I have a bypass rule:
In the example you can see it in action. In OmniFocus and OmniOutliner I don’t want this shortcut to outdent my selected Markdown text, I want the hot key to fulfill its regular duty and outdent my outline or tasks. It gets bypassed and the macro gets canceled.
Just add your applications to the conditions list were you know that the shortcut interferes with important hot keys that you don’t want to miss.
Insert Inline Footnote
A very simple macro that I use quite often. It puts the carrot in the middle of the unobtrusive (**) which Brett Terpstra defined as syntax base for his Service for writing inline MultiMarkdown footnotes.
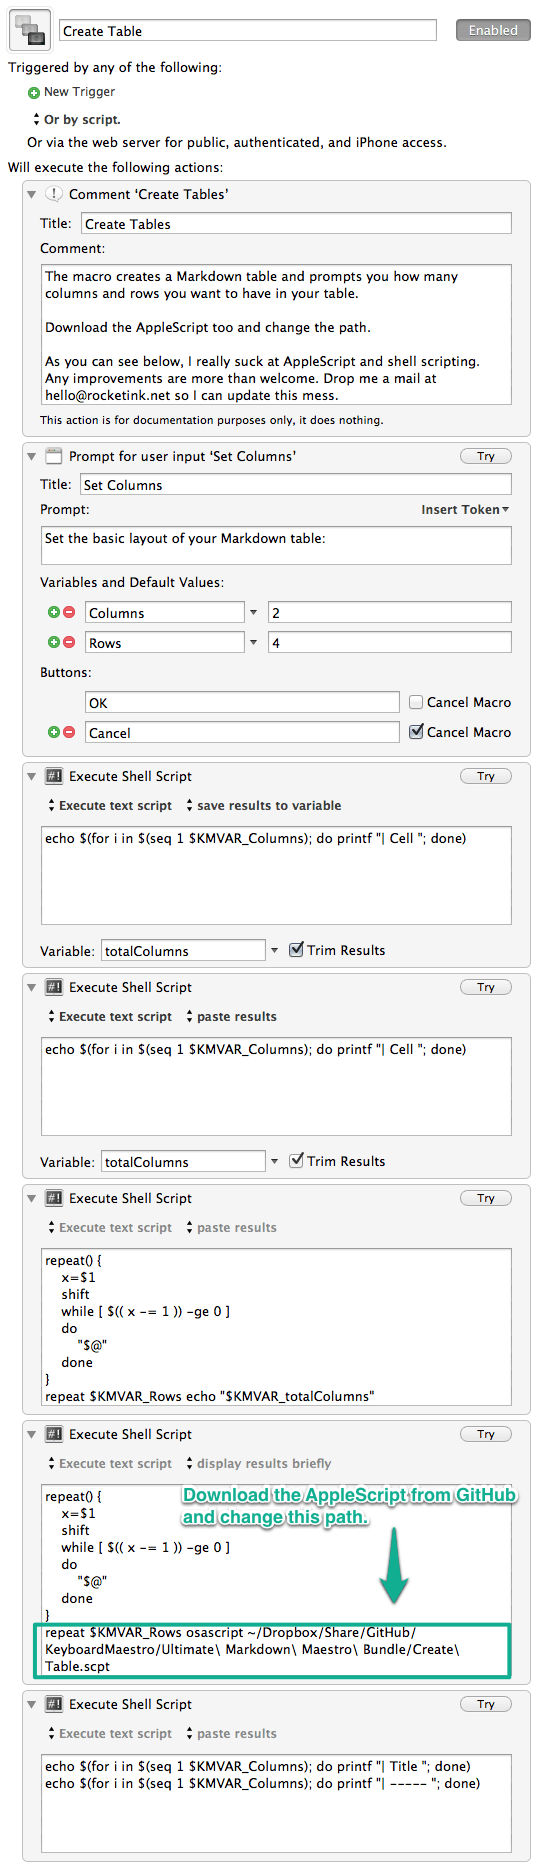
Create Table
The macro creates a Markdown table and prompts you how many columns and rows you want to have in your table.
Dependency: You have to download an additional AppleScript from my GitHub and change the path to where you decided to put the file.
Update: Thanks to Walton Jones (see comments) for making the external script obsolete.
As you can see below, I really suck at AppleScript and Shell Scripting. For instance, the external AppleScript has had the sole purpose to press the up arrow as many times as there is a cell, so the next action could have placed the header in the correct position.5
Increase And Decrease Header Level
Searches how deep the heading is and adds a # followed by a space sign. Stops after a level 6 heading.
I write my headings with a space as divider if you don’t do that the rule will be simpler and faster.
In the first if condition add the editors which got this feature build in, c.f. Byword (I love this smart feature that’s why I tried to replicate it).
Usage: The macro takes a while since this is GUI scripting… be patient and don’t rapid fire the macro.
If you know how to do this with regular expression6 or plain old Shell Commands I’d love to hear about it since this attempt feels more than cumbersome. I bet there’s a better way, e.g. using sed.
Markdown Links
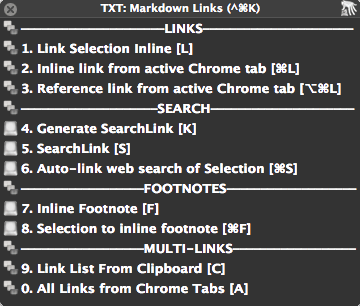
Links are the meat of Markdown blogging. This is a special palette with an shortcut assigned to it which vaguely resembles the system default create link – instead of ⌘K this palette uses ^⌘K.
This is the palette I use the most and I kept it clean on purpose, although there are more operations which could have been included. You might want to beef up this palette to fit your specific needs.
You can trigger the macros with the hot key in square brackets or via the number at the beginning.
Links and Multi-Links
Google Chrome is my main browser hence the absence of Safari macros. But if you dig through the ##author folders you will find enough to replace the Google Chrome ones with Safari ones:
Based on Gabe Weatherhead’s smart Add MD Reference from Safari macro which also grabs the title of a website I was able to change a few lines of code and make it work for Google Chrome. It’s also the base for the inline link version I use.
Brett Terpstra got you covered with the “All Links from Safari Tabs”. It’s part of the Markdown Service Tools, just change the description and choose the corresponding Service via “Execute Macro” if Safari is your default browser.
Search
Link Selection Inline is part of the Markdown Service Tools and does exactly what it says. If you have a link in the clipboard it makes use of it, otherwise the parenthesis stay empty – I told you Brett writes smart scripts.
Speaking of the devil mad scientist, I explained SearchLink in the dedicated Brett Terpstra section of the introduction to this article and why it’s such a cool service. This is the palette from which I generally summon Generate SearchLink, put in the details of my search and continue writing.
Auto-link web search of Selection is another one from Brett, the predecessor of SearchLink which runs an immediate web search returns the first link it finds and pastes it with an inline link syntax.
Footnotes
Inline Footnotes is the same command that I wrote about in the Markdown Basic Set section. Although fn SPACE SPACE is fast to type and easy to remember I felt it would be coherent to pair it with its big sister Selection to inline footnote.
Remember you can trigger the macros with the numbers, in this example (7.) and (8.), or with the assigned hot keys F and ⌘F. For some things I like the versatility even if there’s a good chance that one system usually sticks in the end.
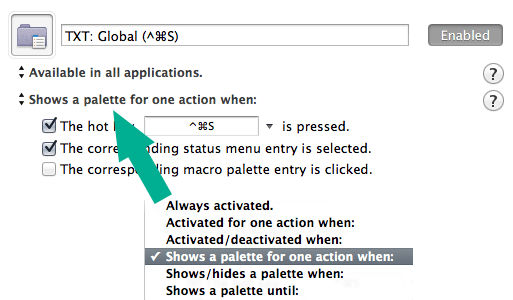
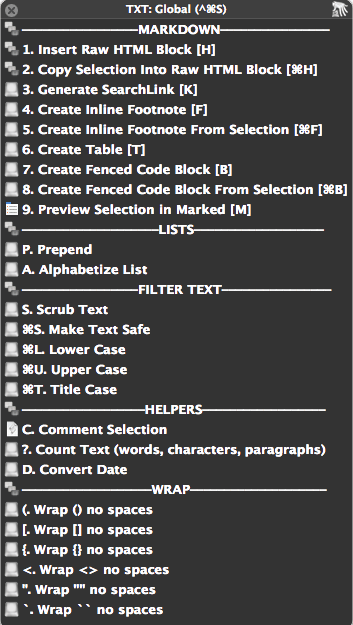
Global – More Markdown
This palette has the hot key (^⌘S) assigned to it since most of the macros inside it are useful when you have text selected, hence the “S” in the shortcut.
You see some old friends in this palette: The footnotes and SearchLink are also in the Markdown Links palette (^⌘K), but they belong to my favorites. So, at least for me it is convenient to also have them in this palette where the same hot keys are assigned to them (to be precise: at least for the letter hot keys this holds truth, they numbers are slightly shifted). My Create Table macro has also made it into this additional tool belt. It is up to you to trim down this palette to include only what you really need.
Raw HTML Blocks and Fenced Code Blocks
Raw HTML Blocks
A MultiMarkdown feature that allows you to render Markdown inside of an HTML block. The Insert Raw HTML Blocks macro prompts you for a class – my most frequent use case – and sets the carrot inside the html block. Macro number two does exactly the same but allows you to select the Markdown you want to wrap upfront.
These two macros are once again based on a macro of Gabe Weatherhead – see ## Gabe Weatherhead or read more here and take a look at the other great text processing macros.
His Fenced Text macro prompts you to choose between ~, - and #. The only modification I made was to remove the user prompt and set the default to ~ which gives me quick and easy MultiMarkdown fenced code blocks in two flavors: with selection or without.
Thanks to Gabe’s macro making the former example and this was a breeze:
I mentioned it before: Marked is a weapon.7 Having the chance to open a piece of Markdown swiftly in it and take a peek at troublesome or beautiful code is worth having it in this palette – and it can do much more.
Lists
Like the Fenced Text macro, the Prepend and Alphabetize List macros come from Gabe’s post «Text Processing Macros».
They are a great addition to my writing toolkit. The alphabetize simply sorts your list alphabetically:
INPUT
OUTPUT
G. Grape
A. Apple
B. Banana
B. Banana
A. Apple
G. Grape
I need this one more in academic writing than writing blog posts.
The Prepend macro is a similar to Brett’s Bullet List macro which defaults to using an asterisks. Gabe’s macro doesn’t recognize the level of indention, but it let’s you choose the prefix. When I’m in nvALT and prepare a list for TaskPaper I fire it up regularly. Matter of fact it’s my default for every list that shouldn’t be an asterisks list, which is often the case when I pass a document to someone who has no clue what Markdown is.
Filter Text and Wrap
I like to have these around. Especially the Wrap macros. I need them every 10 minutes to say the least. Especially when I’m writing class notes in a lecture with Pear Note at the university.
Brett’s wrapping services stopped working since the last update – he’s about to fix them and get around the strict Mountain Lion security measurements. For now I use the macros from my German fellow countryman Andreas Zeitler which you might know already from one of his many excellent Mac OS X Screencasts.
If you haven’t seen his Keyboard Maestro Github repository you have to check it out. It’s full to the brim with Keyboard Maestro goodies. His blog is also filled with good tweaks and a lot of geekiness.
Helpers
Not exactly Markdown helpers, but I still use them on a regular basis.
To briefly describe the Comment Selection macros: when coding they allow me to comment HTML, CSS or script sections. I doubt they are of any use for most Markdown writers.
Count Selected Text displays a Growl Notification if grownotify is installed about the amount of words, characters and paragraphs in your selection.
If you like it here’s the AppleScript I came up with:
tell application "Growl"
  set the allNotificationsList to {"Word Count"}
  set the enabledNotificationsList to {"Word Count"}
  -- Registers a new notification in Growl. You can set a unique theme there.
  -- Set an application icon for the notifications, defaults to TextEdit.
  register as application "Word Counter" all notifications allNotificationsList default notifications enabledNotificationsList icon of application "TextEdit"
  set myCount to count (the clipboard)
  set myWords to count words of (the clipboard)
  set myParas to count paragraphs of (the clipboard)
  --       Send Growl Notification
  notify with name "Word Count" title "Word Counter" description "
  Characters: " & (myCount as text) & "
   Words: " & (myWords as text) & "
   Paragraphs: " & (myParas as text) application name "Word Counter"
end tell
The AppleScript is a bit deprecated since Keyboard Maestro now has this feature build in.
Convert Date
Another one from Brett Terpstra’s brilliant services. You can download it here
A System Service which takes selected text and parses it into a standard date format, using keywords at the beginning to define which format to use.
Examples:
date +5
long +21
short tomorrow 2pm
date thurs 3:15pm
You can also read more about it here in the first of his two posts.
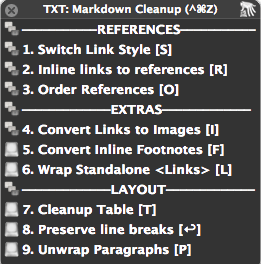
Markdown Clean Up
This is my second favorite palette because when I’m opening it, this means that I’m almost done with a writing project. The hot key (^⌘Z) is chosen because it is tangent to the other palettes shortcuts.
References
The order of the macros here can be of importance since the References tend to be harmful to your text if you use anything other than standard Markdown. I tried to list the risks in a disclaimer section. However, I take no responsibility for the correctness. If you write in standard Markdown there shouldn’t be a problem using any of the macros.
Switch Link Style
Switch Style is formd by Seth Brown aka @DrBunsen, a style switcher between inline and referenced Markdown links and images. Here’s his GitHub page for the formd project.
I love formd, that’s for sure, but there are some things to pay attention to….
Disclaimer
References must be formatted clean
Links only wrapped in square brackets won’t work! [Test] fails while [text][] is just fine.
Reference links with a title attributes like [test]: test.com <http://test.com/> (This is a title) or [test]: test.com <http://test.com/> "This is a title" won’t work.
References without a link will get deleted.
No Support for MultiMarkdown Citations
The good thing is it works splendid with Footnotes. But for those few of you who use MultiMarkdown Citations be aware that it will mess with your text.
Example (borrowed from the MultiMarkdown Syntax page):
This is a statement that should be attributed to
its source[p. 23][#Doe:2006].
[#Doe:2006]: John Doe. *Some Big Fancy Book*.  Vanity Press, 2006.
It will delete your complete reference part: [#Doe:2006]: John Doe. *Some Big Fancy Book*. Vanity Press, 2006.
Inline links to references
Brett’s version from the Markdown Service tools has similar problems with MultiMarkdown.
Disclaimer
Reference links with a title attribute
Wrong: [test]: test.com <http://test.com/> (This is a title)
Right: [test]: test.com <http://test.com/> "This is a title"
No Support for MultiMarkdown
When using footnotes or citations → It will delete: [#Doe:2006]: (see example from above).
Dr. Drang’s Tidying Markdown reference links is a similar script which uses regular expression instead. I wasn’t able to transfer it to a service or use the Python code inside Keyboard Maestro. So I made a wrapper for Phaedra’s Service.
It reformats:
This is a [demo][3].
What [else][1] could it [be][question_mark]?
[3]: demo.com <http://demo.com/>
[1]: else.com <http://else.com/>
[question_mark]: apple.com <http://apple.com/>
Into:
This is a [demo][1].
What [else][2] could it [be][3]?
[1]:  demo.com <http://demo.com/>
[2]:  else.com <http://else.com/>
[3]:  apple.com <http://apple.com/>
A nice extra is, if a reference is missing like [here][] it will put [4]: ***A Missing Link*** in the reference list.
The drawback is that the script is still a bit buggy: a reference with no link get’s deleted!
Disclaimer
No Support for MultiMarkdown
When using footnotes or citations:
Footnotes: the script deletes the whole reference.
Citations: the script deletes: [#Doe:2006]: (see example above)
EXTRAS
I usually run one of the reference macros before continuing to the extras section of this palette which takes care of every bit in my document that looks like a link.
Convert Links to Images
The script grabs a normal url and returns a Markdown image link:
internet.com—some-image.png <http://internet.com/some-image.png> turns into  <http://internet.com/some-image.png)>.
Gabe Weatherhead took a regular expression from John Gruber and turned it into this nifty macro. Just select all your image urls and let the macro run. I’ve added a prompt for a reference tag since I tend to not batch convert my urls. However, if you do just set Gabe’s version in the execute macro or leave the prompt empty and press enter.
Convert Inline Footnotes And Wrap Standalone Links
The service from Brett to convert inline footnotes is explained in detail in this article on his site. Check out the simple syntax and you are ready to go.
The last things I do with a finished piece is first run the Convert Inline Footnotes macro and then the Wrap Standalone Links macro. Both just work and make my life easier.
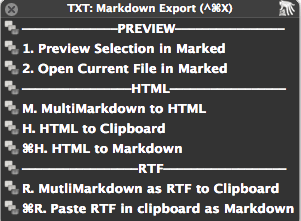
Markdown Export
The hot key for this palette is (^⌘X) – X for export made sense to me.
I still keep them in this palette along with the options that are included in the Markdown Service Tools and .
The recent update to Martin’s services even take care of MultiMarkdown Footnotes and convert them into the RTF. If you don’t have Marked8 and you want to use the service then make sure you’ve followed all the instructions from Martin. You can download the services here. The Keyboard Maestro wrappers are on my GitHub.
To All FoldingText Users
Some of the scripts who use shell scripts or services might break your text when using FoldingText. I’m a huge fan of this innovative and smart application and would like to use it more, but the results when using scripts inside FoldingText often crash the program so that you have to force quit it.
I don’t know if it’s just my setup or if this is due to the nature FoldingText is written.
To replicate the error just use all the reference macros on after another. On my Mac’s after a few tries it start giving me acoustic feedback and error messages.
To All Users - ReadMe and Reference Link Collection
I don’t know when you will come across this post. By the time you read this the GitHub repository might be some months or even years out of date, and, the services might have changed or stopped working.
I try to keep everything up to date since this is what I use on a daily basis. But I guess most of you want to be independent anyway and tweak the system to their liking. After all it’s just a starting point. That’s why I’ve deposited the sources of every macro and the macros which use services inside the comment fields at the top of each macro and the according “Execute Macro”. You can always visit the sources, keep track of the excellent people I mentioned here and download the latest version – matter of fact this is what I encourage you to do since they are all great guys with interesting blogs.
None of the OS X Services mentioned in this article is hosted on my GitHub. You have to download them from the articles I linked.
The make it a bit easer here’s a list of all the external posts and download sites:
You can them in most editors opening the Edit menu in the menubar and selecting Special Characters (most times: ⌘⌥T). ↩
Yes, I take attribution and indication of source very seriously. I think that’s what is missed way to often in the internet and I’m always happy to see when someone actually cares about it too. ↩
If you want to thank Brett, he also accepts donations. ↩
Note to self: learn a real coding language, be it Ruby or Python. ↩
Any improvements are more than welcome. Drop me an or let me know about it in the comments so I can clean up this mess. ↩
This might be a good starting point for a regular expression. ↩
Which auto-promotes Marked 2.0, it will be kind of a Doomsday device for eliminating Markdown related problems. ↩
The keyboard is a geeks best friend. It is a fact that keyboard shortcuts are the most efficient way to do all kind of things on a computer. The pure speed of pressing a hot key makes the keyboard superior to using a mouse.
What you’ve seen so far in this blog is for the most part speeding up workflows with the help of keyboard shortcuts. I’m fully aware that there are a lot of users out there who are more comfortable with keeping there hand on the mouse. Well, today I got something for you: FinderPop.
Although being an avid keyboarder user, I often find myself in a consuming mode. That’s when I use my mouse most of the times. In addition there is still one place where I find myself using the mouse more often than in any other application: it’s when dealing with files in the Finder. No matter how hard I try to use my Mac only with the keyboard, numerous times a day I end up with my palm resting on the mouse: be it switching to a folder with a click on the sidebar, opening up another finder window, selecting and copying certain files from A to B. You all know the various routines.
What it comes down to is this: the best tool to get the job done quickly is the tool at hand. This is were FinderPop comes into play.
Let’s cut the chase and see what it can do for you.
What is FinderPop
FinderPop is a contextual menu extension and a versatile little gem for tinkerers. You can access your whole file system via the contextual menu, open folders, move documents and more. Plus, you can run scripts on files with FinderPop or simply execute them.
If you invest a little bit of time and customize the contextual menu, all relevant locations of your Mac are just one click away.
The application comes rather simplistic as a preference pane, but with a plethora of options – some of them are right Appearance or Options tab, others are hidden.
To sum it up, FinderPop has several use cases, it can function as…
an Applications launcher
a quick way to access files and folders
a helper to make an alias of files or move and copy them
a menu with recently used files and applications
a list that shows running applications
a toolbox where you can organize for AppleScripts and shell scripts
To give you a good overview I have made a 3 minute screencast:1
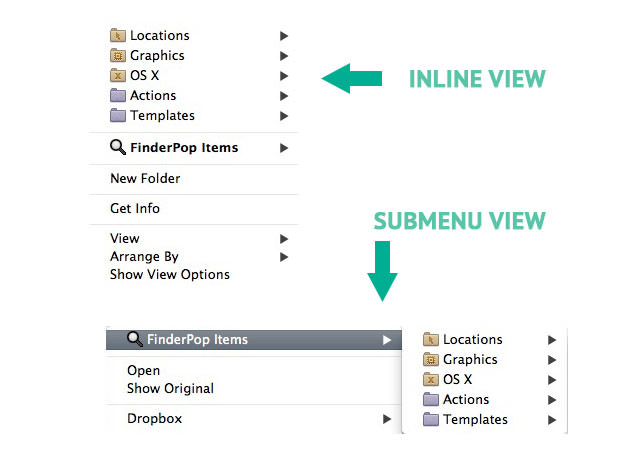
My Setup
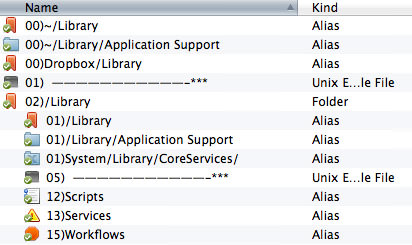
I have a rather minimalistic setup and only use three folders which I display “inline” in my contextual menu:
If you want more structure and more folders you can tuck them away under on entry by unchecking Inline FinderPop Items into main Contextual Menu under Appearance:
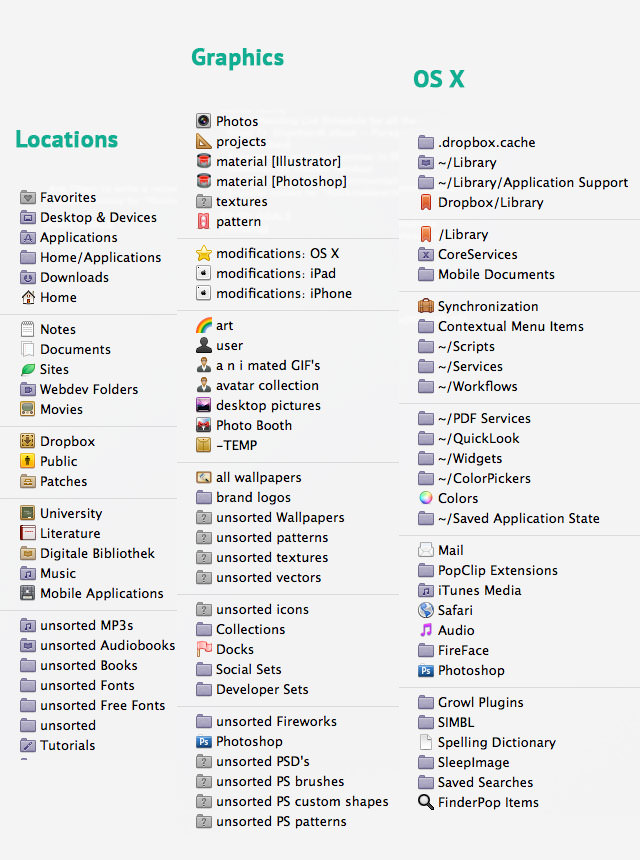
Quick-Start Guide
To get you started open the preference pane, choose the “Items” tab and click on Show "FinderPop Items" folder. Basically this folder can be populated with all the data you want to have accessible in the contextual menu.
What you want to do is only to put an alias to your folders into FinderPop since there is no reason your folders should live hidden away in the library folder of your system – the can stay were they belong.2
After you added a bunch of folders and files you can start to organize them:
Sort order in the contextual menu: by setting a number as prefix with the xx) syntax, you can define the sort order of your files (just like in Keyboard Maestro).
Dividers: pick any file and give it the suffix ---- or -***
Templates: if a folder has the suffix ---C all its content will be function as a template which you can paste into your Finder window.
Be warned that the initial start of FinderPop after a reboot can take a few seconds, but after this it is loaded instantly.
Navigation inside FinderPop
cmd or R to reveal the selection in Finder
cmd-opt or I to open a “Get Info” hud
cmd-opt-shift or P will open a preview hud which is great for viewing images and getting the dimensions of them
cmd-opt-ctrl or DEL instantly puts the selection into the trash or quits an application (if you’re in the applications menu)
For a more elaborate how-to on the basic navigation with FinderPop I suggest a quick browse to the official “Navigating the FinderPop Menus”. There is a description of the 8 functions and it is explained in detail how to invoke them.
The Experience
Apple’s Finder just isn’t what it could be. It often feels out of date and neglected, what is to some extend understandable with Apple’s effort to make the concept of file management irrelevant and in respect to the whole (i)Cloud movement that is being pushed. Alongside the moderate updates the finder received, I don’t get why recent features, namely one specific one -– the “monochrome” sidebar –, don’t have an option in the preferences to deactivate them. My sidebar once was neatly organized and customized with nice 16px icons. Those visual cues became second nature and I instantly knew were to drop the latest downloaded wallpaper. With FinderPop I can have my colored sidebar back without the need for an extra hack like SideEffects or a bigger Finder extension/replacement/add-on like XtraFinder.
When I first used the application I didn’t know about LaunchBar and FinderPop increased the speed of my workflow tremendously. Since the application basically doesn’t use up any screen real estate and is always there, it also feels like LaunchBar for mouse users.
If you have a selection of files in the Finder or on the desktop and invoke the contextual menu it is almost to easy to copy or move them into the correct directory – most of the times you do not need two Finder windows open for these kind of file actions with FinderPop around.
A neat side effect: I have a good amount of friends and know a lot of people who cluster their desktop with all the relevant files and folders they use on a daily basis or which they just want to keep around for reference sake. After showing them how to organize there documents in a subfolder in FinderPop most of them are now proud owners of a clean desktop.
Advanced Options
Shell scripts:
If you select a Unix shell script file (for now, files whose name ends in ‘.sh’) the script will be executed. Any Finder selection is passed to the script as standard text arguments.
AppleScript:
Likewise, if you select a compiled AppleScript file (i.e., a file ending in ‘.scpt’), FinderPop will execute the script. Note however that FinderPop does not currently pass the selection to the Applescript. Note also that FinderPop will not display any script results or errors.
Viewing a package and pressing cmd-opt allows you to browse the package (an equivalent to “Show package content” in the Finder)
The suffix -!!d will give you a menu entry that consolidates the Finders devices view of the sidebar and the content of your desktop.
-!!a as a suffix results in an “All Applications” folder. I’ve set mine up with a .fp-info file inside of my applications folder so that I see this folder sorted by the date the apps were last modified.
You can modify how each individual folder is sorted by adding such a file and putting one of these line in the file:
FinderPop doesn’t stop there, to grasp the whole set of customization options the FinderPop manual is the best resource.
If you like the concept and can do without some of the features there is a similar app named FolderGlance. It costs $20 and sometimes adds an extra step like when copying or moving files. Speaking for myself, I’m a FinderPop guy, but if you like the UI approach when sorting and configuring your files and folders, FolderGlance might be for you. I don’t know if it can be configured to sync via Dropbox – so setting up your basic structure with FinderPop is a one time thing.
Last words
FinderPop developer Turly O’Connor delivers updates for the application since 1997. If one of my Mac apps deserves the title “oldie but goldie” it is FinderPop. Despite of being a huge LaunchBar user I just keep my customized FinderPop folder in my Dropbox to have it with me on all my Mac’s.
If my review hasn’t convinced you to give FinderPop a try, maybe this list will:3
If you’re a nostalgic, then check out this well-aged dinosaur.
If you’re a fan of devoted Mac developers, using this app might open an efficiency door.
If you’re not too fond of the keyboard and like your mouse much more, you know what to do.
And if you love beer, have used the app for ages like me, buy Turly a drink because he loves brew too.
I tried to make up for the last screencast which was a tad too minimalistic and not so gentle on the iris. ↩
Just make sure Aliases in Italic is unchecked in the appearance settings as well, although, it’s purely cosmetic. ↩
I highly doubt that my English is sufficient enough to make this last part an enjoyable read. Dear reader, forgive me for my quill has taken over in these last lines and there wasn’t much I could do. ↩