Create and Edit Lists in Keyboard Maestro with AppleScript
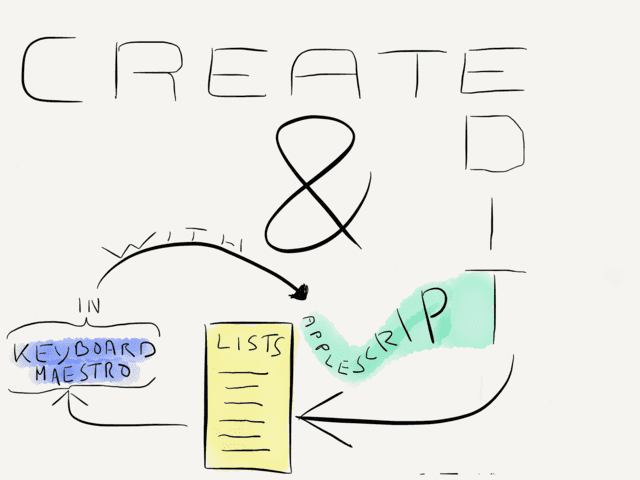
Outline
1. Introduction
The plethora of features and the custom hacks that can be created with Keyboard Maestro are the reason it has earned a place in the top 5 of my favorite Mac apps. Still, there is room for improvements. Today I want to address one feature that already exists, but which isn’t usable for me: lists in a dialog prompt.
In this post I’ll cover the status quo of support for lists in Keyboard Maestro and two workarounds for different scenarios where lists can come in handy. To wrap it up, the last section shows you my present setup of how I create new notes and append notes to lists, as well as how I use a piece of AppleScript to generate a list of recently modified files which prompts me to choose one document along with several other options.
But first things first. Terminology. The following picture illustrates what I refer to when I speak of ‘lists’ in this context:
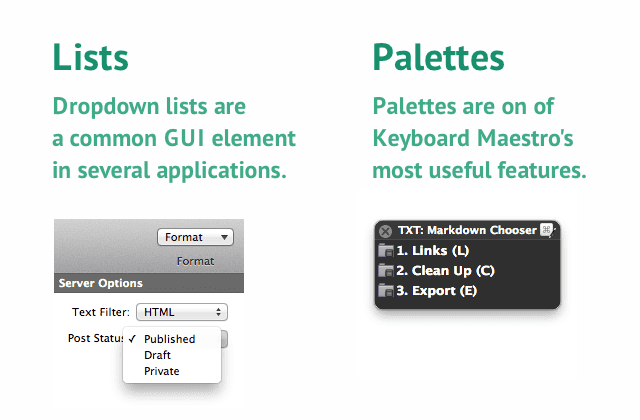
In Keyboard Maestro you can create simpler versions of these traditional GUI element, too. Although they won’t look and act exactly like the one from the screen shot I took (it’s MarsEdit by the way) they are useful in certain contexts. Before we dive in deeper, here’s a comparison of the key features of both, lists and palettes, with the latter being my favorite for replacing ‘dialog lists’ most times.
Lists are good for…
- displaying a huge amount of options
- low priority lists that you don’t visit regularly or that are not crucial to your workflow
- saving some valuable space in that good old brain of yours (since there is no need to learn or memorize shortcuts)
- a simpler approach to keyboard navigation (by using the arrow keys or typing the starting letters of the list entry)
Palettes are good for…
- displaying a few selected and important macros (I’ve tried large palettes and came to the conclusion that they don’t work for me - no matter how many dividers I setup to structure and organize them. Nowadays I try to limit myself to a maximum amount of ten macros in a palette.)
- keyboard aficionados because they tend to react a tad quicker - they’re as simple as it gets
- swift keyboard navigation, especially when you get accustomed to shortcuts
- shortcut versatility, assigning multiple hot keys to one macro, c.f. “1. Links” in the example above is linked to three hot keys:
1,NUM1andL. - nesting and triggering other palettes
2. Status Quo of Lists in Keyboard Maestro
Keyboard Maestro 6 brought some new features which many users (including me) have been waiting for. Above all, I enjoy having the ability to trigger macro palettes with a macro which makes my previous workaround obsolete. The new text tokens are also a nice addition.
To give you an example of how useful and versatile lists are, here’s an example by Gabe from Macdrifter where he makes use of them with his Quick Note macro:
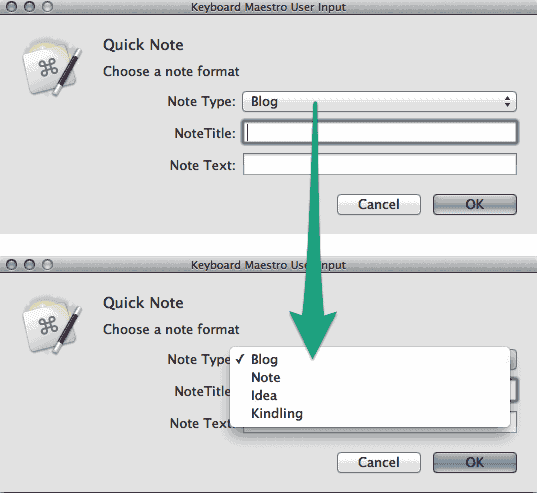
These lists can be created in Keyboard Maestro by making use of the | character aka pipe to create multiple values. It’s a good option, especially for users who use their mouse more than the keyboard.
Your sharp eyes might still stuck on that last remark…. Right, that’s exactly the problem I have with Keyboard Maestro’s implementation of this somewhat hidden feature. You can’t navigate such a list with your keyboard which leads to me not using native Keyboard Maestro lists at all. The point of the whole exercise for me is not to leave my keyboard and gain a swift way to choose from an array of list items. At the moment Keyboard Maestro forces you to pick the entry via the mouse, there just is no other way.
3. Using TextExpander for lists
The fill-in snippet of TextExpander gives you multiple choices in a popup menu which makes it in some cases a quite useful replacement.
I make use of the double space suffix technique by Kaushik Gopal which I find brillant and more logical than the usual approach with a period or semicolon prefix, so here’s my kao SPACE SPACE snippet for a list of my beloved Kaomoji Emoticons:1
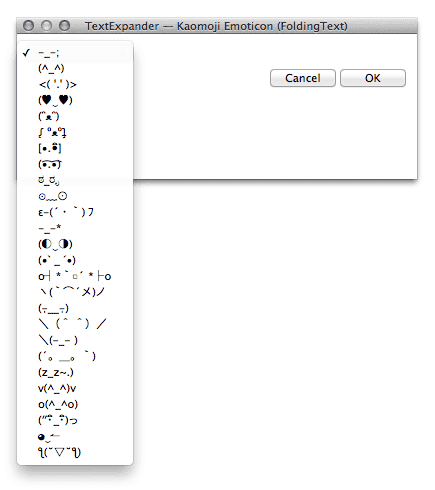
Since I’m deeply in love with Keyboard Maestro and want to preserve the just fallen in love kind of feeling in our relationship for as long as possible, I created a one-action macro to trigger the TextExpander snippet:

Here’s the corresponding snippet:
%fillpopup:name=Kaomoji:default=-_-;:(^_^):<( '.' )>:(♥‿♥):(ᵔᴥᵔ):ᶘ ᵒᴥᵒᶅ:[•.•ิ]:(•͡.•͡):ಠ_ರೃ:⊙﹏⊙:ε-(´・`) フ:-_-*:(◐‿◑):(•ˋ _ ˊ•):o┤*`□´ *├o:ヽ(`⌒´メ)ノ:(-̩__-̩):\(^ ^)/:\(-_- ):(´。_。`):(z_z~.):v(^_^)v:o(^_^o):(″・ิ_・ิ)っ:◕‿↼:ƪ(˘▽˘ƪ)%
What I gain from this ménage à trois is that I can put the macro in a palette or trigger it via a hot key.
However, when using TextExpander you can’t pass the output of a list item into a variable and make use of it anywhere else in the macro. After all it’s TextExpander and it does best what it’s build for. Use it for that purpose. If you want more advanced lists read on.
4. Using Keyboard Maestro and AppleScript for lists
As simple as it is, the TextExpander example above represents a use case scenario where lists make more sense to me than using Keyboard Maestro palettes. Now, to make lists even more useful we can use AppleScript and build a list.
4.1 Kaomoji Emoticon Example
property kaoList : {"-_-;", "(^_^)", "<( '.' )>", "◕‿‿◕", "(♥‿♥)", "(ᵔᴥᵔ)", "ᶘ ᵒᴥᵒᶅ", "[•.•ิ]", "(•͡.•͡)", "(*_*)", "ಠ_ರೃ", "⊙﹏⊙", "٩(͡๏̯͡๏)۶", "٩(●̮̮̃•̃)۶", "ε-(´・`) フ", "-_-*", "(◐‿◑)", "(•ˋ _ ˊ•)", "o┤*`□´ *├o", "ヽ(`⌒´メ)ノ", "(-̩__-̩)", "\(^ ^)/", "\(-_- )", "(>_<\")", "(´。_。`)", "(z_z~.)", "v(^_^)v", "o(^_^o)", "(″・ิ_・ิ)っ", "◕‿↼", "(=^.^=)/", "ƪ(˘▽˘ƪ)"}
-----------------------------------------------------
tell application "Keyboard Maestro Engine"
    activate
    set selectedEmoji to choose from list the kaoList with title "Kaomoji" with prompt "Your Emoticon feels like…"
    -- OK and Cancel actions
    if selectedEmoji is false then -- Play beep and cancel all running macros
	    beep 1
	    do script "Cancel All Macros"
	    error number -128
    else
	    return selectedEmoji
    end if
end tell
As you can see, the output can be reused, which is always a good thing. Here’s the rest which shows you how the AppleScript is embedded in a simple macro:

4.2 Apple Mail “Reply To” Example
Aside from Gabe’s Quick Note macro there’s also Federico Viticci’s recently released macro for Automating Mail Signatures and Senders with AppleScript and Keyboard Maestro. His post provided the initial spark to write this article since I forgot about this feature which I so deliberately abandoned from my workflow until now.
Emoticons are great and all, but they usually don’t count towards having anything to do with productivity. So, here’s a more useful example for Apple Mail users. I checked with Federico and he allowed me to tinker with his AppleScript.
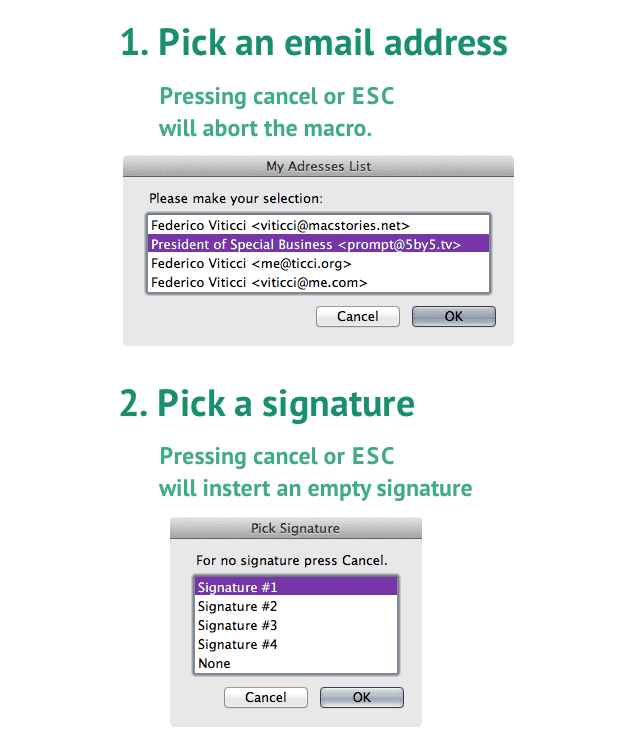
Like outlined above, the advantage is that you can navigate the list with the arrow keys and even type the first one or two letters to jump directly to an entry. For instance if I want to repsond via my zapp@brannigan.com address I just need to press z and the entry gets selected.
Here’s the AppleScript to set this up:
-----------------------------------------------------
--	Name: Simple List Handler for Apple Mail
--	Author: Patrick Welker <https://rocketink.net>
--	Version: 1.0 (July 21, 2013)
--	For Apple Mail and Keyboard Maestro (<http://www.keyboardmaestro.com>)
-----------------------------------------------------
--	Apple Mail Part borrow from Federico Viticci of MacStories (<http://www.macstories.net/tutorials/automating-mail-signatures-and-senders-with-applescript-and-keyboard-maestro/>)
-----------------------------------------------------
--	Installation
--	1. Use this script with an "Execute AppleScript action" and assign a hot key to it, c.f. ⌘R
-- 	2. Add/Remove your list items and setup a default item in the configuration below
-----------------------------------------------------
--	Configuration
property emailList : {"Federico Viticci <viticci@macstories.net>", "President of Special Business <prompt@5by5.tv>", "Federico Viticci <me@ticci.org>", "Federico Viticci <viticci@me.com>"}
property defaultEmail : "President of Special Business <prompt@5by5.tv>"
property signatureList : {"Signature #1", "Signature #2", "Signature #3", "Signature #4", "Signature #5", "Signature #6", "None"}
property defaultSignature : "Signature #1"
property cancelSignatureDialog : true -- If Cancel/ESC dialog then use no signature; set to false for default signature
--	Optional
set titleEmailDialog to "My Adresses List"
set titleSignatureDialog to "Pick Signature"
-----------------------------------------------------
tell application "Keyboard Maestro Engine"
    activate
    --	Prompt for "Send From" Address
    set selectedEmail to choose from list the emailList with title titleEmailDialog default items defaultEmail
    if selectedEmail is false then -- Cancel script
	    beep 1
	    error number -128
    else -- Gets the selected list and creates a variable
	    set fromAccount to selectedEmail as text
    end if
    --	Prompt for signature
    set selectedSignature to choose from list the signatureList with prompt "For no signature press Cancel." with title titleSignatureDialog default items defaultSignature
    if selectedSignature is false then -- If cancel rules
	    if cancelSignatureDialog then
		    set selectedSignature to ""
		    set mySignature to selectedSignature as text
	    else
		    set selectedSignature to defaultSignature
		    set mySignature to selectedSignature as text
	    end if
    else
	    set mySignature to selectedSignature as text
    end if
end tell
--	Apple Mail: fills in "From Address" and chosen signature
tell application "Mail"
    activate
    set theSignatureName to mySignature
    set theMessages to the selected messages of the front message viewer
    set theMessage to first item of theMessages
    set theOutgoingMessage to reply theMessage with opening window
    set message signature of theOutgoingMessage to signature theSignatureName
    set sender of theOutgoingMessage to fromAccount
end tell
5. The Combined Power Of Palettes And Lists
Since lists and palettes are only two different ways with the same goal in mind, it’s obvious to combine them to get automation done more efficiently.
I just have started with using lists after Federico’s post and right now I only have one bigger use case with which I’ll also end this post.
5.1 Prelude - My setup for managing notes and lists
Before I go into detail on the palettes and lists in my repertoire, let me give you a brief introduction on what I use on the Mac and what apps I prefer on iOS. It’s just a short description to give you a better idea of why I choose the macros in the upcoming sections and an why this works for me.
5.1.1 The Mac
nvALT is my database for almost every Markdown or plain text file on my Mac. My notes folder lives in Dropbox which is my favorite way of syncing my documents to iOS while still having easy access to them on the Mac. iCloud has never worked for me, it’s just not my kind of sync. I can’t stand the idea of data I frequently access being tucked away in the depths of OS X. Keeping my notes on my NAS would also be a good solution. Sadly there are close to zero iOS text editors with support for WebDAV – Brett Terpstra’s iTextEditors lists only 6 editors which support this feature at the moment.
There are a lot of editors I have installed (and use) on my Mac, but the point here is not to list and praise them all here, it’s rather highlighting the fact that having my notes in one location makes it easy for me to find and edit them.
I have three types of plain text files in my notes folder which serve different purposes:
- .md for all notes
- .txt for all lists
- .taskpaper for my projects
5.1.2 iOS
On iOS my main editor is Notesy – it’s my nvALT for the iPhone/iPad. In addition I manage my lists with the relatively young Listacular which has recently replaced Listary for me.2
Listacular does a splendid job at managing lists. It reads two file formats (.txt and .taskpaper) and has basic Markdown support. Its trick is that it differentiates between the various Markdown list markers. By using an asterisks your list stays a list, when pre-appending a hyphen you get a todo list with checkboxes.
This works for me because my (running) lists all have a .txt extension. The good thing with this approach is that I only see what I want to see on Listacular: lists.
Facts about Listacular:
- it doesn’t allow to choose or ignore extensions like other text editors do (= if you have .taskpaper files in your notes folders they will show up and there’s no way to avoid that)
- no support for .md files
- it can merge lists making it a good alternative to share grocery lists and alike
- it’s free for up to three lists (the upgrade costs $2.99 via IAP)
5.2 The Notes Palette
There are some repetitive patterns in my workflow. One of them is creating new notes and lists, the other is adding to my already existing lists. The notes palette (⌘Page Down) aims to be my starting point for any of those actions. It’s a work in progress and I’m not sure wether I keep all of the macros, remove some or even add more to it from my global palette (^Space) like ‘create a new email’.
The structure of the palette:
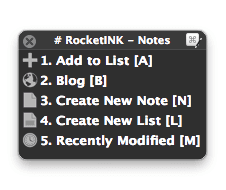
Credit: all icons used in the macros are made by Alex Shutin from The Working Group.
5.2.1 Appending To An Existing List
The “1. Add to List [A]” macro just opens another palette for one action like this:
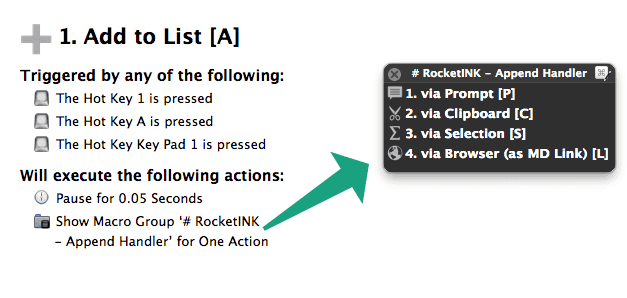
Since all of the 4 macros basically perform the same action, I will only cover the first one here (which also happens to be the longest macro out of those four).
(1) After starting the macro, a list pops up and I can pick which list to add something to. The script is structured just like in the example at 4.1 with the kaomoji emoticons.
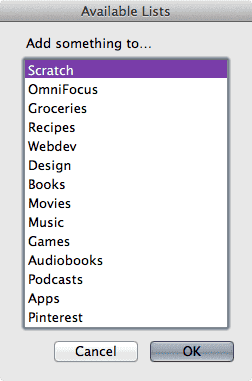
(2) Next there’s a prompt where I enter my list items. Remember, you can always create multiline notes by adding a line-break with ⌥↩ – don’t worry about Keyboard Maestro only displaying one line.
(3) What follows are all the if conditions for the various lists:
- My scratch file is formated as a normal Markdown note (with readability in mind). It adds a level 3 header, the date and time to each entry.
- A new OmniFocus entry is created via OmniFocusCLI: Natural Language Tasks by Don Southard. In my honest opinion, it’s the best way to get tasks into OmniFocus – OmniFocus doesn’t even have to be open (and also won’t get opened). Read the blog entry to learn why it’s a brilliant implementation and how to install in on your system.
- My various running lists. Each line I’ve entered in (2) will also be a new line in the corresponding list pre-appended by an asterisks to match Listacular’s list syntax.
- My grocery list. Same as the running lists, but the list marker is a hyphen to make the entries show up as tasks in Listacular.
(4) Play a sound, send a notification and delete all variables. √
A visual representation of the macro:
UPDATE: I added an easier to maintain version here.

5.2.2 The Blog Palette
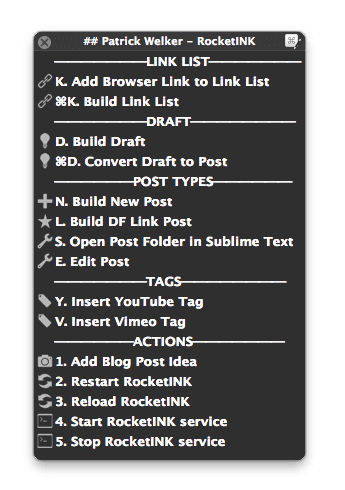
I just added this for the sake of giving you the overall picture of the setup. Going into details would go beyond the scope of this post.
One last note, the “Edit Post” macro makes use of the AppleScript which I’ll introduce in section 5.2.4. Often times I need to correct some spelling mistakes and that’s where this macro jumps to the rescue. It opens up a list with all my posts and syncs them to my Jekyll blog after I’ve finished updating them.
5.2.3 Create A New Note Or List
To be frank: I’m not too fond of these. They are a mix between the add to list macro from 5.2.1 and the recently modified macro in 5.2.4. These macros started as a proof of concept and gradually evolved into something bigger.
Both macros (i) create a new text file (note = .md, list = .txt), (ii) prompt you for a name, (iii) open up the note in the editor you choose from a list, (iv) ask you if you’d like a preview in Marked and if you answer with yes (v) the two windows get aligned filling one half of the screen each. Admitted, this is pointless when you start with a blank canvas, that’s why…
5.2.4 Edit And Preview Recently Modified Notes
This AppleScript is the secret star of this blog post and also resembles my 1st serious go at doing something with Apple’s scripting language. The aim was to make it versatile, useful and something that people could in fact integrated in their note taking or reviewing workflow.
In a normal week I drop several notes into nvALT. It often happens that those files are somehow project related and that I keep coming back to the same documents within said week just to edit them. That’s where this script can come in handy. It prompts you for several steps:
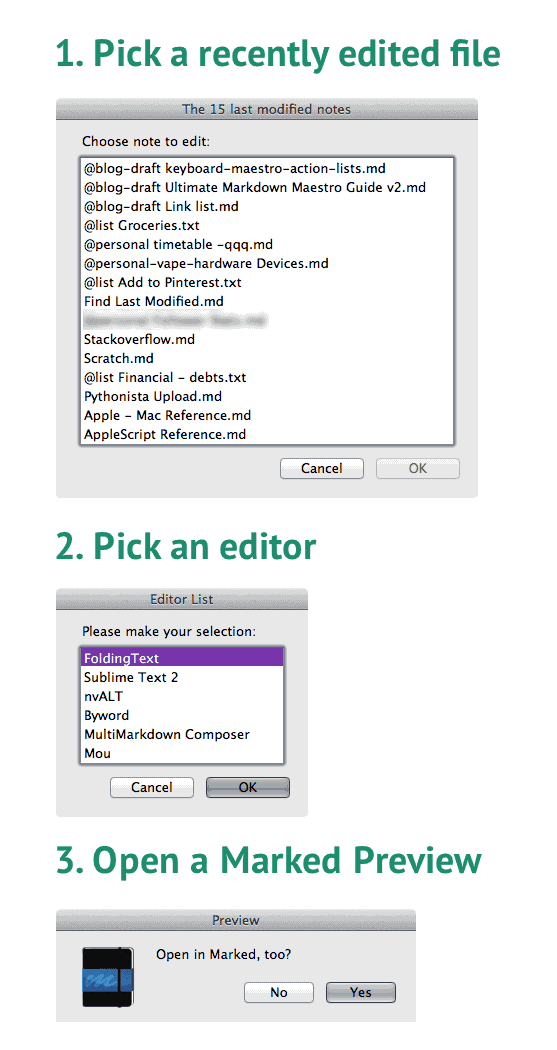
Most parts are customizable. You can optionally turn on Marked to always open up, same goes for the window aligning (which I borrowed from Rob Trew) and some other options. Take a look at the user configuration part of the script where I also explain briefly how to set it up and where the known problems are at.3
Side note: I had problems embedding this script, so here’s a link to the Gist for now.
Versions of the script I use
At present I run several trimmed down versions of this script. They are shortened because I don’t want to get prompted all the time and want a specific behavior for certain actions. If you find the script useful, I’d advise you to just edit the file to your liking. Here are my iterations:
- Show me the 10 last drafts for RocketINK and open the selected one in FoldingText with a Marked preview (without asking me anything).
- Show me all my TaskPaper files and open the selected one in TaskPaper without opening Marked.
- Show me the 12 last nvALT notes with @reference in the title
- Show me all my blog posts and prompt me to open them in Sublime Text or FoldingText, also open up Marked.
Other possible use cases
- If you’re active on GitHub you could make a list of all your ReadMe files. Then, if you update a repo just choose the corresponding repository ReadMe and edit the document in your favorite editor. Advanced users could also setup a commit and upload action.
- Add an additional prompt to enter a search term for viewing the last 10 modified notes in nvALT that contain a specific word or tag. You just have to enter another prompt for the “searchNotes” property.
Note: If your not into the script but use nvALT then add this nvalt://find/* to your LaunchBar or this nvalt://find/{query} to your Alfred searches. … I had to mention it because I’m not sure every nvALT’ler knows about the URL scheme. I use it all the time.
-
A hat tip to Sean Korzdorfer who introduced me to this site by tweeting about it. A great resource for fans of this modern Japanese tradition. ↩
-
Listary is a superior app, but it depends on Simplenote which I don’t use anymore. It has a lot of features Listacular lacks at the moment, but so far I’m happy with my decision. ↩
-
In short, the easiest way to get this running at the moment is to export the script as an application. I know… not the best solution, but I hope some clever person will point me in the right direction to make it more Keyboard Maestro/Service/LaunchBar friendly. ↩