Image Manipulation Series - Keyboard Maestro Image Editing Suite
Image Manipulation Series
Part One: ImageMagick
Part Two: Binaries For Optimization
Part Three: Keyboard Maestro Image Editing Suite
Part Four: Markdown Image Links
Outline
Part three is here and dubbed “Take action. Make some macros!”. I published part one and part two of this series to show the person in front of the display reading these lines that it isn’t too hard to install some binaries and get touchy-feely with the command-line. Granted, if you’re already a die-hard hero of the shell this might not was the most interesting read for you.
The reason behind the two-posts warm-up1 is Peter N. Lewis. More precisely, his insanely good creation named Keyboard Maestro; it truly is an app which you can use for every purpose of your computing life since it can control all cocoa apps and call scripts from various languages to the rescue. (Sales pitch intend. Yes, it’s that good.)
Keyboard Maestro with its GUI-scripting basis was the gateway drug for me. Now I’m hooked and want to learn more programming languages to ease the hunger for better and more satisfying automated workflows.
By now you probably now that I’m a huge ImageMagick fan. Let me tell you… it’s even worse with Keyboard Maestro. This is the kind of ‘put the two together, lock me in a room with a Mac and open the door after a year’ worse we’re talking about. So, let’s see what they can do.
Personal note:
In the last days I tried to add a quick fix to this website since it currently has no elegant way to display tall screen shots… and this post has several of them. After some days I realized that this is something I have to save for a major update of RocketINK. So, for now, external links to the larger images which will open in a new tab will have to do. I put them below the actual screen shots.
Outlook
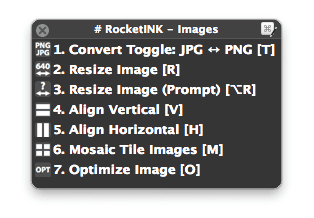
In this post I will share with you seven macros which let your trigger the actions we learned prior to this. The only difference is that you won’t be seeing the command-line and can selectively batch process your image files. The options you could specify are now available as checkboxes and prompts. Here’s the palette we’re initially looking:
Automation only makes sense for tasks you do more or less often. There’s no use in spending a whole day building robots if the actual act of doing what has to be done would take you the same amount of time. Don’t outsmart yourself if it’s a one time challenge.
That’s said, I build the set of macros with versatility in mind. I wouldn’t want all the options I put in there to constantly run. So, after you feel comfortable and know your way around these macros, I would suggest to customize them or mix and match each. This should be possible even if some of the macros look a bit complicated at first. I tried to set the whole thing up in a modular way.
You have to have ImageMagick and the binaries from the last part installed for this to work.
The Various Helper Macros
The make the macros modular I set up eleven helper macros which perform various tasks. You can leave them deactivated. When called (within another macro) they get triggered no matter what their current status is.
If you at some point forgot what one helper (or macro) does, I tried to provide a simple documentation by writing comments inside each helper and macro. It’s a good point of orientation if you get lost.
The Setup Helper
This is the one helper you have to configure. Without filling in your customized variables these macro won’t do anything for you.

The Initial Helper(s)
In many of the macros the first helper that gets triggered is the “Create File Lists, Temp Files, Count Files & Build Info Log”.
This helper then calls the “Get Path, Name and Extension” helper:

All this does is get the path, name and extension of a file so we can manage mischief with it.
The helper proceeds and copies every file into the tmp/images/ folder on your main partition.2 It also deletes any content we put in there before doing so.
Next it creates a list of all the original and backup files (with their path, name and extension). Along the way it grabs the file size and the image dimensions (← Brett Terpstra provided a script for that), counts how many images where selected and generates a markdown table with that information which we will use to generate the first part of a log file.

Prompt Helpers
Some of the macros have a prompt build in like this one:
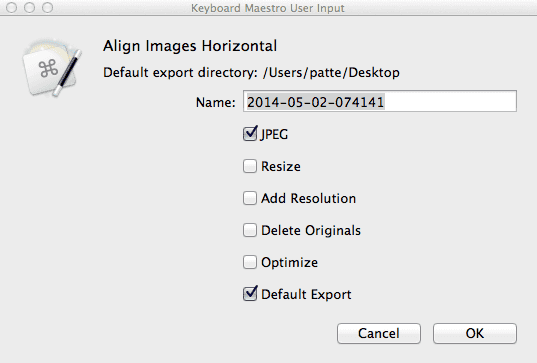
Depending on you selection corresponding helper will run or be ignored.
- Name: defaults to the current date and time
- JPEG: uncheck to render the output as PNG image
- Add resolution: appends the images dimension to the name
- Delete Originals: deletes your Finder selection after composing the image
- Optimize: lossless optimization for your images
- Default Export: defaults to what you set up in the “SETUP helper macro”, if unchecked you get prompted to choose another folder.
You can control the default state of the checkboxes by switching the position of the ones and zeros:

Images Manipulation Helpers
Inside the prompt there are also checkboxes for two of the key helpers: the resize and the optimize helper.
The resize helper always to to select a target width for your image. It’s configured to only allow shrinking. If you want to change this and can’t remember how to do it head over to part 1 of this series.

The optimization helper is one of my favorites which I use all the time. It applies all the good stuff we covered in part two and if it’s a JPEG image it will run JPEGmini on it (… again, only if your SETUP helper macro is configured correct).
Disclaimer:
If you run JPEGmini the app will open automatically and close automatically when all tasks are finished (← I borrowed the last part from Jamie Mason’s script). It’s wise not to interact with your other open windows while JPEGmini is open, otherwise the macro will loose its focus ( – you can try to quit JPEGmini manually if that happens to you).
If your PNG files are larger than 400 kb and you have several of them this script can take ages. So don’t try to run the standalone optimization script on a retina iPad screen shot without resizing it first or converting it to a JPEG.

Final Helpers
At the end of the macro, before your manipulated files will land in your chosen folder these helpers will run (depending if you checked them in the prompt dialog).
Delete Originals: this will remove your Finder selection. I find it practical for files which you just want to share quickly and not want to keep.
Build Report Log creates the second part of the markdown table, this time with the resized images. Afterwards both parts get merged into one table and then via Display Report Log get displayed via QuickLook:
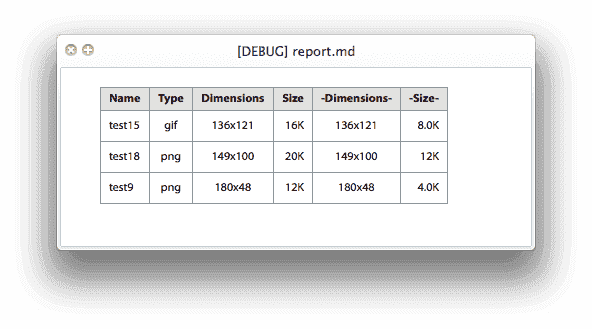
For the Markdown table to be displayed in this readable manner you have to have a QuickLook generator file for Markdown installed. If you don’t already got one, head over to Phil Tolands GitHub page for QLMarkdown, he has the download and instructions to get you going.
Clean-up all variables will reset all our used variables (i.e. delete them so they don’t clutter up your variables library).
Optimization
I decided to start with this macro (despite it being the last in the palette) because it makes got use of the helpers. Basically it just triggers them and does nothing more.
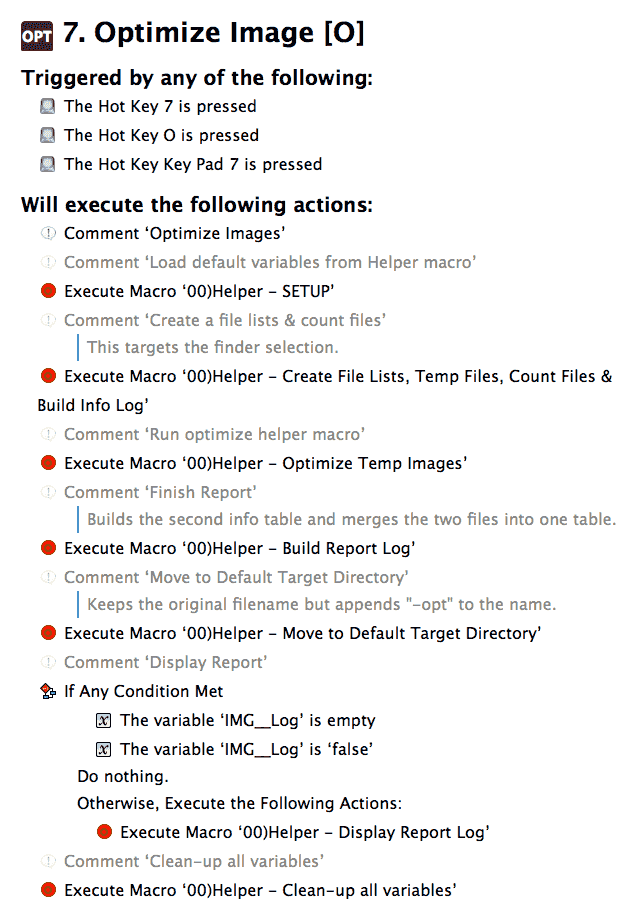
As you can see in the screen shot, there is no prompt to check if the log should get displayed or not. So, if you want/don’t want a log you can (a) set up a prompt to ask you every time (take a look at the other prompts I used to get an idea of how to pull this off) or (b) add another variable to the SETUP helper macro.
Toggling The Image Format Between JPG And PNG
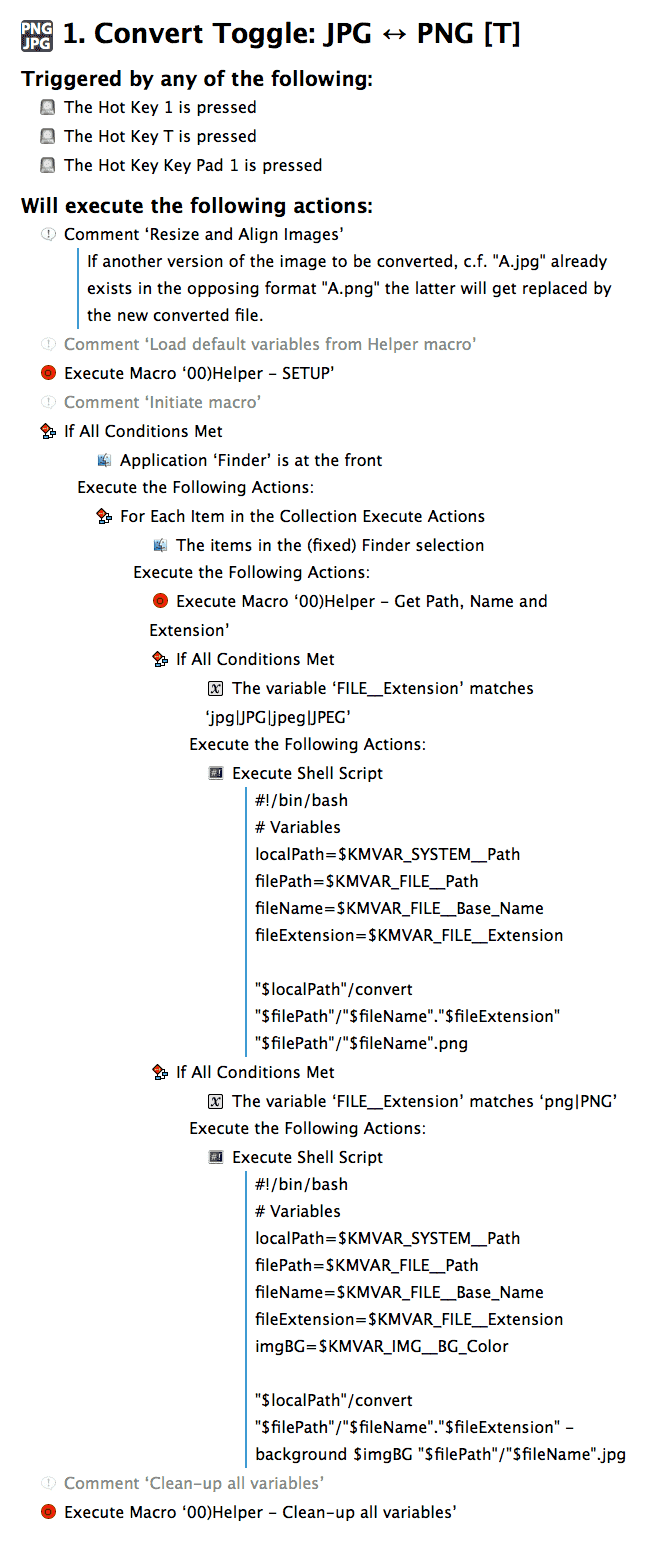
This macro is fairly simple. It just converts image(s) you have selected in the Finder – JPG’s to PNG’s and vice versa. It’s also the only macro which can act destructive if you apply it several times (e.g. converting img1.png to img1.jpg and back to img1.png again).
Resizing Images
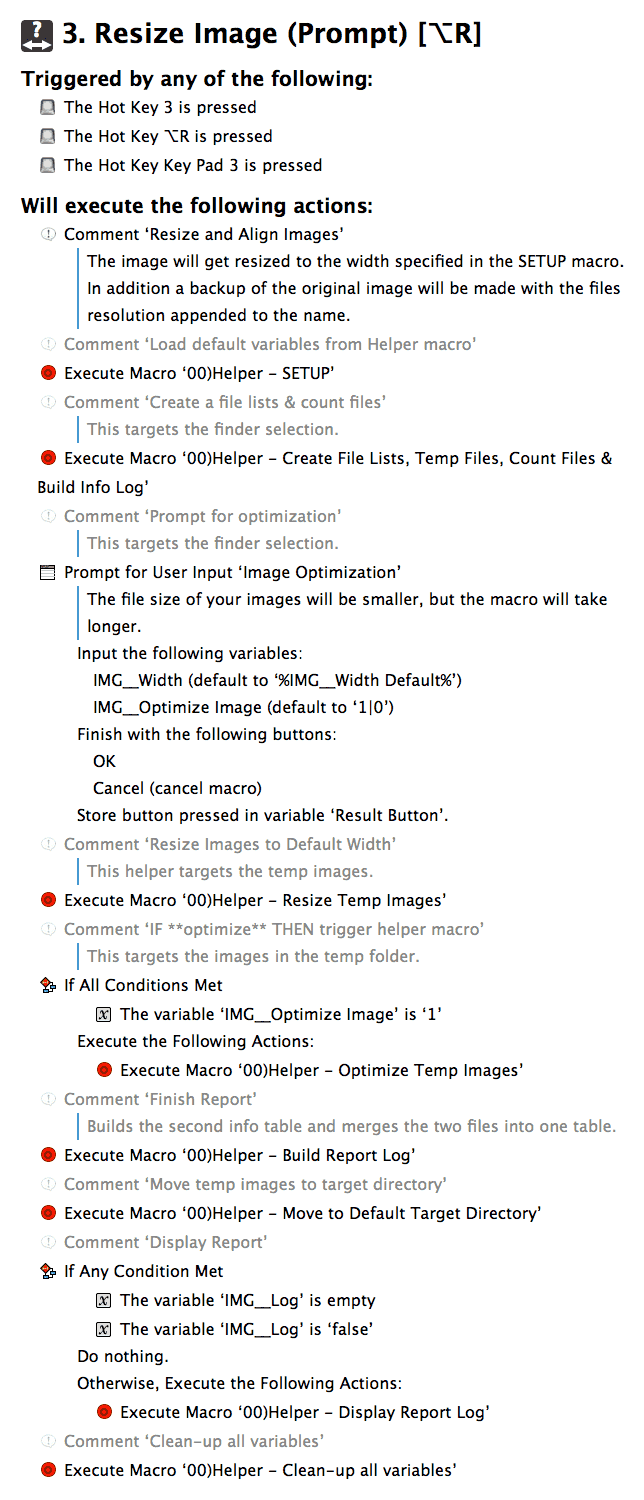
I got two versions of this macro. The one I frequently use is set to a fixed width of 640 px. The other one is not an aim & fire macro which runs on auto-pilot, but prompts you to enter a custom size.
You can see in the screen shot that it almost solely runs the helper macros:
Aligning Images Vertical Or Horizontal
In contrast to my Hazel folders for doing almost the same thing, these macros got some more options. You can choose between two output formats (JPG and PNG), pick a custom name, decide if you want to append the resulting images dimensions to append to the name and lastly, if you want to delete the original files.
My needs are not always the same, sometimes I just need to generate a simple collage and throw away the used images, another time I want to prepare the image a tad more.
This macro works best with images that are ruffly the same size, but even a mixed bag will work.
Example Output – Horizontal Align:

I had this setup some time ago, but preparing this macro for a wider user base involved some thinking… which I didn’t do in the first place since I thought that this would be a rather quickly published post. I ended up writing and deleted macros. At last I remembered what the smart people do. I went back to the planning phase. After a Scapple session I settled for the modular approach and plan to extend the existing macros by adding on to this series later.
Here’s my Scapple mind-map…

… and here’s the resulting macro for horizontally aligning images:

The macro tries to be smart and keep the padding the same size no matter what images your throw at it. Images get resized first then ImageMagick’s append option kicks in.
Mosaic Tile Images
This is my favorite of the whole bunch… because it I like mosaic tiles and this macro also takes the guess work out of thinking which grid I should go with. So, if I selected 6 images it will suggest a 2x3 grid to me.
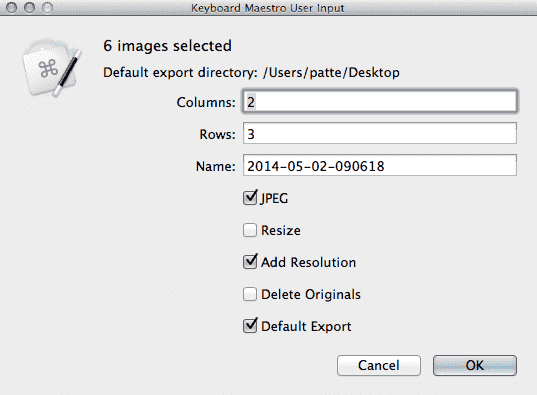
Of course changing values is still an option. Here I choose a 3x2 grid instead.
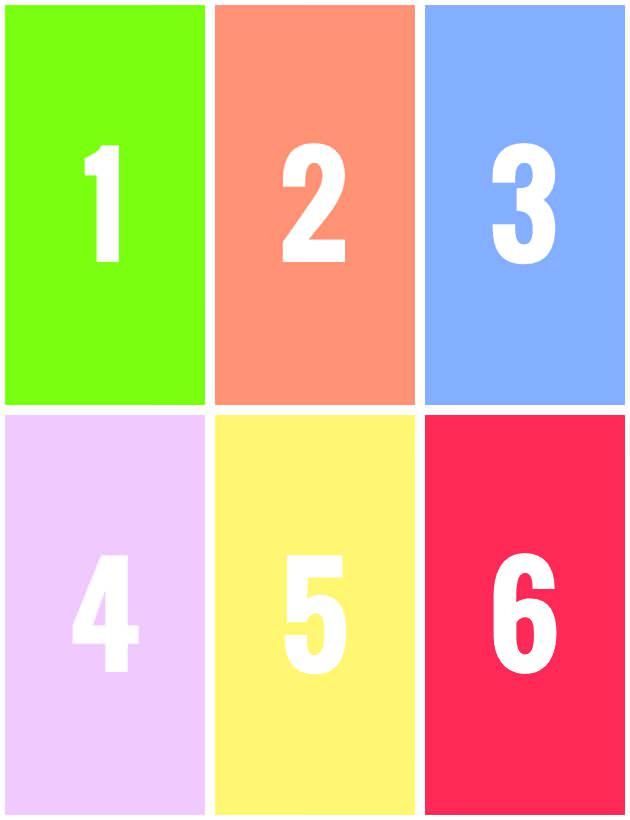
The sad part is that I’m not the sharpest crayon when it comes to math… so I put in the default values for grids with up to 21 images by hand. At least this way I made sure I like the suggestions.
As usual, the comments in the macro are more descriptive:
