Taking Screen Shots And Automating Image Manipulation
In this post I’m going to describe my setup from taking the first screen shots, choosing the right tool for a particular task, whether it be a temporary snap shot, a picture for your photo album or an image intended to end up on a website. The focus here is (a) on creating a Keyboard Maestro palette with all the things one needs for capturing screen shots and (b) on optimizing images for the web with Hazel to make life easier when dealing with repetitive image actions.
Update 08/03/13: Added ImageAlpha and Monosnap. Fine-tuned outline by adding numbers in the post, too.
Outline
1. Getting Screen Shots Done
There are a variety of applications which are specialists when it comes to dealing with screen shots. In this section I will outline what utilities I use more or less frequently. For a larger list of applications you can browse to the end of this article where I list some candidates that could enhance your workflow.
1.1 The System Defaults
| COMMAND | SHORTCUT |
|---|---|
| Save picture of screen as a file | ⇧⌘3 |
| Copy picture of screen to the clipboard | ^⇧⌘3 |
| Save picture of selected area as a file | ⇧⌘4 |
| Copy picture of selected area to the clipboard | ^⇧⌘4 |
The table above lists the actions that ship out of the box with Mac OS X. The can be found and customized in the Keyboard Preference Pane of the System Preferences. In the Screen Shots section you can change the shortcuts or completely disable them.
I only kept “Save picture of selected area as a file” and unchecked all others. Most times a quick snap shot via ⇧⌘4 is all I need.
1.1.1 Grab
Another system default applications is Grab. You can find it in the Applications/Utilities folder. It integrates all the functions of the system wide shortcuts in a minimal interface plus you can set a screen shot timer with it.
1.1.2 Terminal
We will take advantage of the command line later when setting up a Keyboard Maestro palette for screen shots. For now, if you interested in all the glory the shell has to offer, open up the Terminal.app (also located in the Utilities folder) and type screencapture -h or visit man screencapture.
1.1.3 Tweak The Default Settings
You Can Change the default settings for screen shots in Terminal.
1.1.3.1 Disable Shadows when taking screen shots from windows:
defaults write com.apple.screencapture disable-shadow -bool true; killall SystemUIServer
To revert this set the Boolean value to false (instead of true).
1.1.3.2 Choosing the default output format
defaults write com.apple.screencapture type bmp
After that enter in killall SystemUIServer again for changes to take effect or log out and back in again. Setting your screen shots to render as Bitmaps (like in the example above) is possibly the worst choice you can make. Stay away from Bitmaps. Here are all your options: jpg, png, gif, tif, tiff, bmp, psd, gif, sgi or tga.
1.1.3.3 Changing the location where screen shots get saved to
defaults write com.apple.screencapture location Drag-and-Drop-Your-Folder-Right-Here-From-Finder
Don’t forget to seal the deal with killall SystemUIServer.
1.2 Sharpshooter
Sharpshooter is the bottom layer for nearly all of my screen shots, so to speak. After performing one of the standard OS X screen shot actions, c.f. ⇧⌘4 it presents you with a menu where you can…
- move files to a specific folder
- rename files, c.g. appending the image dimensions
- open the screen shots in a specific app
- change the file type
- trash the screen shot immediately

All these options can be set in the preferences as a default action. You can also disable the pop up window completely. But honestly, if you purchased Sharpshooter that pop up is exactly what you want since it comes with some extra benefits, for instance: in the preferences there is an option that allows Sharpshooter to remember the last settings. This is particularly useful when gathering screen shots to a certain topic.
Let’s say you just doing some research and don’t want to clutter up your Desktop. After the first shot you save the file to a Dropbox folder and change the file format to JPG to save some space. Continue snapping screen shots and they all get filed away in the same folder. I absolutely dig this feature. My default location is the desktop and switching back is as easy as pressing the default system wide shortcut ⇧⌘D before saving.
Another great feature is the favorites section where you can define locations for quick access just like in DefaultFolderX.

1.3 Keyboard Maestro
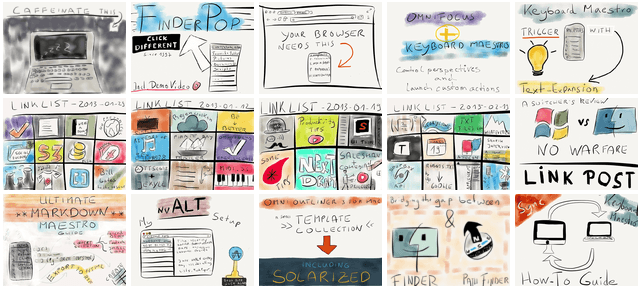
As with text editors when doing screen shots I like to have a variety of options to choose from. Keyboard Maestro offers a convenient way of providing one with a custom tailored arsenal of capturing methods that would make every paparazzo jealous. Currently I have several apps installed that help me with screen shots. The latest addition to the group is Voila – I fallen for it since I first read about it here at Gabe Weatherheads blog. To illustrate what Voila has done for me let us take a quick glance at my screen shot palette:

Before I was using Voila I still kept LittleSnapper around. I decided for me that I like the feature set of Voila better, so LittleSnapper had to go. Thanks to Voila I also removed the selfmade screencapture timer macro and the Paparazzi bookmarklet for snapping a website… and since I was on a roll I also removed the shell command for making a screencapture of the whole window.
Note: The LittleSnapper macro and the Paparazzi macro are also in the macro set which is available on GitHub. If you currently don’t have a solution for snapping websites, here’s the bookmarklet for Paparazzi (I couldn’t find it on their website so I just add it here): javascript:location.href='paparazzi:'+location.href
1.3.1 Voila
Voila is behind number 2, 5, 6 and 7 in this palette. The macros are super simple to setup. Just reassign the hot keys in Voila’s settings to some crazy shortcut you won’t trigger by accident. By doing this you’ll save some nice hot keys like ⇧⌘1 for something more important. Voila assigns its hot keys globally by default, you can uncheck that too in the settings. When you’re done head over to Keyboard Maestro and match the shortcuts of Voila to the according “Type Keystroke” action in Keyboard Maestro. Here’s an example:

Bonus Tip: If you like to save websites to images via a bookmarklet take a look at iWeb2Shot. The bookmarklet has its limits but it works well enough. To get up to speed with assigning hot keys to bookmarklets read my article on how to make your browser and Keyboard Maestro work hand in hand.
1.3.2 “1. Screencapture selection to clipboard”
I like to keep this one around for quickly pasting images in emails or photoshop mockups.
It’s a simple shell script: screencapture -ic1
1.3.3 “3. ScreenFloat: snap area”
ScreenFloat is one of the applications that I use all the time. It’s tremendously useful to have a borderless snapshot floating on the desktop and personally I find many use-cases for it. It’s one of the apps that you simple have to try to see if you like it. Just give the 15 day trial on the website a go to see if it’s something for you.
The macro works just like the Voila ones (it’s a shortcut).
Bonus Tip: to get ScreenFloat-like floating screen shots in Voila, Little Snapper and even the Finder you can use Apple’s Quick Look Droplet2. For Finder items create a macro with the “Open Finder Selection in” action and assign the Quick Look Droplet to it. In the other apps you can set the open with or export to the droplet (and of course… assign a shortcut to it with Keyboard Maestro).
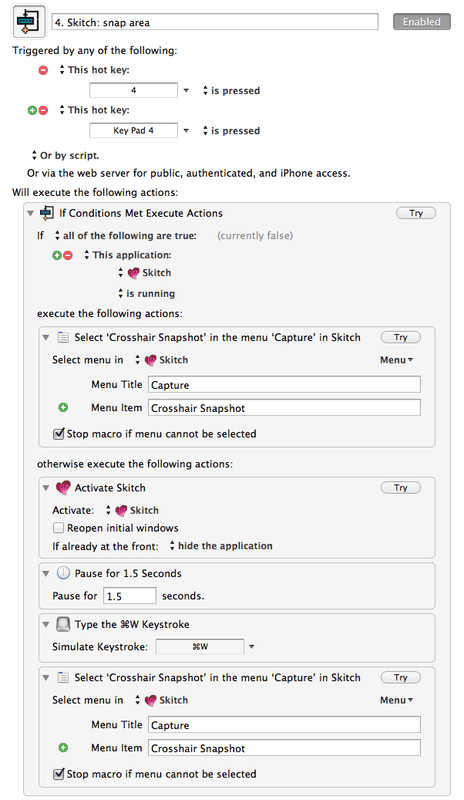
1.3.4 “4. Skitch: snap area”
Skitch is useful for quick and nice looking annotations. It’s one of this tools that just get’s the job done in the right way.
1.3.5 “8. Screencapture selection to CloudApp”
CloudApp is my web application of choice when it comes to sharing the small things like random texts, links and images with friends.
The macro is just a shell script for putting the selection in the clipboard (screencapture -ic) followed by a “Type Keystroke” action which triggers the CloudApp shortcut to upload whatever is in your clipboard.
There’s also a CloudApp CLI. I hadn’t had the time yet to tinker with it since I mentioned it in one of my link posts. Setting up the CLI and maestroing away with it would make a nice flexible macro.
1.3.6 “9. Record Video”
A simple macro which opens ScreenFlow if it’s not already open and starts a screen recording using the default ScreenFlow shortcut:
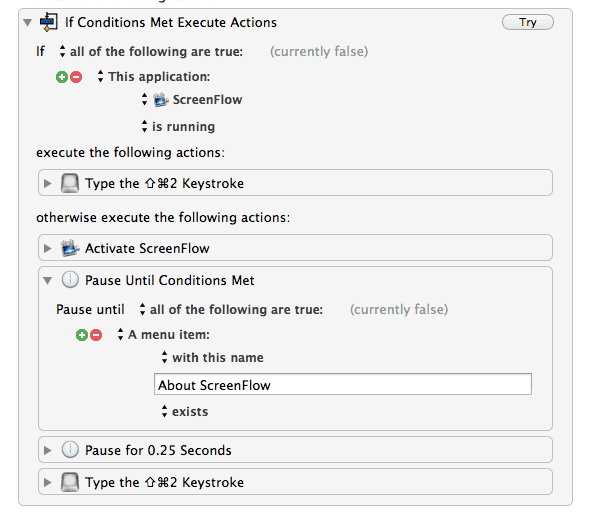
Simply put: nothing beats screencasts when explaining something on the Mac to none tech-savvy friends. Good to have a shortcut at hand for this.
2. Optimizing And Modifying Images
There are two things that I usually do before uploading images to the internet: resizing them and optimizing their file size. This section consists of two parts. The first part deals with getting the smallest size possible out of PNG’s and JPEG’s. In the last part we see how we can resize, align and tile images.
My approach to changing images is to create drop zones for different actions. These drop zones are simple folders, which is why Hazel is the perfect candidate for the job. I have to admit there’s nothing new to the idea. Folder actions have been around for a long time and there is a plethora of articles in the internet describing how to setup useful rules like resizing pictures with Automator.
So, what is this about? In a nutshell, the Hazel folders you are going to setup are wrappers for scripts. I have a “Actions” folder in my Dropbox, inside it is my images folder:

I think a operating system is all about having versatility. Being able to send files to a folder instead of triggering file actions via Keyboard Maestro, FastScripts, Alfred or LaunchBar. It’s like having a Keyboard Maestro palette that is always open and which doesn’t require anymore interaction. Of course it’s up to you to use one of the said applications to move the files to the folders in the first place.
For me folders actions have a big advantage which justifies to keep them around and use them in spite of the versatility of scripts and macros which are so easily accessible with other apps. This advantage is: folders are deeply integrated in the whole system and often there is no difference in speed whether one uses a Alfred or LaunchBar to trigger a script or moves a bunch of files into a folder. After all files often get selected with the mouse and a drag and drop operation is the next best thing to do when files are already selected.
It’s no wonder running rules on folders is so popular. Folders can be placed in many places in the system:
- the Finder toolbar

- the Finder sidebar
- in open and save dialogs when you use DefaultFolderX
- in contextual menu’s via FinderPop
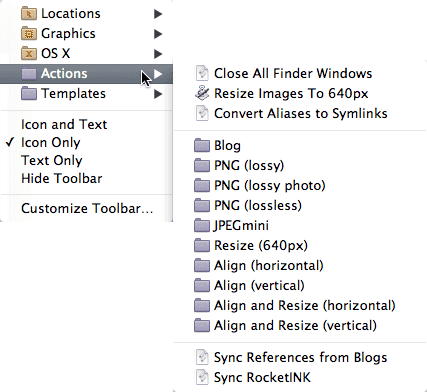
- in Dropzone so that they are always short in reach
- (and) everywhere you want them to be when you use Aliases ;)
2.1 PNG Heaven With Hazel And A Homemade ImageOptim
Portable Network Graphics (PNG) are my favorits since the allow lossless compression. Unfortunately most PNG images are quite big in comparison to JPEG’s. We all know that in the web, when it comes to images less is more… at least when speaking about the actual size of images. A good deal of my readers visits this site from a mobile device3 and what I want is to deliver them a fast loading site.
2.1.1 Lossless Compression
The best way to compress PNG’s lossless is ImageOptim. Until now I have used the GUI application for the Mac on almost every PNG I uploaded for a website.4 When the settings are amped to the maximum it performs a really good job, especially when feeding it with pictures that have only a few colors in it, like screen shots.
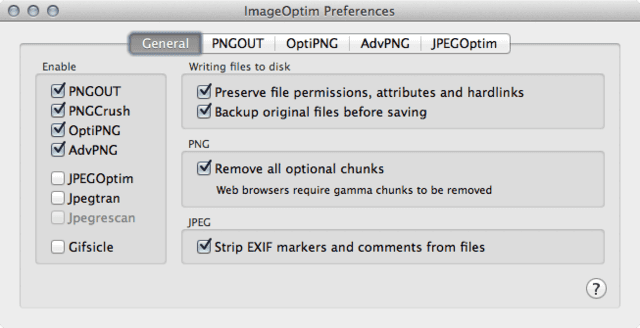
The sad part is that there is no official CLI version and using open -a ImageOptim.app only opens up the GUI app. Fortunately there is a ruby gem on GitHub which is basically a CLI wrapper for ImageOptim. I installed it and it works splendid in Terminal, but I couldn’t get it to work within Hazel. That’s when it dawned on me… ImageOptim does one thing. It runs several optimizers one after another:
All you need to do to have the power of the application accessible in the shell is to head over to the websites, download the binaries and put them in your /usr/local/bin.5
Update: by the time this article is written there was another GitHub release with a similar wrapper. Jamie Mason’s script provides all the executables that you’d otherwise have to download. This one might work out of the box with Hazel. I’ll have to give it a try. Back to the topic.
If you copied my folder structure from above your rule should look like this:
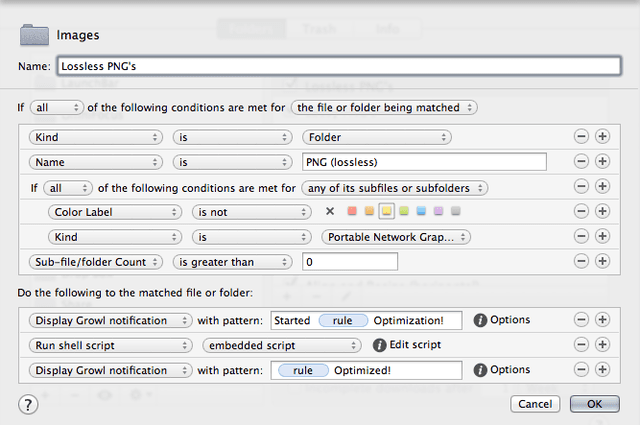
By default the embedded script makes a copy of the originals in the “_Backup” folder and puts the compressed images on your Desktop:
# Change the destination and backup folder to your liking and leave the rest untouched.
destination=~/Desktop
backup=_Backup
bin=/usr/local/bin
path=`dirname "$1"/sub_dir`
cp "$path"/* "$backup";
for i in "$path"/*.png; do ${bin}/pngcrush -reduce -brute -l9 -e "$i" "${i%.png}-crushed.png" && mv "${i%.png}-crushed.png" "$i" ; done;
for i in "$path"/*.png; do ${bin}/pngout "$i" "${i%.png}-out.png" && mv "${i%.png}-out.png" "$i" ; done;
for i in "$path/"*.png; do ${bin}/optipng -o7 "$i"; done;
for i in "$path/"*.png; do ${bin}/advpng -z -4 "$i"; done;
for i in "$path/"*.png; do mv "$i" "$destination"/; done
Hazel will check if the “PNG (lossless)” folder has any PNG files in it and will run the script if there is at least one PNG.
Optional:
- The nested condition is optional - if you want to you can remove it. The “kind is PNG” makes sure that the rule doesn’t fire up if you accidentally put a JPG in the folder.
- Same goes for the two growl notifications. Since compressing can be a time-consuming matter, c.f. when you pass several photos with many details to the script, I like to be notified when the compression starts and when it has finished.
- If you don’t want to use a specific destination folder you can delete the first and last line in the embedded script and leave the “color is not yellow” condition where it is. To keep the rule from processing the files again add this AppleScript as “Run AppleScript” after the “Run shell script”:
    tell application "Finder"
	    set thePath to theFile as string
	    try
		    set label index of entire contents of folder thePath to item 3 of {1, 2, 3, 4, 5, 6, 7}
		    -- 1. orange, 2. red, 3. yellow, 4. blue, 5. purple, 6. green, 7. gray, 0. none
	    end try
    end tell
This will mark all processed files yellow and therefore they won’t be compressed again.
2.1.1.1 Remove Backups with “Run rules on folder content”
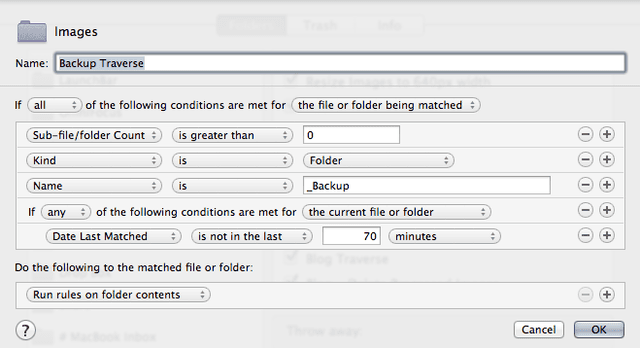
As an alternative, instead of sending the script to take action on the folder content, you could also use Hazel’s “Run rules on folder contents”. An example for this would be the Backup rules wich we use to clean up the “_Backup” folder.
When using “Run rules on folder contents” it is crucial to tell Hazel which folder it should apply the rule to. Here we are limiting this rule run only on the “_Backup” folder. To keep it from running all the time we add a nested condition with a “Date Last Matched” condition to check the folder roughly every hour (with a small 10 minutes overhead in case Hazel is too busy at the moment):
After 70 minutes every new file gets a red label applied to it. Since we are dealing with folder content rules I like to double check that we are in the correct folder, so I add a nested condition that the enclosing folder is indeed the “_Backups” folder:
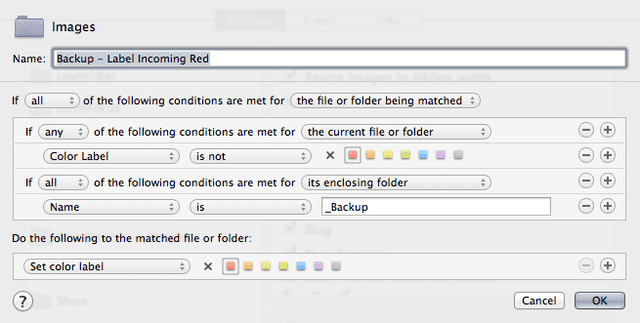
In the last step we tell Hazel to remove all files with a red label after one hour. Again, only if the enclosing folder matches our condition. Note, if you slowly populate the “_Backup” folder you will get a kind of stop and go behavior - some files will get marked red, while older ones will get deleted. Then there will be silence for another 70 minutes. This behavior might seem a bit odd at the first glance but it’s just a basic safety net to keep Hazel from deleting all files at once when new backups join the older ones:

2.1.2 Lossy PNG’s
At first I was bit sceptic if I wanted to go lossy, but after stumbled upon the web application TinyPNG and tested it thoroughly with a couple of images I was sure that this is the way to go for my uploads. The next step was finding a command line alternative to it. As it turns out, the web app runs on pngquant and that is exactly what we will run before all the other executables. Just like before you have to download the binary and put it in /usr/local/bin.
Now the chain of scripts looks like this:
Put this command before pngcrush in the script lossless script from above:
for i in "$path/"*.png; do ${bin}/pngquant --quality=65-80 --ext .png --force "$i"; done;
Note: For GUI lovers there’s ImageAlpha for Mac which, besides employing the latest pngquant, also offers pngnq-s9 and the alpha-channel-aware posterizer. Posterizer works good on feature-rich PNG’s.
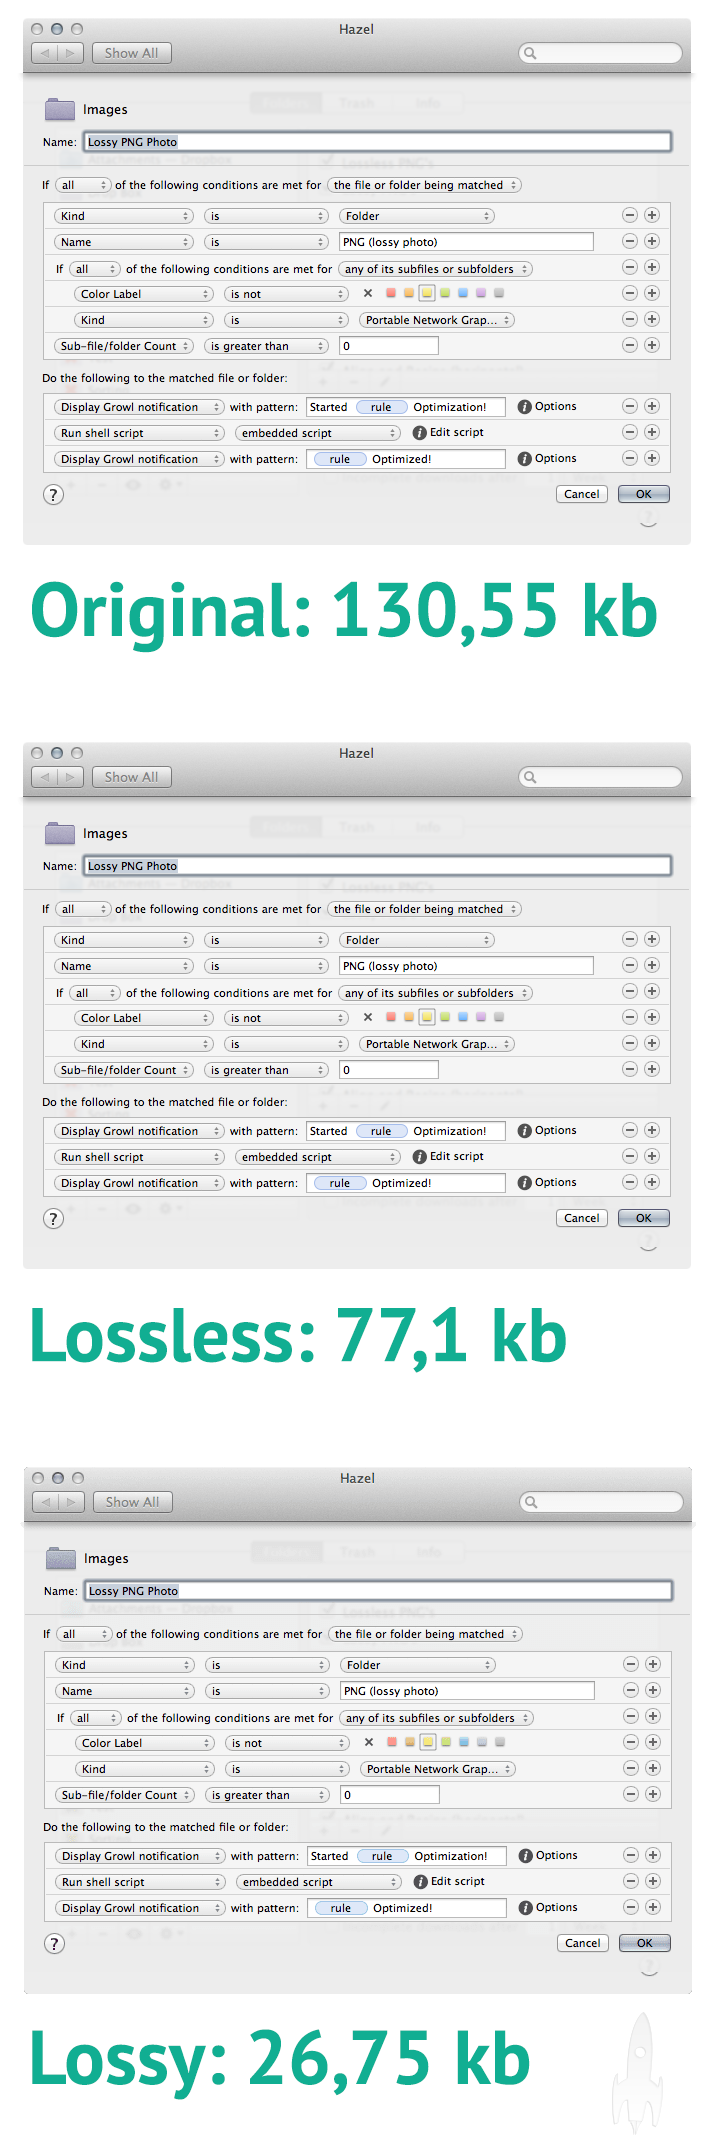
2.1.3 Speaking of weight loss
Here’s a comparison I did with the different PNG compression modes which are setup working for the Hazel action folders.
| Original | Lossless | Lossy |
|---|---|---|
| 130.55 kb | 77.1 kb | 26.74 kb |
External Link (0.3 MB): Comparison 1 - screen shots
| Original | Lossless | Lossy v1 | Lossy v2 |
|---|---|---|---|
| 2062.56 kb | 1071.28 kb | 420.17 kb | 350.74 kb |
External Link (4 MB): Comparison 2 - Pixar’s Dug
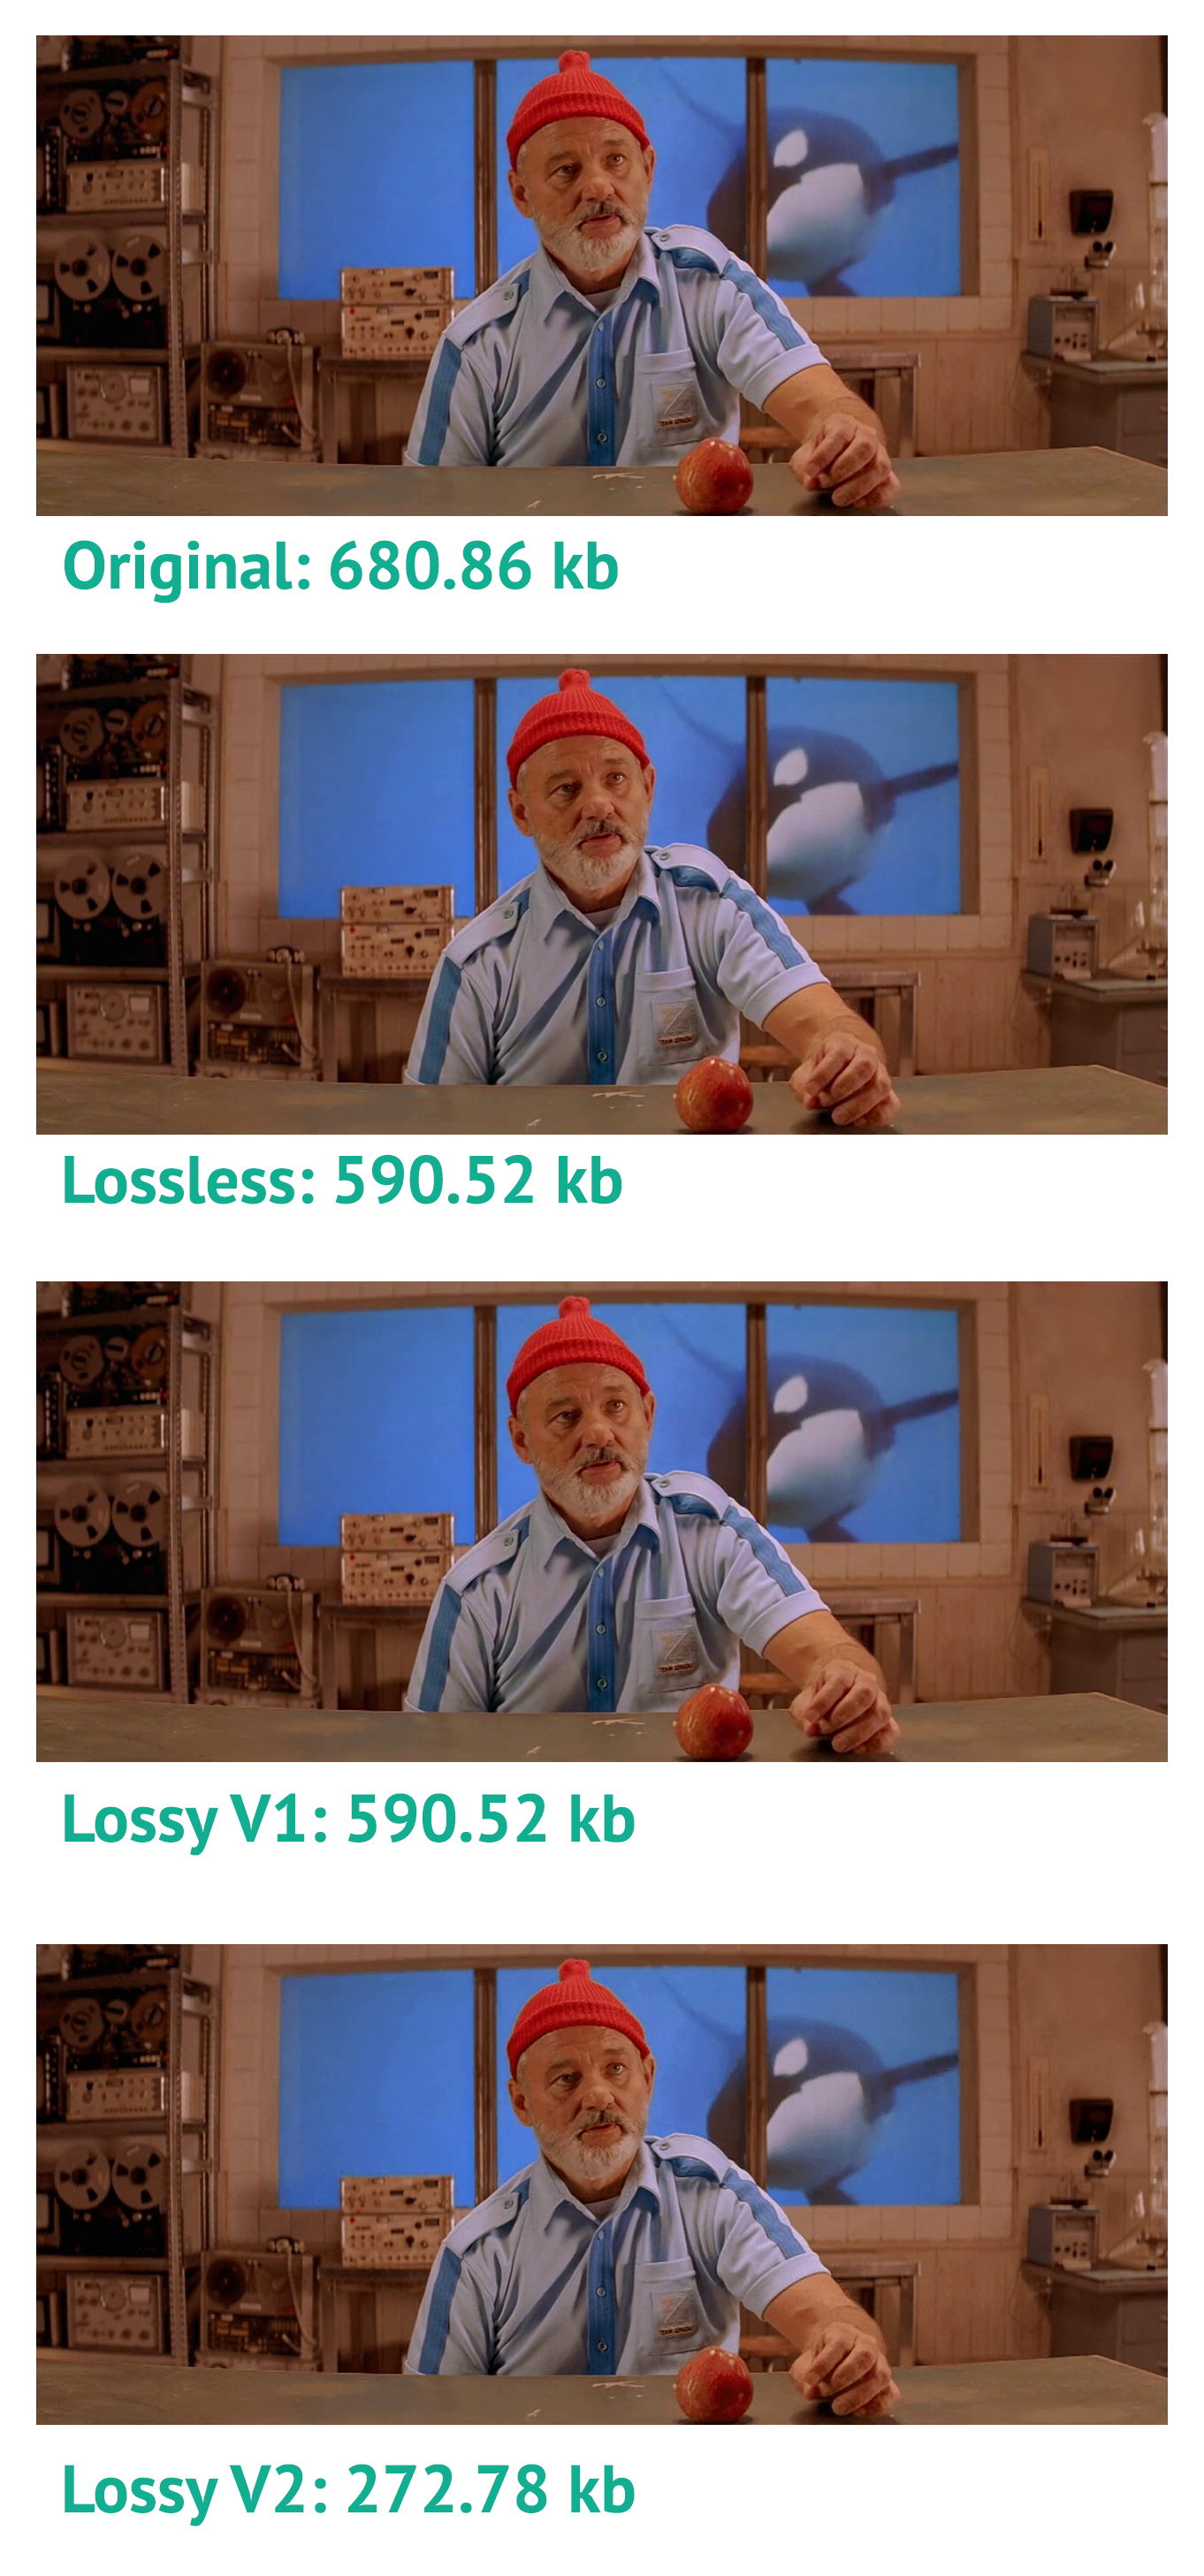
| Original | Lossless | Lossy v1 | Lossy v2 |
|---|---|---|---|
| 680.86 kb | 590.52 kb | 590.52 kb | 272.78 kb |
External Link (2.6 MB): Comparison 3 - That Other Steve
- Lossy v1 settings:
pngquant --quality=85-90(adjusted my default setting so that photos look okay) - Lossy v2 settings:
pngquant --quality=65-80(my default setting, good enough for screen shots, not sufficient for most high detail photos)
Using slightly stronger compression settings can end up pretty bad (see comparison 2) or you can get lucky and end up with an completely acceptable image (see comparison 3).
Still, the bottom line is if you are dealing with images of a photographic nature then JPEG’s are the way to go.
If you want even more compression or more options then take a look at this overview and see what tools are available to add to the already long chain of binaries.
2.2 JPEG - undisputed king for feature rich photos
On my journey to finding the best compression tools available I’ve searched for a true alternative to my momentary favorite: JPEGmini.
JPEGmini is absolutely the best thing since sliced bread when it comes to large photos. I swear by it and even went so far that I converted my whole Aperture library with it – “30 GB saved so far”. Admitted, I got a backup of the originals just in case I miss a few pixels some day.6
The problem is that it isn’t the best application to reduce the size of smaller files. Another thing that bothers me is that it doesn’t accept images dropped to the application icon. You have to open the app first, then it will accept any JPEG you drop on on the window.
To automate JPEGmini I have to rely on a rather ugly solution, but it gets the job done:

This is basically what I explained before but this time the rule relies on some additional GUI-scripting. It definitely has a more than a few rough edges. I will only going through the essentials:
- In the topmost screen shot the embedded AppleScript (see below) does two things: it labels the files yellow and starts the Keyboard Maestro macro.
- The Keyboard Maestro macro (i) opens JPEGmini, (ii) opens the “Open” dialog waits a little bit (you probably have to tweak this if your app opens faster or slower adjust the value), (iii) pastes in the path to the
~/Dropbox/Actions/Images/JPEGmini(change it to your own path) and confirms the action. -
tell application "Finder" set thePath to theFile as string try set label index of entire contents of folder thePath to item 3 of {1, 2, 3, 4, 5, 6, 7} -- 1. orange, 2. red, 3. yellow, 4. blue, 5. purple, 6. green, 7. gray, 0. none end try end tell -- ignoring application responses tell application "Keyboard Maestro Engine" do script "Hazel to JPEGmini" end tell -- end ignoring - I only started automation JPEGmini because I wanted some blog images to get processed by it. That’s why I set the time for the “Run rules on folder contents” rule to kick in to only 1 minute which is enough for a few images (… and a terrible long time to wait).
- The last step is to move the processed files (the ones with a yellow label) to the desktop and quitting JPEGmini with this AppleScript snippet:
tell application "JPEGmini Lite" to quit
If you’re interested in the server version of JPEGmini you have to fill out this enquiry formular. Looking at the Amazon Web Services Marketplace of JPEGmini it seems their prices start at a monthly subscription fee of $19 plus the data transfer fees.
The Lite version of the app is free in the Mac App Store but limited to 20 photos a day.
For getting really small JPEG’s my recipe is doing a bit of handwork with Photoshop, optionally running JPEGmini if you downloaded it, and as a final step let it run through JpegOptim (part of ImageOptim).
At the end of the day not everybody is as convinced of JPEGmini’s qualities. Here’s a good and valid critique for you to read.
2.3 ImageMagick
Ok, you’ve made it this far, now it’s time for some cool stuff. The cool stuff goes by the name of ImageMagick and has been around for over a decade.7
Disclaimer I: if all you want is resizing your pictures you’ll probably want to skip this part and/or replace the embedded ImageMagick shell scripts in Hazel with your own Automator workflows. This is an easy and effective way to get resizing done with Hazel (and there are tons of tutorials out in the wild for Automator).
Disclaimer II: ImageMagick can be a royal pain in the lower back area - well, actually even a bit lower than that - to install. It went relatively smooth for me after reading this short gist: “Installing ImageMagick on Mountain Lion“.
If everything works in your favor you’re all set after trying one of the following commands:
«Long Pause» At this point I’m going to assume you have ImageMagick installed, and have symbolic links to the executables in your /usr/local/bin. In addition you should have understood the basic setup of the folder rules outlined above (see the lossless rule – it’s the same rule with only slight modifications, in particular the embedded script has changed).
The ImageMagick website provides an excellent documentation and there are many examples in the World Wide Web waiting for you.
All scripts start with the following variables to tell Hazel were the binary path and the path of the relevant subfolder is located in the “Actions/Images” folder. Also, were files should be saved to.
destination=~/Desktop
backup=_Backup
bin=/usr/local/bin
path=`dirname "$1"/sub_dir`
2.3.1 Resizing Images
cp "$path"/* "$backup";
for i in "$path/"*; do ${bin}/mogrify -resize 640x800\> "$i"; done;
for i in "$path/"*; do mv "$i" "$destination"/; done
Details:
- maximum width: 640px
- maximum heigh: 800px
\>makes sure that smaller images don’t get upscaledmogrifyis the same asconvertbut it keeps the original name of the source file- as before: the original file gets saved in the “_Backup” folder and the processed file is placed on your desktop
2.3.2 Aligning Images Horizontally
${bin}/convert "$path/"* -splice 20x0 -background "#ffffff" -gravity center +append -crop +20+0 "$destination"/`date '+%Y-%m-%d_(%H%M%S)'`.jpg; mv "$path"/* "$backup"
spliceputs a small padding between the images andbackgroundsets the background colorgravity centeraligns images centered+appendis the aligning part (here: horizontally)cropremoves the padding we added before from the right and left side of the resulting imagedate '+%Y-%m-%d_(%H%M%S)'.jpg= 2013-02-27_(191740).jpg (date stamp image name)
This is a similar setup like the one Federico Viticci introduced on MacStories a while ago. The benefit of ImageMagick is that you don’t need to specify any sizes and that you can use it with what all kind of images and additional options - just drop the files in the folder and you’re good to go. Tweak the look of the output until you have something that works for you.
2.3.3 Align Images Vertically
${bin}/convert "$path/"* -splice 0x20 -background "#ffffff" -gravity center -append -crop -0+20 "$destination"/`date '+%Y-%m-%d_(%H%M%S)'`.jpg; mv "$path"/* "$backup"
-appendis the aligning part (here: vertically)cropremoves the padding we added before from the top and bottom side of the resulting image
2.3.4 Aligning And Resizing Horizontally
${bin}/convert "$path/"* -splice 20x0 -background "#ffffff" -gravity center +append -crop +20+0 -resize 640\> "$destination"/`date '+%Y-%m-%d_(%H%M%S)'`.png; mv "$path"/* "$backup"
2.3.5 Aligning And Resizing Vertically
${bin}/convert "$path/"* -splice 0x20 -background "#ffffff" -gravity center -append -crop -0+20 -resize 640\> "$destination"/`date '+%Y-%m-%d_(%H%M%S)'`.png; mv "$path"/* "$backup"
2.3.6 Tiles
Tiles rock! But it here comes the part where I had to troubleshoot ImageMagick a bit. For ImageMagick’s montage to work (the one with the tiles) I needed to install “ghostscript” (the easiest way to do this is brew install ghostscript - in case you already use Homebrew) and I also had to build a font list - described here. But if I can do it with my very limited command line knowledge I’m sure that you, my dear reader, will succeed even if it is with flying colors.8
${bin}/montage "$path/"* -geometry +2+2 "$destination"/`date '+%Y-%m-%d_(%H%M%S)'`.png; mv "$path"/* "$backup"
This is the basic way a tile gets build with montage. The command can’t guess every thing right, but the snippet above should give a nice tile when the images you drop in the folder are square and have roughly the same size.
You will get the best results when you specify the grid you would like to use. Even better, the size and padding. The more details you enter, the better. The screen shot above has the following options specified (to get a picture that is 640px wide and has uses a tile grid with 5 columns and 3 rows):
montage ~/Folder-With-RocketINK-Pictures/* -tile 5x3 -geometry 124x92\>+2+2 ~/Desktop/montage_geom_larger.png
If you have a certain type of tile that you use often in your blog or somewhere else just set up a folder and, for instance to mimic a tile like the one above, specify the minimum number of files in the folder to be 15.
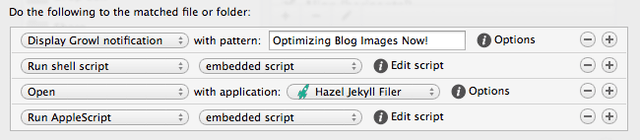
3. Putting It All Together
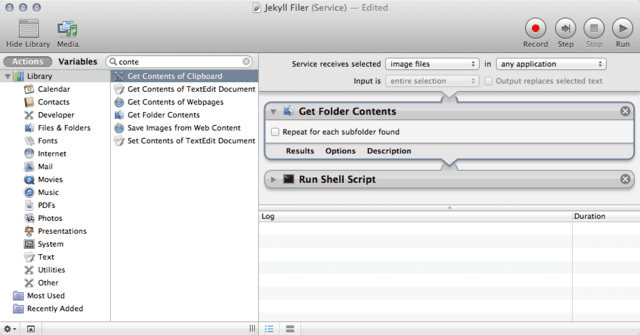
I’m running a Jekyll blog which sits in my Dropbox and get’s updated as soon as I put my files in the folder. From the beginning on my goal with this post was to make use of Brett Terpstra’s Jekyll Filer, merge it with my workflow and provide a more powerful image compression.
When I make a screen shot I save it to one of the action folders and then the auto-pilot takes over for me:
- Run ImageMagick (“mogrify” to shrink larger images)
- Run pngquant (lossy conversion)
- Run pngcrush
- Run pngout
- Run optipng
- Run advpng
- Run Jekyll-Filer
Boom. Thank again Mr. Terpstra.9 All my Markdown image links are in my clipboard and if it’s the occasional JPEG, Brett’s filer takes care of it by running JpegOptim on it.
You can tweak the lossless or lossy rules to work with his Jekyll Filer:
All you have to do is open Brett’s workflow in Automator, duplicate the file, add a “Get Folder Contents” action at the top and export it as an application or another workflow:

4. Link List For Screen Shot Applications And Helpers
- Slingshot
- Uploads your screen shots directly to Cloud Services such as Dropbox and puts a link in your clipboard. $2.99 in the Mac App Store.
- GrabBox
- GrabBox is a free app that does the same thing Slingshot does with one limitation: it only supports Dropbox.
- Skitch
- If your a Evernote user you will love the integration with their service. If you knew Skitch from before the Evernote acquisition you might miss some cool features like saving a web url. It’s still a cool app and sharing Skitch images is a breeze when you link the Skitch library with your Evernote account.
- MonoSnap
- The only Skitch alternative so far which has solid annotation featrues and a lot of export features like SFTP, WebDAV, Amazon S3, Evernote, Dropbox, Box.com. CloudApp. The app is free if you need the export functions you have to pay $2.99 per IAP to unlock the external services.
- ScreenFloat
- Creates a borderless snapshot that floats on your desktop. $5.99 on the Mac App Store
- Voila
- Read this, check if you can space are $29.99, head to the MAS. #nuffsaid
- LittleSnapper
- For $39.99 you get an all-round screenshot manager.
- SnappyApp
- Nice little tool for taking snap shots and sending them to Pinterest, Facebook or your Email client. It’s available for free.
- Framator
- If you often taken screen shots with predefined sizes this $2.99 helper waits for you in the Mac App Store.
- ScreenshotMenu
- If you are a die-hard menubar fan and only need what OS X already provides then this app is for you. All it does is adding a menubar icon from which you can choose to make a snapshot of the window or an area and save it as a file or to the clipboard.
- Screenshot Helper
- Oldie but Goldie. Now also available in the Mac App Store for free. It gives you a blank canvas for your screenshots (or any image you choose).10 If you like the idea you might also want to check out Shades or Isolator. Want more bells and whistles? Take a look at Desktop Curtain or Camouflage
- ImageOptim
- My favorite tool for reducing the size of PNG’s.
- ImageAlpha
- It’s the lossy GUI companion to ImageOptim. If you’re going for the smallest size, run your PNG’s through ImageAlpha before squeezing the last bit out of them with ImageOptim.
- JPEGmini
- My favorite tool for reducing the size of large JPG’s.
- Pixa
- Pixa is technically not a screen shot helper. But it can handle all kinds of images and organize them. If you don’t use Voila, LittleSnapper, ScreenFloat, Aperture or Lightroom to manage your images then Pixa might convert you. If you are willing to pay $24.99 you get a rock-solid image organizer. It’s fantastic. If you have a large collection of stock images, designs, vectors, photoshop files I highly recommend checkin it out.
-
If you wonder why I used shell commands in the first place instead of the build in Keyboard Maestro screen shot actions, it’s because by using c.f.
screencapture -iwofor taking a window snap I can bypass Sharpshooter, which is sometimes just what I want to do. ↩ -
I had quite the hard time finding the new download link. Formerly the app was on Apple’s main site, but after OS X 10.5 they started moving things to the Mac OS X Automation site which has a “THIS WEBSITE IS NOT HOSTED BY APPLE, INC.” in all caps as sub header ٩(͡๏̯͡๏)۶. ↩
-
Dear smartphone users, I’m truly sorry that I haven’t had the time yet to figure out why clicking the comments button doesn’t work on an iPhone yet. Be assured, it is on my to-do list. ↩
-
I even let it run through all the PNG’s in my graphic design folders on Dropbox. Backup at hand, just in case. ↩
-
This is the fool-proof method. After downloading press
⇧⌘Gin the Finder and paste in/usr/local/bin. If you’re already a shell ninja then simply install the binaries via Homebrew or MacPorts - PS: You’ll still need to get your hands dirty because advpng isn’t available there. ↩ -
I’m not going to put all my eggs in one basket. Trust has limits, especially when it comes to something personal as the own photo collection. It’s still nice to have a slightly more portable Aperture library. ↩
-
It’s more like “grand daddy cool” considering it’s long history - especially when you look at the 90s tutorials with the crazy effects that are quite heavy on the eye. ↩
-
Fingers crossed that the idiom works in English in this context. If not… then I claim that this one was intended. I call it literary freedom. ↩
-
I stopped counting how many times I thanked Brett for the stuff he put’s out. ↩