Cheaters For Keyboard Maestro Macro And Updating Cheat Sheets from nvALT

August 03, 2013

Cheaters For Keyboard Maestro Macro And Updating Cheat Sheets from nvALT → via @_patrickwelker

When learning new shortcuts for an application or when in need of taking a quick glance at reference material for a project, I often find myself plowing through nvALT. It’s my database for everything. One of my common routines is navigating back and forth, adding information in one note whilst looking at another for referential purposes. Recently I switched from Terminal to iTerm 2, in addition I wanted to amp up my shortcut game with Sublime Text. What I needed was a quick way to browse my shortcut cheat sheets. After looking for good ways to build a tool I remembered Brett Terpstra’s Cheaters and decided that it is the perfect tool for the job.

Cheaters Screen Shot

Cheaters sheets can link to images or take converted Markdown files which makes the whole thing super easy to use. If you want to know more about populating Cheaters with your references, just head over to the official site.

The big ‘but’ for me was that after heavily using it after Brett’s initial released, I started neglecting Cheaters for quite a while. This was due to 2 facts:

  1. I was to lazy to convert my Markdown notes from nvALT (definitely the place where I write and collect references) and copy them to the Cheaters directory. Plus, I need to add new notes to the file.
  2. When calling up Cheaters it always bugged me that I couldn’t press the escape key to dismiss it directly. I have to click on the window first to make it active, only then I can close it via ESC.

Pretty minor complaints, but they were enough to make me not use Brett brilliant utility. I’m glad to say, I fixed both issues thanks to Keyboard Maestro and a bit of AppleScript voodoo.

Cheaters for Keyboard Maestro

Brett recently updated Cheaters and released Cheaters for Alfred and it now supports kind of a fuzzy search thanks to some mysterious JavaScript magic:1

[…] you can type “cheat keyword” to jump straight to a specific cheat sheet. For example, “cheat jq” would jump to jQuery, and “cheat git” would jump to the Git cheat sheet, assuming you have it active. Brett Terpstra

It’s very comfortable to use and Keyboard Maestro users obviously deserve a version, too. Why do Alfred users always get the good stuff, right? So, here’s my ripp off of Brett’s version:

Cheaters for Keyboard Maestro Macro

What you need to make this work is the Cheaters KM app2 I attached below. I’m not sure if you need to open it once to get it recognized by Keyboard Maestro. Just do it one time, let it fail and you’re on the safe side. Also, don’t forget to update to the latest Cheaters version. Head over to Brett’s site now and download it.

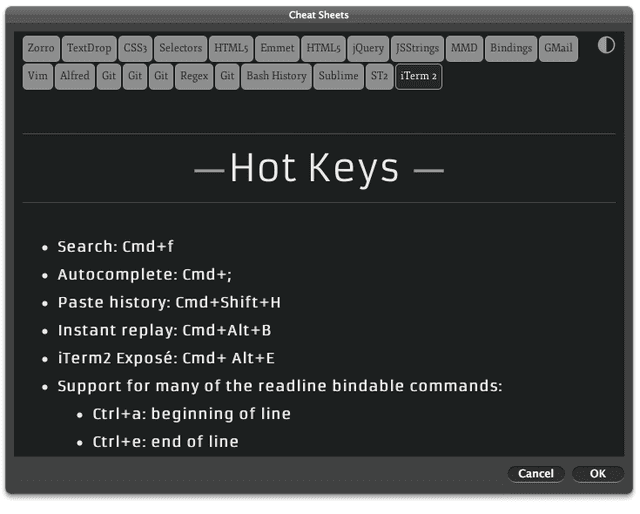
After you filled in your username and the UNIX path where Cheaters is located (e.g. /Users/pat/Dropbox/cheaters/) you can call it with a hot key and type in bin to open Brett’s Keybindings cheat sheet – just like in Alfred.

For the curious ones: getting Cheaters to directly accept an ESC all you have to do is tell Applescript to activate it, which brings its window to the front. Even if you don’t want the Keyboard Maestro version and prefer opening Cheaters the traditional way, I’d suggest to build a short AppleScript wrapper and make it open Cheaters for you this way.

DOWNLOAD

Creating and updating Cheat Sheets

Have I mentioned before that I live in nvALT. I guess so. That’s why adding to an existing reference file and updating the corresponding cheat sheet is crucial for making Cheaters work for me. Here’s the itinerary:

Update Cheaters

Update an existing Sheet

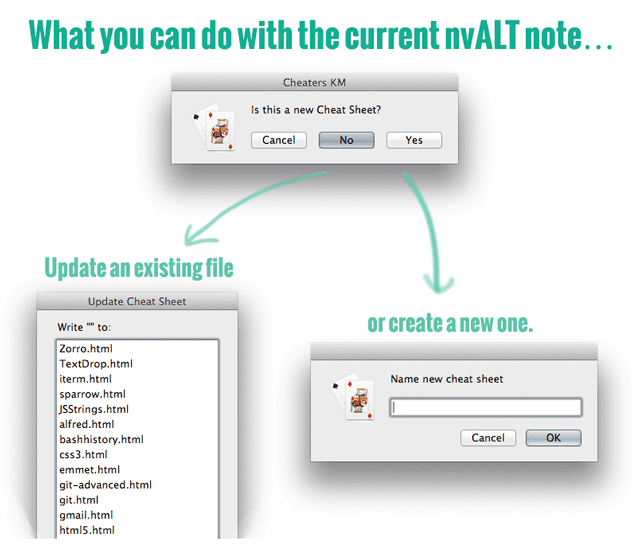
If you choose “no” and want to update an existing cheat sheet, the currently selected note in nvALT will get rendered as HTML file. A list opens up and you can choose which Cheaters file you want to replace.

For the conversion you need to have Fletcher Penny’s MultiMarkdown installed. Download it, install it and you’re good to go.

Create a new Cheat Sheet

If you decide to create a new cheat sheet you’ll get prompted for a name. Like before, your nvALT note gets converted to HTML. For your convenience a link will be placed in the clipboard and your text editor of choice will open up Cheaters index.html file. All you have to do is paste the link at the position where you want it be and you’re set.

Additional Notes

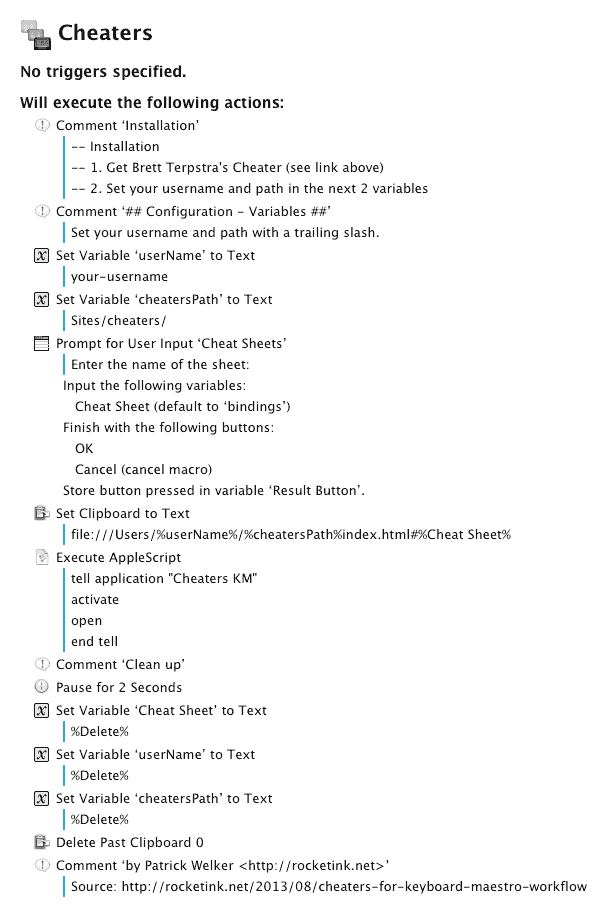
In Keyboard Maestro you need to fill in the Configuration details in the AppleScript (the path to your nvALT notes, to Cheaters, the icon, your favorite editor, …).

If you don’t like the prompt and search pop-up there’s another macro included which presents you with a list of your cheat sheets. In case you prefer this one, you’ll have to adjust the AppleScript and trim down or expand the list of sheets to your liking. It’s a more effort and another file to manage.

The last addition is the raw AppleScript. Make a service out of it with ThisService or do whatever you want with it.

Disclaimer: Needless to say, but you need to have a note selected in nvALT for this to work. Hence, this won’t work:

nvALT without a selection

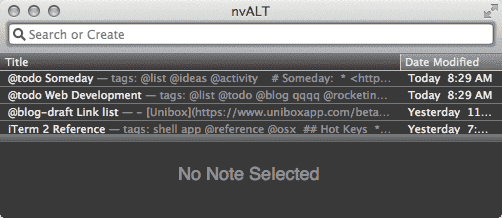
Also, I don’t take any responsibility if you accidentally overwrite one of your cheat sheets. Just make sure you have the originals in nvALT and you will be fine.

UPDATE: Avoid creating notes with spaces in the filename. Cheaters files are html files which usually don’t handle that well. I haven’t added anything to prevent you from creating them or gracefully fail if you try to do so. I also organized the content of the zip file better and added a ReadMe file in the download packs to explain briefly how to setup Cheaters KM  .

DOWNLOAD
DOWNLOAD COMPLETE PACK3

Credits

First and foremost, Mr. Terpstra himself ( – keep the legend alive and donate).

Cheaters for Keyboard Maestro uses the same icon Brett choose for Cheaters. It’s from Alessandro Rei.

Special thanks to Lauri Ranta who helped me with getting the currently selected note in nvALT.

  1. My guess is that he wrote the code with his unicorn-leprechaun hybrid gloves in a full-moon night whilst singing Led Zepplin lyrics backwards. Dunno, but it has to be something like this. Well, that’s one of the secrets of the lab.

  2. The only thing this app does is handing over the URL which Keyboard Maestro generated and set to the clipboard. Then it passed it the Automator’s website pop-up action.

  3. (1) Cheaters KM for opening it and getting prompted which sheet to open and (2) the create new or modify old Keyboard Maestro + AppleScript macro. Also, (3) the original AppleScript and a list version of the create/modify macro.

My Podcast Player For Mac Is Called Airfoil

August 03, 2013

My Podcast Player For Mac Is Called Airfoil → via @_patrickwelker

The recent release of native Mac versions of the popular iOS Podcast apps Instacast and Downcast reminded me of how excellent one little Mac gem is: Airfoil.

Airfoil for Mac

Airfoil can send whatever you’re playing on your Mac to your iPhone, iPad or basically every gadget that comes with AirPlay support.

In the mid-July the released the official Airfoil Remote for iOS with which you can control Airfoil for Mac without being right in front of your Mac.

Airfoil Remote also controls many audio sources playing through Airfoil. Pause your music in Spotify, skip tracks in Rdio, or see album artwork from Last.fm. With Airfoil and Airfoil Remote, full control is in the palm of your hand. Get Airfoil Remote in the iOS App Store!

Rogue Amoeba: http://rogueamoeba.com/airfoil/remote/

Rogue Amoeba acquired Reemote for Airfoil with the result that Airfoil users now don’t need a separate server app running in the background anymore and can enjoy the complete Airfoil Suite served from one developer team.

By now you maybe wonder what sending audio from the Mac has to do with a really good podcast player. To be honest, Airfoil for Mac is only the padding, the real star for me is Airfoil Speakers, which you get for free when you buy an Airfoil license.

Airfoil Speakers

With Airfoil Speakers you can turn your Mac into an AirPlay receiver, making it the ideal companion for playing podcasts on your iPhone whilst listening to them on your Mac. When I come home and sit down in front of my Mac all I have to do is select my Mac in the AirPlay menu on my iPhone and continue listing right where I left off.1

My iPhone has become my main listening device, be it podcasts or audiobooks. I even listen to music on my iPhone via Airfoil Speakers from time to time when I’m on my desktop machine. The intial spark for going with this one device setup was that I grew unsatisfied with the state of podcast synchronization between my iPhone and iPad. After running out of space on my iPad because Podcasts took up so much space on the device. My iPhone had enough storage, but the sync - no matter how I configured my podcast app - didn’t deliver the results I wanted. One day I decided to deleted all podcast apps from my iPad and so far I’m happy with the decision. It’s no more micro-managing synchronization issues for me, which is good and just what I wanted.

Airfoil Speakers for Mac

After Instacast for Mac was released I downloaded it to see if there was any benefit over my beloved Airfoil Speakers. To its defense: the Mac version definitely works, but I still prefer my one device approach. Hence, I won’t even bother to check out Downcast for Mac.

If you’re a Spotify users you will enjoy this app tremendously. Spotify is a peer-to-peer based piece of software which means that the bandwidth it uses can be very demanding… demanding and unpredictable. The Spotify forums are full of complaints about this, but that’s simply they way how Spotify works and it’s a part of how they can offer their product for a dumping price to the whole world. When I started with Spotify I wasn’t aware of its peer-to-peer nature until my upload bandwidth was constantly maxed out. The solutions I found involved blocking parts of Spotify via the host file or Little Snitch, using Hazel to clean the cache folder and many more workarounds which all didn’t work that well in the end. So, to avoid this I switched to Spotify on iOS and streamed the content to Airfoil Speakers. It’s a simple solution to keep Spotify from killing your upload bandwidth and it works really well, thanks to the iOS clients being just so good.

As an audiobook buff I also swear by Airfoil Speakers. If you’re into audiobooks, you’ve probably know that playback position syncing was added to iCloud with iTunes 11 and iOS 6. However, iTunes *wireless sync* doesn't support this – at least not for audiobooks. Update: As reader Teddy Svoronos reported this also works wireless now, but it’s unreliable.

I admit it’s been a while since I checked if Apple did anything on that front. And, as of writing this post I wanted to check again if iOS 7 maybe changed anything in that regard for the better. I tried my best, but as so often my iPhone wouldn’t show up as connected in iTunes. In my book this is another point for Airfoil Speakers.

Last but not least, for Audible users this should also be an easy way of getting their listing to the Mac.

This was my list of tiny little reasons why Airfoil works for me. If you caught yourself mentally checking off some points too that you were not to happy with before, you might want to head over to Rogue Amobea and give the trial version a test run.

  1. If you want the opposite – streaming to your iDevice then check out the free Airfoil Speakers Touch.

Using Git with Dropbox

Permalink

LINK - Using Git with Dropbox → via @_patrickwelker

Nifty idea: placing your git remote origin master inside Dropbox an occasionally pushing the changes to it. I’d never even though of such a workflow. It’s a cheap alternative if you have no host where you can create git repositories.

The two main drawbacks are that this setup only works well when you’re on your own. I have a few git repo’s in my Dropbox which I didn’t exclude from my Dropbox sync and even those were prone to errors. Imagine a team working on a project that’s hosted on Dropbox. That’s a no-no. But for a one man coding army it should work.

The other thing is that Dropbox’s syncing algorhtyhm doesn’t work to well with a lot of small files. That’s one reason why I put my Dropbox votes in this votebox suggestion: “Ignore file like .gitignore”1.

All in all, when basic versioning and zero costs for private repositories are something for you, then here’s one more option to look into.

PS: Yep. That’s an Octcocat not the Git logo in the “O”.

  1. The odds seem to be slightly better than voting for CLI support for the Mac and Windows here. I’m currently fed up with this and will do some research to find out if it’s possible to use the CLI version with a Mac. I’d have no problem to dismiss the GUI when I gain the little extras from Dropbox.py.

Link List – July 28, 2013

July 28, 2013

Link List – July 28, 2013 → via @_patrickwelker