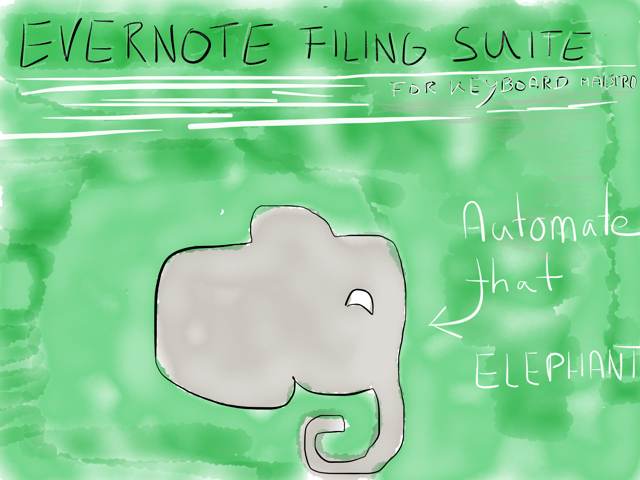
Evernote Filing Suite For Keyboard Maestro
Update (2014-08-08): You need to have the latest version of Fletcher Penny’s MultiMarkdown installed on your Mac (see Dependencies).
Update (2014-01-19): Added a new condition → if you don’t enter a tag at all there won’t be added any tags to your Evernote file(s).
Update (2013-12-31): Dependencies section → added links to the Martin Kopischke’s download site for the pre-compiled Automator action. You just have to double click the action to install it. I also added a download link for the Automator wrapper.
Outline
1. Introduction
I’ve neglected Evernote for a long time. Lately, I’m willing to give it a second chance. This post is about my ‘Evernote Filing Suite’.
What brought to me this set of macros is the need of a speedier filing for my findings to Evernote. Coming from plain text entering data is super simple and fast – I really missed that when considering Evernote again. The new Evernote Web Clipper is a great browser plug-in, but it’s oh so slow.
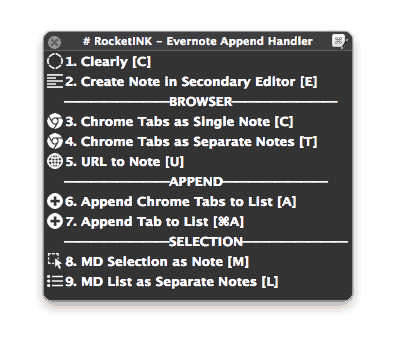
After installing the macros you will get a Keyboard Maestro palette which looks like this:1
Don’t worry Safari users… I got you covered, too.
2.1 How It Began
Initially, I just wanted to migrate some of my running lists from Markdown lists to Evernote. I’m still not sold on the idea since plain text is so versatile and allows me some kind of flexibility like rearranging items in a list very fast. Simply put, for any kind of document modification plain text rules.
To get the purge of my lists going, I used Martin Kopischke’s Markdown to Evernote Ruby script which is an enhanced version of Brett Terpstra’s System Service for Evernote clipping. Back then I wrote a shell script which was doing a couple of things:
- Get a Markdown link list
- Remove a list interpreters
- Add a predefined notebook and tags
- Convert the URL to a variety to x-callback-url’s
- Create a new text for each line of the Markdown list and run Martin’s script on it.
It worked, despite of some minor annoyances. Beforehand my lists looked like this:
* [iOS statusbar cleaning on any background - All this](http://www.leancrew.com/all-this/2013/12/ios-statusbar-cleaning-on-any-background/)
* [The Feed Reader Reviews: Six Months Later](http://www.macdrifter.com/2013/12/the-feed-reader-reviews-six-months-later.html)
* [Daring Fireball: Pixel Perfect](http://daringfireball.net/2012/08/pixel_perfect)
After the script, a note in Evernote on iOS would look like this:
The only thing that was missing was a way to specify a source URL for the Evernote notes. No big deal since I already had a couple of clickable links to the source url in the note, but you know… I can be pretty stubborn when it comes to minor details. Sometimes I can’t let go, and after doing some research and trying to make my script work with some excellent scripts over at Justin Lancy’s Veritrope I finally gave in and send out a tweet to Martin:
Two months later Martin has completely rewritten is script and now offers you the convenience of an app which makes it as easy as it gets to transfer your Markdown to Evernote. He added some really clever options aside from adding a source URL you now can attach a file, modify the date, etc.
I’ve been beta testing his app ever since and made a couple of Keyboard Maestro macro for all the relevant Evernote tasks I could think of. While testing the app I gave Martin some sleepless nights because my OS is kind of over-tweaked and despite of working flawless with the Automator workflow Martin provided in the 1st beta it just hesitated to work with his app. By the way, Martin is always happy to hear about possible bugs. If you encounter one drop him a mail or get in touch via Twitter or ADN.
2. Dependencies
So, before we jump right in to my Keyboard Maestro filing suite for Evernote, let’s clarify the bare necessities.
You got to have this on your Mac:
- Evernote
- Keyboard Maestro
- Martin Kopischke’s Markdown to Evernote app (which runs on Mavericks or later)2. You can get the latest pre-compiled build here (– in the zip file is the Automator action which you’ll have to double click to install it).
- an Automator wrapper for his app (download)
- the Evernote Filing Suite for Keyboard Maestro
- The latest version of Fletcher Penny’s MultiMarkdown
Head over to Martin’s GitHub page and install the Automator action. We don’t really need the app for the Keyboard Maestro macro’s, but a wrapper for his action. Either you download his first beta where there is an Automator workflow in the download package or you use the download link above or you get your hands dirty and build your own which should look like this:

Save it as an Automator workflow named “MMD → Evernote” to your ~/Library/Services folder.
We do this because when sending multiple entries/files to the app in a loop, the app will choke a bit and generate the same Markdown file in Evernote. An example would be the “Safari Tabs as Separate Notes [T]” macro. My theory is that an Automator workflow handles a loop like this different, allowing only one instance to run, then waits until the foremost is finished and continues with the next action only when the previous workflow has finished. But what do I know… using the Automator wrapper works, so that’s what we’re going to use for all macros.3
3. The Macros
Here’s a detailed description of what the macros do and what features they have on-board.
3.1 Clearly
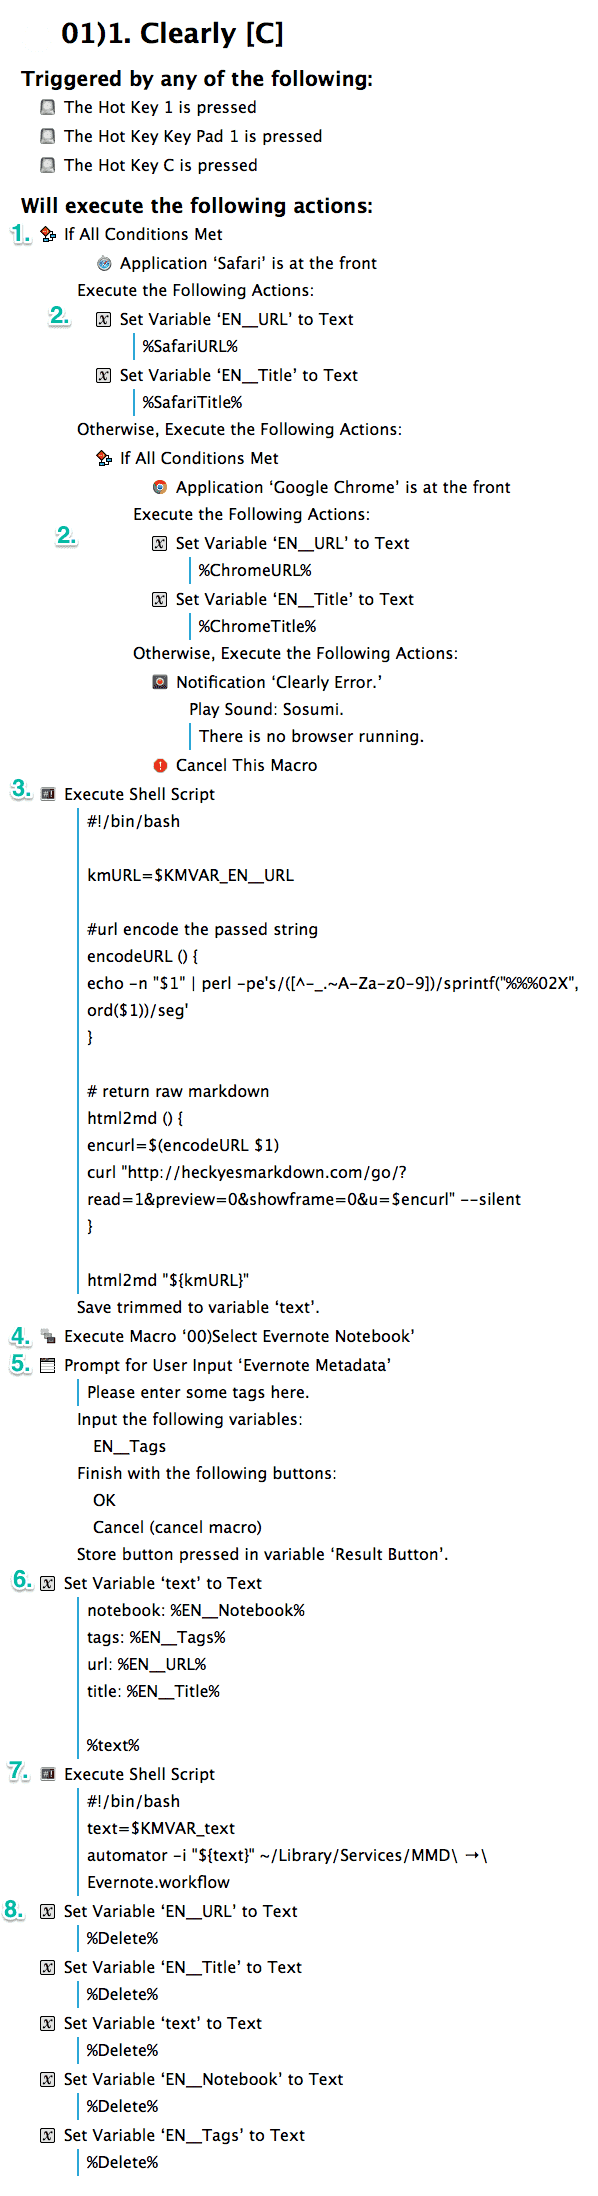
As an Evernote user you clearly came across Evernote Clearly.4 Well, this macro does just that – more precisely it resembles the “simplified article” function of the latest Evernote Web Clipper plugin for your browser. It strips out everything that is unnecessary and sends a clean version of the web site your on to Evernote.
Why should you use this macro instead of the browser plugin?
- You’re like me and want to keep your browser clean and save some resources. Go ahead, ditch the plugin.
- You want a speedier way to add a simplified article to Evernote and avoid your mouse having a better pedometer count than you.
How the macro works:
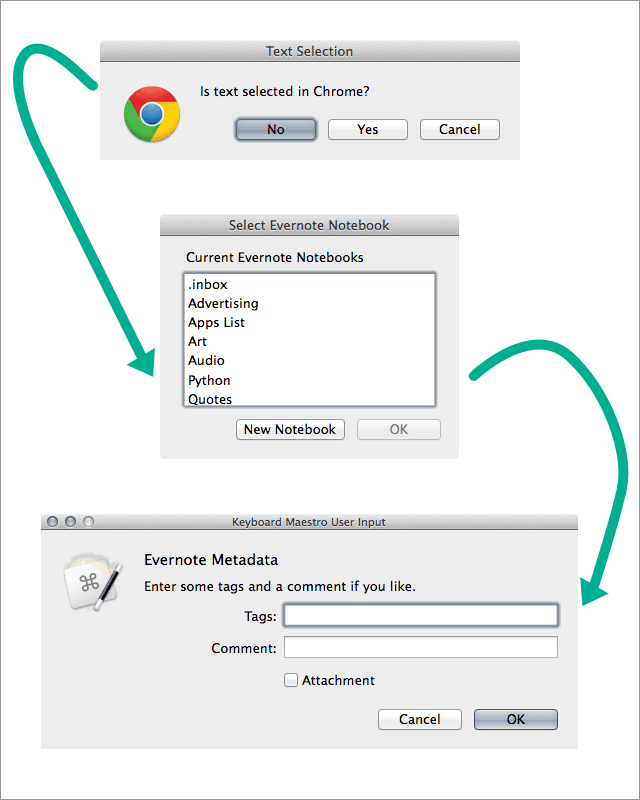
- Checks if Safari or Chrome is at the front if not it outputs at error message. This also means that you can’t fire up the macro anywhere. Your browser has to be the active window.5
- Sets up variables for the title and the URL of the web page in the active tab.
- Runs Heck Yes Markdown by Brett Terpstra in a shell script and returns the a clean Markdown text as a variable.
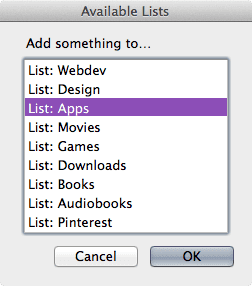
- Runs a helper macro (“00)Select Evernote Notebook”) - an AppleScript to select one of your Evernote notebooks out of a list.6 If you cancel the macro exits more or less gracefully: it deletes all variables and stops the helper macro and the macro that executed it.
- Prompts you for some tags that you want to add to the note and generates a variable.
- Formats your markdown text along with all variables for the front matter.7
- Runs the workflow for Martin’s Automator action and send your data nicely formatted to Evernote.
- Cleans up all the used variables.
Note: Currently the macro doesn’t check upfront if Evernote is running. As a best practice, start Evernote first and just let it run in the background so that the prompt for selecting a notebook has a database to work with.
3.2 Create Note In Secondary Editor
If you like me you have more than one text editor. On my Mac FoldingText is always open, hence I neglect the excellent Byword.
In case you’re equally cruel to your second favorite editor that I am, fear no more because with this macro it will become useful again. After some smart questioning about the Evernote note you want to create, this macro will open your secondary editor and enter all the relevant metadata.
When your done, just save and quit the editor and the macro will upload your Markdown note to Evernote.
In detail:
- Starts the helper macro to select one of your Evernote notebooks.
- Opens a dialog where you can enter some tags, select if you want to add an URL (from Safari or Chrome) and if you want to add an attachment to the note.
- if you choose to select an URL the title from that web page will get used, too.
- if you check that you want to attach a file a Finder dialog will open and you can choose a file which will get appended to your Evernote.
- Depending on the options you choose a different IF condition will trigger and format your markdown text as a file which will then launch in the editor you specified (set it in the first variable “Secondary Editor”).
- Since we don’t need them anymore, all used variables get deleted and the macro is paused until you quit your secondary editor.8
- If you quit the editor the Automator action starts to send your document off to Evernote.
Side note: Usually I try to avoid option lists in Keyboard Maestro since you can’t navigate through them with the arrow keys unless you press escape one time when you enter the list. On the second run, they can be navigated via the arrow keys. This behavior is counterproductive for a keyboard user and the reason why I came up with this solution in the first place.9
Here’s the macro – you need to configure the macro for your editor of choice – the two actions you need to change are outlined in the first comment (which is not part of this screen shot):

3.3 Chrome/Safari Tabs As Single Note
This macro is for those times when you do a want to archive your web research findings to Evernote.
If you’ve already download the macros you will see four different options: one for Chrome and one for Safari. Each of them has a version which doesn’t prompt you for inserting tags.
Here’s what is going on in the “Chrome Tabs as Single Note” macro:
- We use a slightly modified version of an AppleScript from Veritrope which generates a Markdown list of all tabs in your browser window.
- The helper macro gets triggered and you can choose the Evernote notebook.
- The text gets reformatted.
- We send the whole thing of to “Markdown → Evernote” and delete all unused variables.
The output looks like this:
3.4 Chrome/Safari Tabs As Separate Notes
Similar to the previous macro this one fetches all browser tabs. The key difference is that we use Keyboard Maestro’s “For Each Item in a Collection Execute Actions” to break up the generated link list.
On each line (which contains a Markdown formatted link like [God](http://heaven.org)) we run some regular expressions to get the title and URL into separate variables.
After that we generate another title variable for an encoded version of the title since we want to generate a list of x-callback-url’s for each of the links. This way, when viewing the note on an iOS device we can jump right into the action. Yeah.
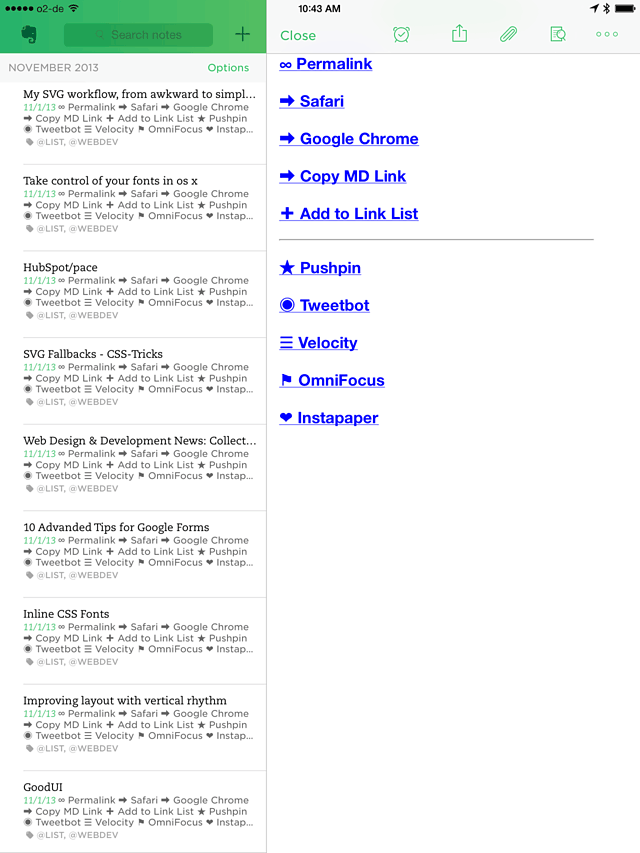
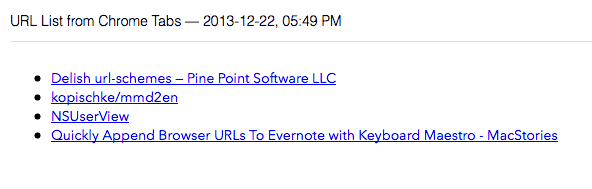
The output looks like the screenshot in chapter 1 of this post.10
The x-callback-url’s I used are explained in a comment above the action (inside the macro). I suggest you adjust them to your liking, most of them will work out of the box.
3.5 Send URL From Browser To Evernote
This macro takes the current browser tab in Safari or Chrome (which ever is at the front) and sends it to Evernote. You can also make a selection in the browser and add an attachment in an Finder dialog. Both will get appended to your note.
Regarding the selection:
- if Safari is at the front the macro figures out automatically if there is a selection
- if Chrome is at the front there’s a dialog box will ask if there is a selection
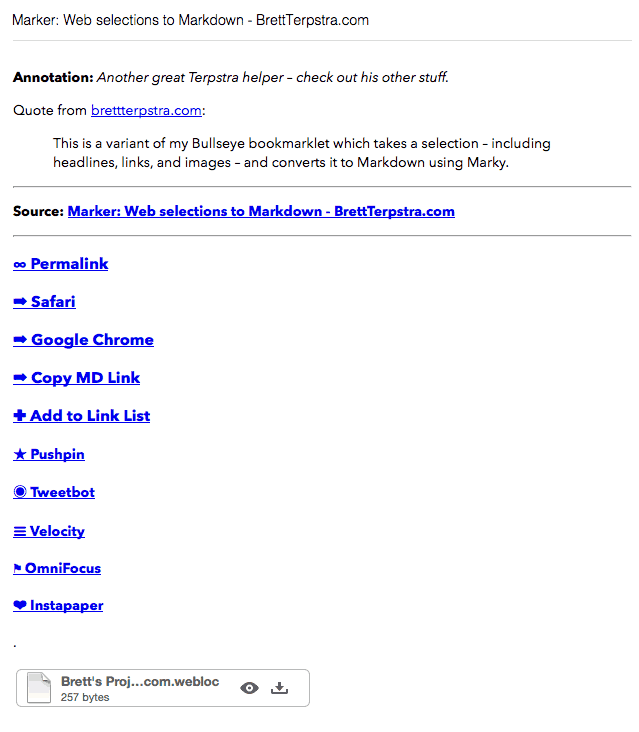
I’ve tried my best to format the selection as a Markdown quote, but sometimes the result isn’t that great. Maybe I find a way to incorporate Brett’s latest addition to his Markdown family: Marker: Web selections to Markdown.11
If there is text selected and an attachment the note will look like this:
3.6 Append Chrome Tabs To List
This macro grabs all tabs and appends them formatted as a list to a note.
So, if you don’t use separate notes as a list and instead prefer to gather material in a single note then this is for you.
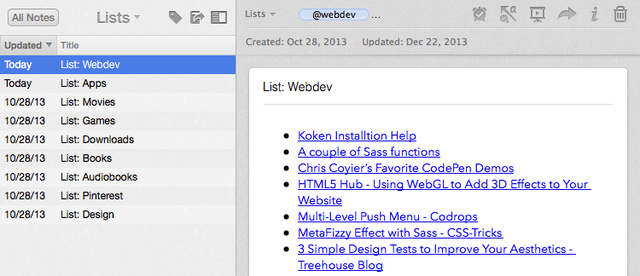
The output looks like this:
Since I image you won’t have a lot of these notes I choose to use a more concise approach when selecting one of your lists. I used an AppleScript well know to RocketINK readers to choose a list:
Next, there’s again the great script from Justin Lancy’s Veritrope which gets all links from the browser. And lastly we use a modified version of Federico Viticci’s append AppleScript](http://www.macstories.net/tutorials/quickly-append-browser-urls-to-evernote-with-keyboard-maestro/).
Additional notes:
- there’s a Safari version, a Chrome version and a version with an IF condition which you can use if you run both browsers (
25)6. Append Tabs to List [A]). Choose the one which best fits your needs. - if Evernote isn’t running the script will start it
- there’s another macro which does the same thing but only for one tab
3.7 Markdown Selection As Note
Here we have the most simple use of Martin’s script. I just passes the current selection to Martin’s “MultiMarkdown → Evernote”. That’s it.
3.8 Markdown List As Separate Notes
This macro takes an input that is formatted like a Markdown list with inline links…
- [Macdrifter](http://macdrifter.com)
* [MacStories](http://macstories.net)
+ [Dune 2000](http://mygamesworld.tripod.com/games_dune2000/dune2000.html)
… and outputs each of the links as a separate Evernote note.
4. Tips & Ideas
Lastly, here are some thoughts on how to further improve this set of macros to make it more personal and useful.
Favorite Notebooks
If you have a huge list of Evernote notebooks and what to keep the “Select Evernote Notebook” dialog concise, built your own dialog with your favorite or most used notebooks.
You can find an example in the “Append Chrome Tabs to List” macro.
Automatically Add Tags For Specific Notebooks
I double-tag most of my notes. What I mean is that if I put something in my notebook “Recipes” the first tag I’ll enter will be “recipe”. Maybe you have a cupcake notebook, so you could modify the default tags for such a notebook via an IF action in Keyboard Maestro:
IF cupcake THEN add “recipe, cupcake, sweet, baking, sins”
More Comments
If you like the comment function if TKTK and what it in some other macros then just adjust them and copy them over.
Comments For Clearly
Add a comment prompt like some of the other macros use to the Clearly macro to make it even more useful.
Customized Browser Support
If you only use Safari or Chrome you can get rid of the IF condition in some of the macros that checks which browser is at the front. By doing this you can trigger the macro even when your browser window is not the active window.
On the other hand, if you’re constantly running two browsers then you could integrated said IF condition into the macros where it’s missing.
Links
- Geeknote
- Need More Command-Line Power? This is it.
- Evernote Alfred Workflows by Sean Korzdorfer
- This is an insane collection of Alfred Workflows. The various searches are great. I haven’t dared yet to try Sean’s workflows out, but it’s definitely on my to-do list.
- Capturing Ideas and Tasks in Evernote
- Justin Lancy’s workflow from 2010. Still good. If you need more inspiration check it out.
- Evernote Essentials, The Definitive Getting-Started Guide for Evernote
- You probably heard about this one before.
5. Last Words
This macro suite enables me to swiftly create notes. What I still have to get used to is that my data is tucked away in an app. With plain text I just open my list and theres the data ready to be worked with – on iOS I can still work with my data without no matter if I have an Internet connection or not (which wouldn’t be a problem if I’m a premium subscriber to Evernote… but at the moment it is).
In conclusion, for the few running lists I keep that workflow is hard to beat. That’s why I still keep my plain text lists and use Evernote for gathering research material and collecting static web finds that I don’t modify or change in any way. More on that soon.
-
All icons in the palette are from iconmonstr. ↩
-
My guess is this is because of Ruby 2.0, so if you have that one installed on an older Mac it might work there, too. ↩
-
It certainly works with the app, too, but I’d have to put some wait and pause actions in the macros. For a simpler maintenance I just kept the worklow in all macros instead of changed some to use the app. ↩
-
Yes. That’s exactly the kind (cheap) of wordplay slash pun you’re going after if English is not you’re native language. You just take what you can get and live with the shame for the rest of your life. \(-_- ) ↩
-
Tip: if you don’t like this and only use one browser, you can get rid of the if statement and it will work without the browser being active, c.f. if you’re text editor is open. ↩
-
The macro consist of a modified version of an AppleScript by Joe Ross: “Evernote + Automator = Auto-combine PDFs”. ↩
-
The front matter is located at the top of your document and contains a set of metadata which doesn’t show up in the actual document but which is used to format the note in Evernote correctly, c.f. the tags, title, etc. ↩
-
Again, that’s why I didn’t choose to use my default editor. It usually has some documents opened and I don’t like to interfere with them. ↩
-
If I see myself using the URL chooser more often I will either divide this macro in two macro (one for each browser) or write an AppleScript that replaces the Keyboard Maestro dialog. I should probably contact one of my favorite Mac developers out there (aka Peter Lewis). ↩
-
Well, almost. I have used Keyboard Maestro percent encode function, when instead I should have encoded the URL’s properly like in the Clearly macro. I had some problems getting the output of OmniFocus x-callback-url to look nice, but have postponed this to some other time. Also the horizontal rule is gone and a dot is at the bottom. Ugly, but it works. ↩
-
Marker just got released as I wrote this. I’d love to play with it, but for now I invested enough time in Evernote for another two Christmases. ↩