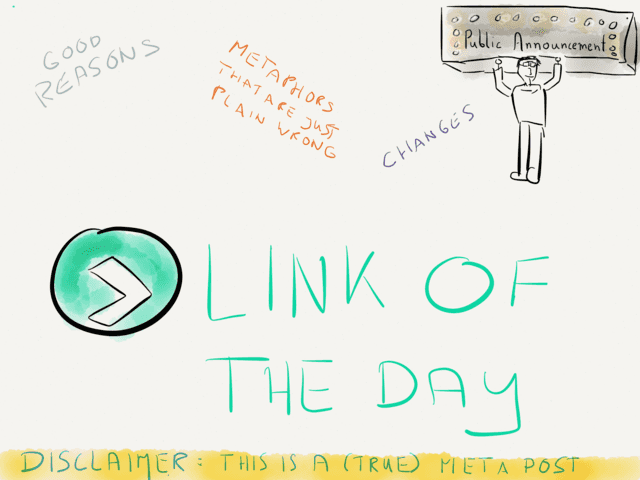
This is one of the rare meta-posts you see from time to time on my website. It’s a follow-up to my About Link Posts and more article which doubles as an announcement:
RocketINK now officially sports two kind of link posts.
I always had two kind of link posts on the site, but it’s only lately that I have fully accepted that the classic “DF-Style” link posts should be a part of this site. It’s like the site now has a “link of the day” section.
Rest assured that there will not be a flood of new meaningless posts. My guess is that most times I will post one link in the evening that struck me as the most interesting one.
Here’s want my upcoming link posts say about themselves:
I won’t be spam, I will be relevant or interesting.
A fresh link post about a cool Kickstarter campaign that wouldn’t have made it into the Link List in time.
I aint’ no technology related topic. Fo shizzle.
Link post with an attitude that promises it will not be about cats, dogs, trolls or rainbows. That’s what parts of the Link List are reserved for.
I can help Patrick finish that big article he’s writing without worrying about having nothing added to RocketINK for a whole week.
The care bear of all the link posts. He’s indeed super nice and caring. Usually he’s the one that I’d love to show you immediately after discovering it, but until now dismissed it or kept in in a queue for the Link List.
I’m so awesome. When will you introduce me to your friends.
Link Post that is a cousin of the care bear link post. It’s indeed awesome/excellent/brilliant/superb, so it’s only understandable that it isn’t shy about it. I will no longer hold it back from meeting as many people as possible. Subject could be that new revolutionary app on the block.
I’m a comment to an article.
Link Post that pays hommage to an article by someone else aka a full-featured reading suggestion.
Changes are good, options are better
Have no fear. You know I like to have options if you’ve read any of my Keyboard Maestro posts. It’s only logical and fair to provide you a way to opt out of receiving link posts in your feed reader.
What always made me uncomfortable was that not everybody likes the experience that link posts deliver. If your pet lies in the corner after an opulent meal which simply was a touch too much, you let it sleep it off or go for a walk with your quadruped. Still, the best practice is not to overfeed your pal in the first place.
Likewise, caring owners of a RSS client often times have the same problem. When a blogs posts more than 5 link posts a day they start to get nervous (me too) and can see how bloated their beloved RSS reader suddenly looks. They know that more links will join the already existing ones and that the evening walk with their digital pet will probably take a bit longer.
Owing to the fact that I care for animals and RSS users alike, my solution is to not overdue it and in addition I’ll offer a RSS feed without link posts. Personally I appreciate it when sites offer multiple RSS feeds where it makes sense. This to me is a scenario where it makes sense.
If you think you can manage the small additional overhead and are curious what links I will post you don’t have to do anything. On the other hand, if link posts aren’t your cup of tea I’d appreciate it even more if you give this new addition to my site a chance before switching to the trimmed RSS feed.
Note: Linked Lists will stay as they are. I want this tech-centric blog to have a mixed full of surprises from time to time – even if some links are 100% off topic.
Brains or Looks
We say we don’t care about the looks and that only the inner values are what really counts. Sometimes this is true, other times it’s just preposterous. I want RocketINK to have the brains and the looks – so I hope you appreciate a bit of curves on a feed. More precisely: curves that will tell a story of how this blog is growing up and who takes it by hand with every step it makes.1
Fighting the bloated belly syndrome mentioned above was the first step. So, to keep my blog “sexy”, attractive and good looking I want my link posts to look different from the usual posts here on rocketink.net. Starting with a smaller teaser image and some other changes I haven’t coded yet.
The archive will also get a small design update. The first steps are taken; I moved the existing link posts to the bottom. As they are not the star of this blog, they don’t deserve the pole position.
Realizing that I don’t have to abandon the idea completely, took me quite a while. The way I see it now is, link posts are like nutrition and vital organs in one. They exist but act more in the background, keeping the blog going on a more natural pace without huge gaps while still maintaining a set of interested topics. I want them to look more subtle, but also be relevant or interesting content-wise.[^time]
It’s a running experiment. Don’t expect to see the design changes happening overnight. There’s also the chance that I change my mind about the structure of the archive again (or even how I treat link posts on the whole).
To sum it up: I think this might work for keep me writing more frequently here with the bonus of not feeling stucked in between my drafts for longer articles.
Trust me, you’re not the only one who is shaking his head in disbelief when reading these lines because the analogies are so bad and cheesy. In my mind I’m ending the sentence above with “curves that will tell a story of how this young girl grows into a woman.” That just doesn’t seem to work in this context, but then again if you know that I recently purchased a shower gel which carried the label “The daily care for young women” it starts to makes sense… with the “care”, and the “daily” and the “young”. Let me transcribe the hidden message: this young blog delivers you a carefully selected link on a daily basis. Yeah. It’s there’s still no reason to use the words I used other than sharing my embarrassing shopping habits with you. On the plus side, this will stop the comparisons saying the sum of my feed frequency looks like a Karl Lagerfeld model when looking at all the posts of a month lined up. – Since I doubt this footnote makes the paragraph any better. I will stop right here. ↩
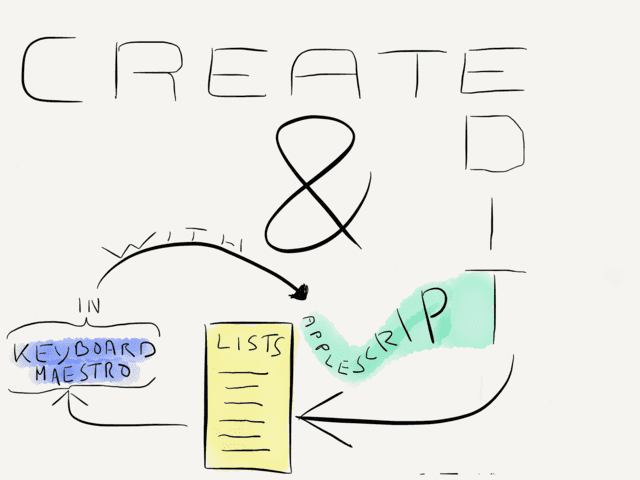
The plethora of features and the custom hacks that can be created with Keyboard Maestro are the reason it has earned a place in the top 5 of my favorite Mac apps. Still, there is room for improvements. Today I want to address one feature that already exists, but which isn’t usable for me: lists in a dialog prompt.
In this post I’ll cover the status quo of support for lists in Keyboard Maestro and two workarounds for different scenarios where lists can come in handy. To wrap it up, the last section shows you my present setup of how I create new notes and append notes to lists, as well as how I use a piece of AppleScript to generate a list of recently modified files which prompts me to choose one document along with several other options.
But first things first. Terminology. The following picture illustrates what I refer to when I speak of ‘lists’ in this context:
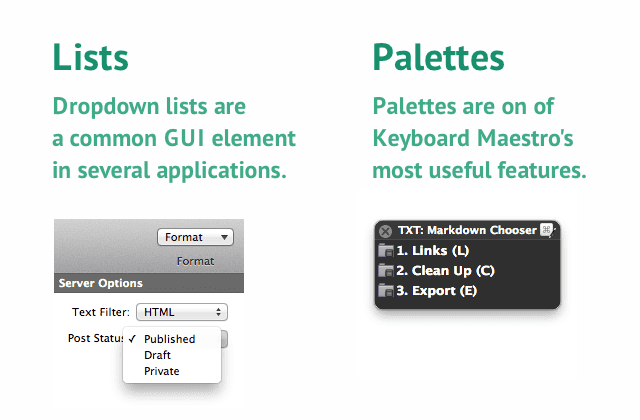
In Keyboard Maestro you can create simpler versions of these traditional GUI element, too. Although they won’t look and act exactly like the one from the screen shot I took (it’s MarsEdit by the way) they are useful in certain contexts. Before we dive in deeper, here’s a comparison of the key features of both, lists and palettes, with the latter being my favorite for replacing ‘dialog lists’ most times.
Lists are good for…
displaying a huge amount of options
low priority lists that you don’t visit regularly or that are not crucial to your workflow
saving some valuable space in that good old brain of yours (since there is no need to learn or memorize shortcuts)
a simpler approach to keyboard navigation (by using the arrow keys or typing the starting letters of the list entry)
Palettes are good for…
displaying a few selected and important macros (I’ve tried large palettes and came to the conclusion that they don’t work for me - no matter how many dividers I setup to structure and organize them. Nowadays I try to limit myself to a maximum amount of ten macros in a palette.)
keyboard aficionados because they tend to react a tad quicker - they’re as simple as it gets
swift keyboard navigation, especially when you get accustomed to shortcuts
shortcut versatility, assigning multiple hot keys to one macro, c.f. “1. Links” in the example above is linked to three hot keys: 1, NUM1 and L.
nesting and triggering other palettes
2. Status Quo of Lists in Keyboard Maestro
Keyboard Maestro 6 brought some new features which many users (including me) have been waiting for. Above all, I enjoy having the ability to trigger macro palettes with a macro which makes my previous workaround obsolete. The new text tokens are also a nice addition.
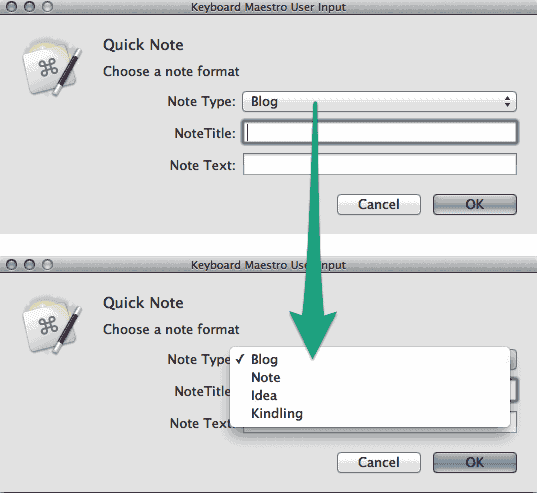
To give you an example of how useful and versatile lists are, here’s an example by Gabe from Macdrifter where he makes use of them with his Quick Note macro:
These lists can be created in Keyboard Maestro by making use of the | character aka pipe to create multiple values. It’s a good option, especially for users who use their mouse more than the keyboard.
Your sharp eyes might still stuck on that last remark…. Right, that’s exactly the problem I have with Keyboard Maestro’s implementation of this somewhat hidden feature. You can’t navigate such a list with your keyboard which leads to me not using native Keyboard Maestro lists at all. The point of the whole exercise for me is not to leave my keyboard and gain a swift way to choose from an array of list items. At the moment Keyboard Maestro forces you to pick the entry via the mouse, there just is no other way.
3. Using TextExpander for lists
The fill-in snippet of TextExpander gives you multiple choices in a popup menu which makes it in some cases a quite useful replacement.
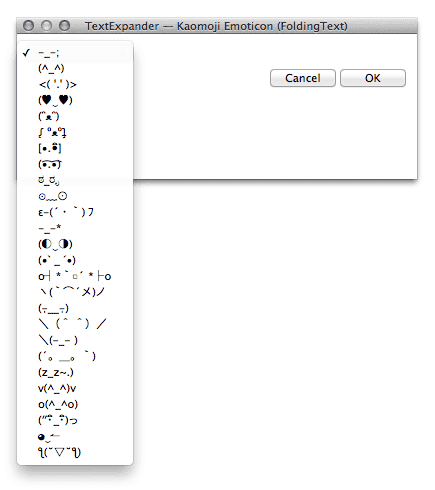
I make use of the double space suffix technique by Kaushik Gopal which I find brillant and more logical than the usual approach with a period or semicolon prefix, so here’s my kao SPACE SPACE snippet for a list of my beloved Kaomoji Emoticons:1
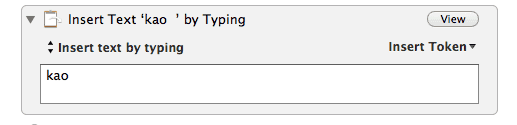
Since I’m deeply in love with Keyboard Maestro and want to preserve the just fallen in love kind of feeling in our relationship for as long as possible, I created a one-action macro to trigger the TextExpander snippet:
What I gain from this ménage à trois is that I can put the macro in a palette or trigger it via a hot key.
However, when using TextExpander you can’t pass the output of a list item into a variable and make use of it anywhere else in the macro. After all it’s TextExpander and it does best what it’s build for. Use it for that purpose. If you want more advanced lists read on.
4. Using Keyboard Maestro and AppleScript for lists
As simple as it is, the TextExpander example above represents a use case scenario where lists make more sense to me than using Keyboard Maestro palettes. Now, to make lists even more useful we can use AppleScript and build a list.
4.1 Kaomoji Emoticon Example
property kaoList : {"-_-;", "(^_^)", "<( '.' )>", "◕‿‿◕", "(♥‿♥)", "(ᵔᴥᵔ)", "ᶘ ᵒᴥᵒᶅ", "[•.•ิ]", "(•͡.•͡)", "(*_*)", "ಠ_ರೃ", "⊙﹏⊙", "٩(͡๏̯͡๏)۶", "٩(●̮̮̃•̃)۶", "ε-(´・`) フ", "-_-*", "(◐‿◑)", "(•ˋ _ ˊ•)", "o┤*`□´ *├o", "ヽ(`⌒´メ)ノ", "(-̩__-̩)", "\(^ ^)/", "\(-_- )", "(>_<\")", "(´。_。`)", "(z_z~.)", "v(^_^)v", "o(^_^o)", "(″・ิ_・ิ)っ", "◕‿↼", "(=^.^=)/", "ƪ(˘▽˘ƪ)"}
-----------------------------------------------------
tell application "Keyboard Maestro Engine"
    activate
    set selectedEmoji to choose from list the kaoList with title "Kaomoji" with prompt "Your Emoticon feels like…"
    -- OK and Cancel actions
    if selectedEmoji is false then -- Play beep and cancel all running macros
	    beep 1
	    do script "Cancel All Macros"
	    error number -128
    else
	    return selectedEmoji
    end if
end tell
As you can see, the output can be reused, which is always a good thing. Here’s the rest which shows you how the AppleScript is embedded in a simple macro:
Aside from Gabe’s Quick Note macro there’s also Federico Viticci’s recently released macro for Automating Mail Signatures and Senders with AppleScript and Keyboard Maestro. His post provided the initial spark to write this article since I forgot about this feature which I so deliberately abandoned from my workflow until now.
Emoticons are great and all, but they usually don’t count towards having anything to do with productivity. So, here’s a more useful example for Apple Mail users. I checked with Federico and he allowed me to tinker with his AppleScript.
Like outlined above, the advantage is that you can navigate the list with the arrow keys and even type the first one or two letters to jump directly to an entry. For instance if I want to repsond via my zapp@brannigan.com address I just need to press z and the entry gets selected.
Here’s the AppleScript to set this up:
-----------------------------------------------------
-- Name: Simple List Handler for Apple Mail
-- Author: Patrick Welker <https://rocketink.net>
-- Version: 1.0 (July 21, 2013)
-- For Apple Mail and Keyboard Maestro (<http://www.keyboardmaestro.com>)
-----------------------------------------------------
-- Apple Mail Part borrow from Federico Viticci of MacStories (<http://www.macstories.net/tutorials/automating-mail-signatures-and-senders-with-applescript-and-keyboard-maestro/>)
-----------------------------------------------------
-- Installation
-- 1. Use this script with an "Execute AppleScript action" and assign a hot key to it, c.f. ⌘R
-- 2. Add/Remove your list items and setup a default item in the configuration below
-----------------------------------------------------
-- Configuration
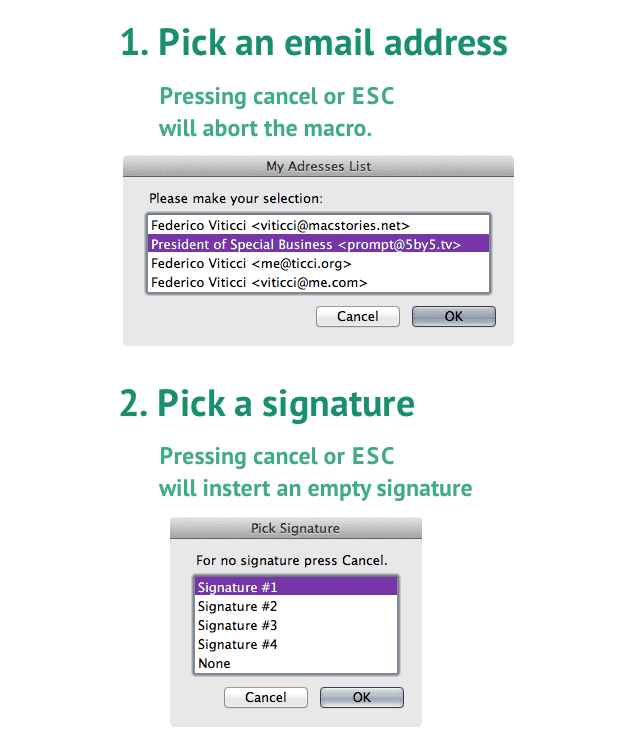
property emailList : {"Federico Viticci <viticci@macstories.net>", "President of Special Business <prompt@5by5.tv>", "Federico Viticci <me@ticci.org>", "Federico Viticci <viticci@me.com>"}
property defaultEmail : "President of Special Business <prompt@5by5.tv>"
property signatureList : {"Signature #1", "Signature #2", "Signature #3", "Signature #4", "Signature #5", "Signature #6", "None"}
property defaultSignature : "Signature #1"
property cancelSignatureDialog : true -- If Cancel/ESC dialog then use no signature; set to false for default signature
-- Optional
set titleEmailDialog to "My Adresses List"
set titleSignatureDialog to "Pick Signature"
-----------------------------------------------------
tell application "Keyboard Maestro Engine"
activate
-- Prompt for "Send From" Address
set selectedEmail to choose from list the emailList with title titleEmailDialog default items defaultEmail
if selectedEmail is false then -- Cancel script
beep 1
error number -128
else -- Gets the selected list and creates a variable
set fromAccount to selectedEmail as text
end if
-- Prompt for signature
set selectedSignature to choose from list the signatureList with prompt "For no signature press Cancel." with title titleSignatureDialog default items defaultSignature
if selectedSignature is false then -- If cancel rules
if cancelSignatureDialog then
set selectedSignature to ""
set mySignature to selectedSignature as text
else
set selectedSignature to defaultSignature
set mySignature to selectedSignature as text
end if
else
set mySignature to selectedSignature as text
end if
end tell
-- Apple Mail: fills in "From Address" and chosen signature
tell application "Mail"
activate
set theSignatureName to mySignature
set theMessages to the selected messages of the front message viewer
set theMessage to first item of theMessages
set theOutgoingMessage to reply theMessage with opening window
set message signature of theOutgoingMessage to signature theSignatureName
set sender of theOutgoingMessage to fromAccount
end tell
Since lists and palettes are only two different ways with the same goal in mind, it’s obvious to combine them to get automation done more efficiently.
I just have started with using lists after Federico’s post and right now I only have one bigger use case with which I’ll also end this post.
5.1 Prelude - My setup for managing notes and lists
Before I go into detail on the palettes and lists in my repertoire, let me give you a brief introduction on what I use on the Mac and what apps I prefer on iOS. It’s just a short description to give you a better idea of why I choose the macros in the upcoming sections and an why this works for me.
5.1.1 The Mac
nvALT is my database for almost every Markdown or plain text file on my Mac. My notes folder lives in Dropbox which is my favorite way of syncing my documents to iOS while still having easy access to them on the Mac. iCloud has never worked for me, it’s just not my kind of sync. I can’t stand the idea of data I frequently access being tucked away in the depths of OS X. Keeping my notes on my NAS would also be a good solution. Sadly there are close to zero iOS text editors with support for WebDAV – Brett Terpstra’s iTextEditors lists only 6 editors which support this feature at the moment.
There are a lot of editors I have installed (and use) on my Mac, but the point here is not to list and praise them all here, it’s rather highlighting the fact that having my notes in one location makes it easy for me to find and edit them.
I have three types of plain text files in my notes folder which serve different purposes:
.md for all notes
.txt for all lists
.taskpaper for my projects
5.1.2 iOS
On iOS my main editor is Notesy – it’s my nvALT for the iPhone/iPad. In addition I manage my lists with the relatively young Listacular which has recently replaced Listary for me.2
Listacular does a splendid job at managing lists. It reads two file formats (.txt and .taskpaper) and has basic Markdown support. Its trick is that it differentiates between the various Markdown list markers. By using an asterisks your list stays a list, when pre-appending a hyphen you get a todo list with checkboxes.
This works for me because my (running) lists all have a .txt extension. The good thing with this approach is that I only see what I want to see on Listacular: lists.
Facts about Listacular:
it doesn’t allow to choose or ignore extensions like other text editors do (= if you have .taskpaper files in your notes folders they will show up and there’s no way to avoid that)
no support for .md files
it can merge lists making it a good alternative to share grocery lists and alike
it’s free for up to three lists (the upgrade costs $2.99 via IAP)
5.2 The Notes Palette
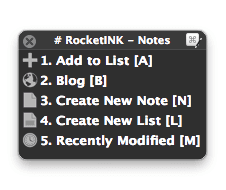
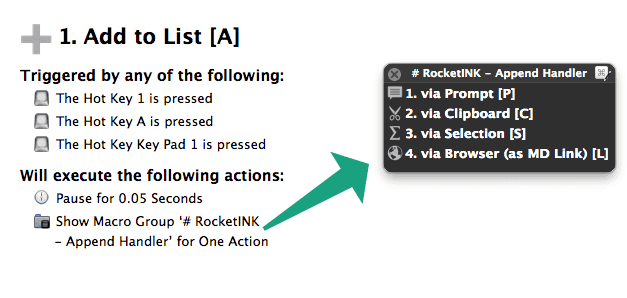
There are some repetitive patterns in my workflow. One of them is creating new notes and lists, the other is adding to my already existing lists. The notes palette (⌘Page Down) aims to be my starting point for any of those actions. It’s a work in progress and I’m not sure wether I keep all of the macros, remove some or even add more to it from my global palette (^Space) like ‘create a new email’.
The “1. Add to List [A]” macro just opens another palette for one action like this:
Since all of the 4 macros basically perform the same action, I will only cover the first one here (which also happens to be the longest macro out of those four).
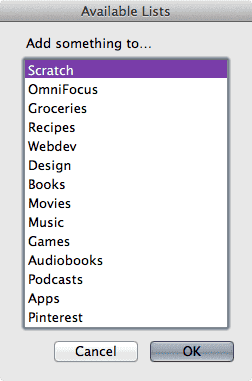
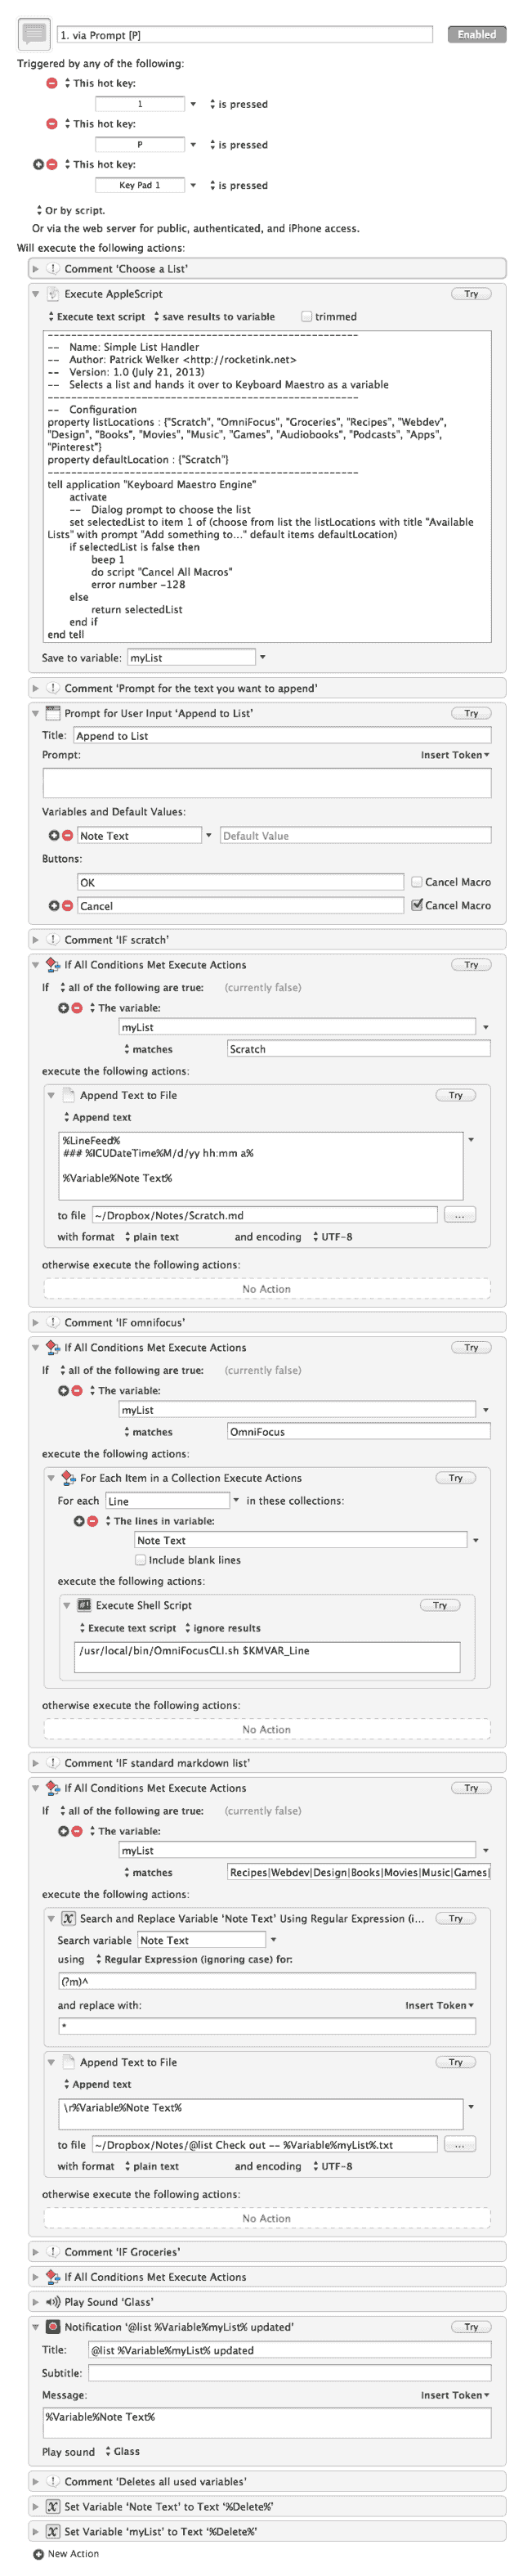
(1) After starting the macro, a list pops up and I can pick which list to add something to. The script is structured just like in the example at 4.1 with the kaomoji emoticons.
(2) Next there’s a prompt where I enter my list items. Remember, you can always create multiline notes by adding a line-break with ⌥↩ – don’t worry about Keyboard Maestro only displaying one line.
(3) What follows are all the if conditions for the various lists:
My scratch file is formated as a normal Markdown note (with readability in mind). It adds a level 3 header, the date and time to each entry.
A new OmniFocus entry is created via OmniFocusCLI: Natural Language Tasks by Don Southard. In my honest opinion, it’s the best way to get tasks into OmniFocus – OmniFocus doesn’t even have to be open (and also won’t get opened). Read the blog entry to learn why it’s a brilliant implementation and how to install in on your system.
My various running lists. Each line I’ve entered in (2) will also be a new line in the corresponding list pre-appended by an asterisks to match Listacular’s list syntax.
My grocery list. Same as the running lists, but the list marker is a hyphen to make the entries show up as tasks in Listacular.
(4) Play a sound, send a notification and delete all variables. √
A visual representation of the macro:
UPDATE: I added an easier to maintain version here.
I just added this for the sake of giving you the overall picture of the setup. Going into details would go beyond the scope of this post.
One last note, the “Edit Post” macro makes use of the AppleScript which I’ll introduce in section 5.2.4. Often times I need to correct some spelling mistakes and that’s where this macro jumps to the rescue. It opens up a list with all my posts and syncs them to my Jekyll blog after I’ve finished updating them.
5.2.3 Create A New Note Or List
To be frank: I’m not too fond of these. They are a mix between the add to list macro from 5.2.1 and the recently modified macro in 5.2.4. These macros started as a proof of concept and gradually evolved into something bigger.
Both macros (i) create a new text file (note = .md, list = .txt), (ii) prompt you for a name, (iii) open up the note in the editor you choose from a list, (iv) ask you if you’d like a preview in Marked and if you answer with yes (v) the two windows get aligned filling one half of the screen each. Admitted, this is pointless when you start with a blank canvas, that’s why…
5.2.4 Edit And Preview Recently Modified Notes
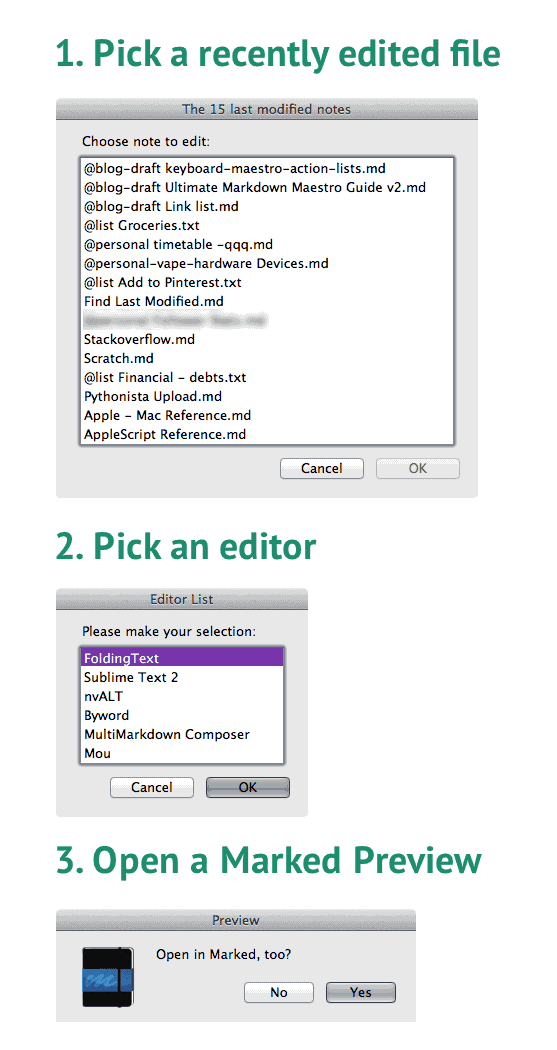
This AppleScript is the secret star of this blog post and also resembles my 1st serious go at doing something with Apple’s scripting language. The aim was to make it versatile, useful and something that people could in fact integrated in their note taking or reviewing workflow.
In a normal week I drop several notes into nvALT. It often happens that those files are somehow project related and that I keep coming back to the same documents within said week just to edit them. That’s where this script can come in handy. It prompts you for several steps:
Most parts are customizable. You can optionally turn on Marked to always open up, same goes for the window aligning (which I borrowed from Rob Trew) and some other options. Take a look at the user configuration part of the script where I also explain briefly how to set it up and where the known problems are at.3
Side note: I had problems embedding this script, so here’s a link to the Gist for now.
At present I run several trimmed down versions of this script. They are shortened because I don’t want to get prompted all the time and want a specific behavior for certain actions. If you find the script useful, I’d advise you to just edit the file to your liking. Here are my iterations:
Show me the 10 last drafts for RocketINK and open the selected one in FoldingText with a Marked preview (without asking me anything).
Show me all my TaskPaper files and open the selected one in TaskPaper without opening Marked.
Show me the 12 last nvALT notes with @reference in the title
Show me all my blog posts and prompt me to open them in Sublime Text or FoldingText, also open up Marked.
Other possible use cases
If you’re active on GitHub you could make a list of all your ReadMe files. Then, if you update a repo just choose the corresponding repository ReadMe and edit the document in your favorite editor. Advanced users could also setup a commit and upload action.
Add an additional prompt to enter a search term for viewing the last 10 modified notes in nvALT that contain a specific word or tag. You just have to enter another prompt for the “searchNotes” property.
Note: If your not into the script but use nvALT then add this nvalt://find/* to your LaunchBar or this nvalt://find/{query} to your Alfred searches. … I had to mention it because I’m not sure every nvALT’ler knows about the URL scheme. I use it all the time.
A hat tip to Sean Korzdorfer who introduced me to this site by tweeting about it. A great resource for fans of this modern Japanese tradition. ↩
Listary is a superior app, but it depends on Simplenote which I don’t use anymore. It has a lot of features Listacular lacks at the moment, but so far I’m happy with my decision. ↩
In short, the easiest way to get this running at the moment is to export the script as an application. I know… not the best solution, but I hope some clever person will point me in the right direction to make it more Keyboard Maestro/Service/LaunchBar friendly. ↩
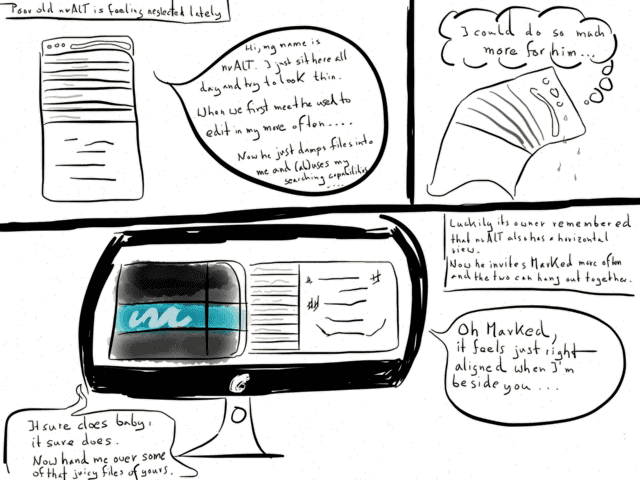
The blogging slowed down lately on RocketINK.1 So here are two snacks to shorten the waiting time for the next ((teaser: large)) post. A teeny tiny macro and a true love story in form of a cartoon… which you probably can’t read unless you have increadible eye-sight or visit this link.
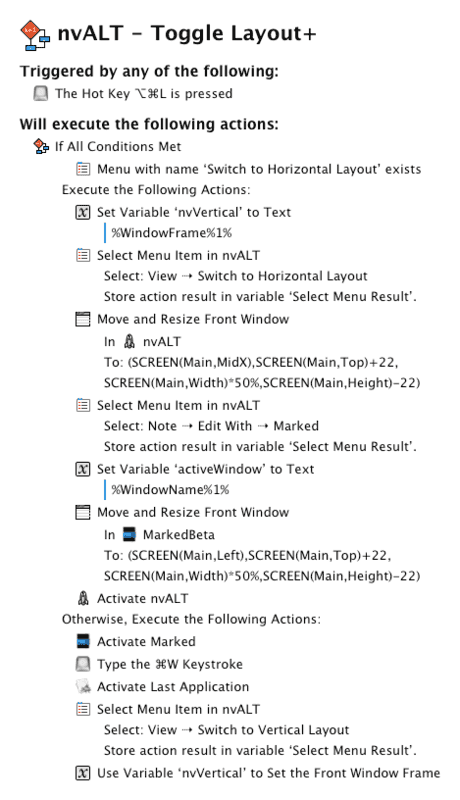
I don’t give nvALT credit enough for its editing capabilities. I always use it to create quick notes and search my plain text database. But as soon as I have to write more than two lines I open the note in FoldingText.
As you know, I love the vertical layout view. I keep nvALT’s window width very narrow and it literally lives on the right side of my screen. It’s just not practical to do longer writing with this layout applied.
I rediscovered that switching layouts can be quite useful. The downside of using the narrow width is that when I select the horizontal layout I can’t read anything in my list because the width stays the same.
This short little toggle macro is all about making horizontal useful to me again. Now, as soon as I enter the horizontal mode Marked pops up beside nvALT. When I leave the horizontal view, Marked goes too.
Or, to say it in a numbered list style:
Remember nvALT’s position and window size.
Switch the layout to horizontal view and resize the window to take up the right side of the screen.
Open the document in Marked and resize its window to fill the left side of the screen.
Place the cursor in nvALT’s editing window
If you use the macro again it closes the frontmost Marked window and resets nvALT to it’s concise vertical view.
Here’s what it will look like - nvALT and Marked aligned:
Shortcomings: if you already have a document open in Marked the new preview won’t fill the left side of the screen completely. For me it works since all I need when I trigger the macro with ⌥⌘L is a quick and dirty editing solution.
That’s because I finally started with iOS automation. In addition, I’m learning AppleScript at the moment. ↩
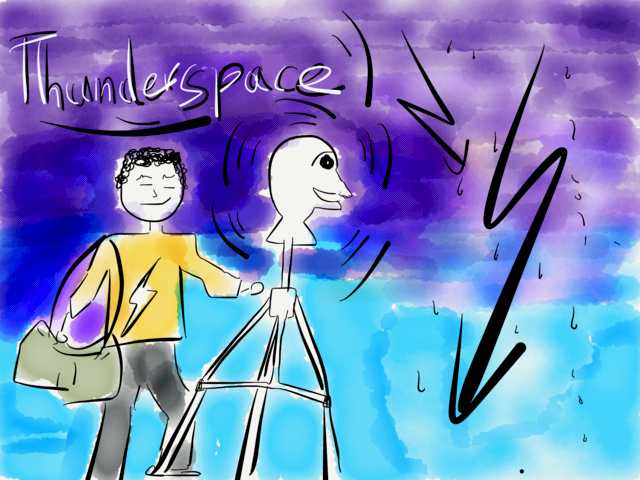
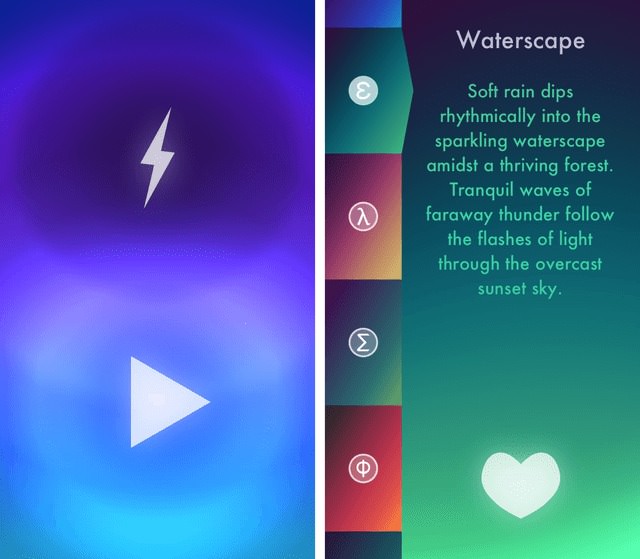
Need to calm down? Then I got just the right thing for you: Thunderspace. I try to fit a 30 minute relaxation break in every day and now I have found another very nice addition to my “health” folder which I’m going to talk about right now.
In a nutshell: Thunderspace offers a total of eight high quality atmospheric natural soundscapes to listen to and then simulates a lightning bolt by triggering the iPhone’s flashlight.
The segment of relaxation apps in the App Store is not too crowded but still lacks of quality applications. Thunderspace differs from other apps that aim to bring you the same virtual thunderstorm experiences in three different key aspects.
1. App Design
Thunderspace is a good looking and simple to use. UI √, UX √. In the credits I read that the app was designed by Taptanium. Since they worked with Robocat on the beautiful Haze weather app, I somehow assumed that Robocat’s famous chief designer Michael Flarup had a finger in the pie. After a short email conversation with Franz Bruckhoff, head of design and development of Taptanium, it proofs that my first hunch was not incorrect, but that my second guess on who the prime suspect is was indeed correct: Taptanium’s Franz was the lead designer.1
Let’s start with the app icon. If it’s done right, the likeliness of me buying your app just skyrockets – you will have won me over by 50% percent already and will click to read more about your app. This was the case with Thunderspace. Its icon is spot-on, has a clear meaning and mirrors the look of the app on a small space.
The app itself is conspicuous by its use of color which fits the respective song, c.f. the Moonlit soundscape basks in midnight blue and light purple tones whilst the African desert has a gradient starting with red-violet at the top ending in a sandy yellow at the bottom. When changing the soundtrack the description of the new scenery fades in accompanied with a subtle waterdrop animation in the background. The text is descriptive and the style of an imaginary journey – if you ever listend to an autogenic training program and read the corresponding booklet this will sound familiar. It’s a nice touch that get’s you in a relaxation mood and helps you visualize the great acoustic area which you’re about to enter.
I’m an avowed fan of binaural, meditation and relaxation apps. To say the least, most of them are not really that beautiful. Matter of fact all relaxation apps on my device haven’t been updated yet for the iPhone 5. Keeping in mind that we enjoy the enlarged screen real estate for about 10 months now that’s an indicator for little updates this segment usually receives. So, in the “niche market” of relaxation apps I’m pleased to see a strong contender which brings a visual aesthetic and a simple user interface to the glowing screen in my palm (if I dare to speak of niche market at all when talking about the App Store with it’s gazillion apps for purpose X).
Apart from usual interface elements even the in-app purchases are nice and thought truth. To cite from the Behind the Scenes PDF in the PressKit:
A lot of attention to detail went into the catalog, the place where you choose a thunderstorm in Thunderspace. For example, when you listen to a preview and decide to purchase the full length version, you can keep listening to the preview while Thunderspace downloads the full length version. Once the download completes, Thunderspace seamlessly crossfades from the preview to the full length version, and lets you continue to listen from there.
The purchase buttons are circles which transforms into a progress bar. All in all, there are many details to deliver a fine-tuned and well-balanced UI and UX. It’s the little things that make me smile when using OS X – needless to say that I like them on iOS, too.
2. Innovation
Thunderspace developer Franz Buckhoff is no stranger when it comes to thinking outside of the box. He also developed Holographium which lets you light paint texts in the air with your iPhone which reveal their message when taking a long exposure photograph.
The idea behind the Thunderspace, as simplistic as it is, is a fantastic one. It is subtitled with…
Unwind in a thunderstorm
… and that’s exactly what it does. After pressing the blue icon with the lightning, the iPhone brings a virtual thunderstorm to your home in all it’s glory.
I was blown away by the app when using it for the first time. I hooked it up to the stereo system in my bedroom before going to sleep. This initial test run was only to surprise my girlfriend with the lightning. The ideal user would want to wear headphones to get the full stereoscopic 3D audio experience. Despite not sticking to the recommended usage the bolts in our bedroom felt quite real and I was stunned by the fact that they were created just by invoking that stupid flashlight on my iPhone.
In addition to using headphones you will also get a more true-to-life thunderstorm if you put your phone out of sight to trick your brain into forgetting the actual source of the sudden light flashes.
The promotion video is one of the better ones and emphasizes how real your soothing thunderstorm experience can get:
If you want to listen to Thunderspace without the lightning, just tap the bolt and you’re in public transport mode. You won’t get suspicious glances of people thinking you’re trying to make photos of them.
3. Realistic Sounds
Audio was our primary focus though, so we spent a lot of time recording, auditing, analyzing and mastering the sound for Thunderspace.
While reading the app descriptions I can imagine people thinking of the developer boasting a little bit with buzz words. Mentionings of the “stereoscopic 3D audio” and the high profile soundtracker and pro audio engineer Gordon Hempton, an “Emmy-award winning nature sound recordist”, are all over the App Store description, the official website and in the apps tutorial. But let me tell you, it’s true. The audio is top notch. No need to hide it behind the curtain.
Gordon Hempton
As a former audio engineer I am familiar with the name Gordon Hempton and it is likely you have heard his work too if you watch a lot of nature documentaries. He’s a nature sound recordist specialized in capturing the close to extinct truly quiet places on our home planet. Gordon does this for over 30 years and published over 60 albums. Most of them sell for $50 to $100 to pay for his production and travel costs.
Every professional is sensitized. A special awareness towards all things related to the field of study grows the more experience one gets. Designers immediately spot the flaws of the new iOS 7 design, writers might convulse with pain when my grammar hits their iris and sports scientists know when you’re locomotive functions are off whilst you pass by them when you go for a run. Gordon has a keen sense for when something doesn’t sound right. More precisely, when something is added that shouldn’t be there. As an acoustic ecologist Gordon Hempton has a strong opinion on where we are heading and what is wrong with the status quo. If you’re into interested in environmentalism and in how Gordon sees/hears the world, this video does not fail to bring across his point of view.2
Experience is one thing and the equipment to put one’s vision into practice is the other half. You probably wonder about the (binaural) head mannequin in the pictures above. Instead of explaining it myself, I let this passage from an interview with Gordon do the talking:3
Yes, my business partner “Fritz” raises a few eyebrows. This binaural microphone system (Neumann KU-81i) works over speakers and headphones and does an amazing job of capturing the experience of being there. It is the closest system to human hearing that I have found and I have tested nearly all. It is not widely used because there’s no blind side, if there is something that you don’t want in your recording, well that is a problem.
The master about the rest of his audio equipment:
Customized high-end with low self-noise, extended frequency response, and rugged. But it also helps to have a few cheap mics around for when it time to explore an unknown like a volcanic steam vent. My equipment has to be usable in the dark and under the worst weather conditions. I plan for bad weather and call it lucky if it’s good. It helps to glue bits of sand paper on the control buttons of the deck so your fingertips can navigate inside a closed bag. I replace noisy closures with quiet ones like buttons and ties. I pair up cables and mark channels with black tape so I can feel left from right, not see. A flashlight can really scare off wildlife. When I’m on location my equipment is always ready to go on a moment’s notice, already assembled and packed in bags that are loaded with enough desiccants to keep the humidity inside the electronics close to zero. I buy equipment from DPA, Neumann, Sennheiser, Sound Devices, Gitzo and Domke; then go to work on making them better. With all the time and expense of finding the right place, the last thing I want to do is fool around with gear.
To keep it short, the result of Gordon’s work is high quality stereoscopic 3D audio material. The thunderstorms and effects he captures using a tweaked version of the Neumann KU-81i microphone have the advantage over traditional audio recordings in that you (or better your brain) can define where the sounds originally appeared location-wise; be it before, behind, upon of below your ears. There is a lot going on in a thunderstorm: wind, light drizzle in the beginning which transforms into heavy rain drops, and the additional sounds of animals and nature itself. Since Gordon is talented enough to capture the moment, it is possible to create virtual thunderstorms on a high level.
To provide an insight into other recording techniques like the holophonic approach I’ve appended some examples in the list at the end of this review. This way you can decide for yourself if you like a binaural thunderstorm better than a holophonic ones.
The Tracks
Now that you know they guy who did the recording can be trusted, let’s move on to the actual material.
I opened the app’s package with iExplorer and checked the quality of all tracks. Each has a BitRate of 256 Kbps. When you rip a CD the default setting to still retain the quality is exporting with 192 Kbps. Most people won’t hear a difference between the two BitRates, but it’s nice to see that Taptanium decided on sticking with a slightly higher BitRate, especially when you’re using something better than Apple’s EarPods4 you gained the right to be thankful for each extra Bit.
Title
Size
Length
Roof Garden*
10.6 MB
5:22 min
Waterscope
12.5 MB
6:30 min
Desert
10.1 MB
5.08 min
Wetlands
13.6 MB
6.16 min
Amazon RainForest
58.6 MB
26.15 min
Moonlit
13.7 MB
6.23 min
Angels
17.5 MB
8.49 min
Wood Frogs
20.4 MB
7.49 min
As you can see in the table the tracks are all long enough so that your brain won’t realize instantly when a audio loop ends – at least it doesn’t get too accustomed to it.
I included the size because I’m always nervous about keeping to many apps that take up over 500 MB of space on my iPhone. Thunderspace is 42.6 MB without the IAP’s and if you buy them you’ll end up with 172 MB.
Note: This is a compliment from a guy who not bothered emailing the Cleartones guys to send him a better versions of the ringtones he just purchased. Cleartones has a solid product and I still can’t understand why they try to save a few bytes by choosing a 160er BitRate. Admitted, the speakers of the iDevices aren’t the best (but in my defense: I walk around with my headphones the whole day and sometimes hook the iPhone up to my speaker-boxes).
The first two tracks in the table are the free ones. “Roof Garden” is recorded by Frank himself and the rest of the recordings are from QuietPlanet, the company of Gordon Hempton were he sells his audio recordings to movie studios, broadcasting networks and the rest of the world.
Franz recorded “Roof Garden” with a Neumann KU-100 which is the successor of the Neumann KU-81i Gordon Hempton uses. Neumann has it’s headquarter in Berlin since the company was founded in 19285 and I had the pleasure to listen to a variety of recordings from this mic during my apprenticeship.6
Pricing
There are two full tracks and six shorter demo tracks which you can listen to, the will cost you $0.99 each to unlock. Thunderspace with all 8 songs will set you back by $6.93. This will make some customers wrinkle their nose, but taking the high quality audio into account it’s justified. I might be biased having worked as an audio engineer but the tracks are stellar and production is costly - full stop.
According to Franz Bruckhoff he will raise the price for Thunderspace to $2.99 and $1.99 each for the IAP’s in approximately two weeks (or later). This places the complete package at $14.93. So, if you’re toying with the idea to purchase Thunderspace, now would be a good time.
Additional Comment And Resources
The technique used by Gordon Hempton is only one of many approaches to capture authentic or 3D audio. Holophonic Audio another one. It’s a trademarked technology invented by Hugo Zuccarelli and I embedded the following video demonstrating what it sounds and feels like because it’s funny, educational and a great listening experience. Put it on your watch later list and use the force (by which I mean headphones):
If you head over to the Holophonic Audio website there are a few more examples which are mind-blowing. This quote from Ron Oakland(Concert Violinist and Concertmaster of American Ballet Theatre) captures the essence:
What I expected of Holophonics™ was a refined, clean, system; like many other systems (demos in studios). What I got instead was sound that was all around me and even inside me. It was stunning to hear various demo sounds make the hair on my neck stand up. It was as though you had someone with you performing various tests and really “feeling” the sound. I found this technology to be very impressive!
Generally I’d like to see this getting more attention, especially in a market where it makes sense. Audiobooks was the first thing I could think of. Most people use headphones to consume them – the perfect target group. With the technology being available for several years, it still hasn’t been widely adopted apart from a few productions. This is might be due to the fact that constructing the third dimension in audio is a very complex and time-consuming editing task. As much as I’d be interested in hearing the footsteps of Bilbo Baggins on wet moss in the Shire, I don’t see it happen any time soon.
The virtual haircut recording (see YouTube above) is a good example. On YouTube you can find more, even a short sample of what the Lord Of The Rings could sound like in “3D”. I wasn’t blown away by it. The left and right panorama was overused and I missed more atmosphere and effects. So if someone out there is going to make a high quality 3D audiobook opposed to the cheaper traditional one narrator audiobooks, then please go all in.
Global Soundmap Project by radio aporee is a database of field recordings. You can discover sounds via Google Maps on there. I imagine this is what our planet must sound like to aliens tuning in. If you want to tune in too whilst on the go then you can also find radio aporee in the App Store. Their main site is also an excellent example of data journalism.
The 3Dio is a portable (and affordable) binaural audio 3D microphone. The link points to the examples section.
The holophonic vs. binaural thread on Gearslutz is an excellent read if your into the topic and want to record something yourself. Mark A. Jay has severals posts about the topic, but this one strikes me as the most mass-compatible. About Gearslutz: it’s the best resource/forum for audio engineers. If you ever wanted to know anything about recording music, a podcast or whatever, here you can get find the pro’s exchanging their secret recipes.
If you’re looking for free sounds of Gordon Hempton, he regularly posts free tracks here.
If the subplot of this review has already turned you into becoming more aware of what acoustically happens around you, then the Deep Listening Institute is also a fine link to cultivate that interest a bit more.
I want to end this review with a quote from another audio engineer which nicely fits in and aims at making us aware of the noise around us:
I was in the Northern India, very remote, and wandered out of my hut at night (4am) in winter and I heard nothing…I mean nothing. No wind, No insects or wildlife. Then very faintly I heard something. I held my breath. Then I heard it Loud and Clear…my heartbeat.
Fun fact: Franz (aka Taptanium) did 95% of Haze and signed a publishing deal with Robocat which brought their marketing engine and experience to the game app. He also told me that the deeper insight of Robocat - who already worked on three weather apps before (Thermo, Outside and Ultraviolet) and the Thermodo gadget - was more than helpful and that Haze wouldn’t have survived in the jungle of the App Store without their help. For instance who remembers to think about regions where the sun doesn’t rise for several months and that they should be taken into consideration whilst designing a weather app. I imagine there are other things one worries about whilst developing. ↩
For most of us hearing is a subordinate sense. We’re just not used to pay more attention to sound than necessary. When we’re going to the movies it’s a visual experience, yet most times the sound is what makes atmosphere work in the end. Next time you watch your favorite movie try to focus on the audio and explore another layer of storyline. Ideally you have an awesome home stereo system or watch it with headphones. ↩
Personally, I was disappointed that Apple moved away from the traditional circular shaped earbuds. They claimed the design being “defined by the geometry of the ear” and stated that this “makes them more comfortable for more people than any other earbud-style headphone”. The moment I read this I realized the EarPods wouldn’t fit my ear. And yes, the don’t stay inside my ear… which again makes my iPhone more valuable when I’m going to sell it. I have to thank you for that one Apple. ↩
Fun fact: Microphones in 40’s and 50’s were already great recording devices. What was laking was a quality storage medium and quality speakers. ↩
The Neumann KU-81 is out of production for several years now. If you thinking about buying one ($6,000) and you’re not making a living out of recording stuff, then I’d suggested renting one (or a similar one like the newer Neumann KU–100). There are also other candidates but the are also not cheap, plus the rest of the audio gear is also quite expensive. ↩